January 19, 2023
Back to Sites
January 19, 2023
Sites
Sites are locations where your crews will perform Services. On this page, you can create your Site and set up the geofence around the area where your crew will work.
Note: You cannot create Sites if you are sponsored by another company.
Here are the instructions to build your Site
- How to export my Sites?
- Managing archived and unarchived sites
- Site name
- Enable or Disable weather and photos
- What is the Client field for?
- What is the Map Icons?
- Setting your address Site
- Setting your address geolocation
- How does this Time Zone work?
- How to set the geofence?
- How to edit your Site map image?
- What is Contacts Information for?
- Setting up Site tags on your Site
- How to set up the Services for this Site?
How to export my Sites?
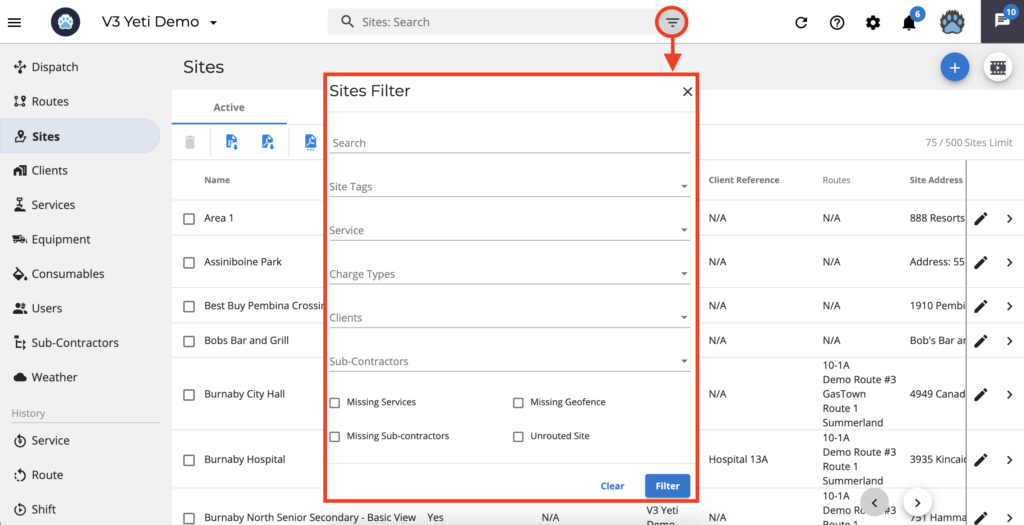
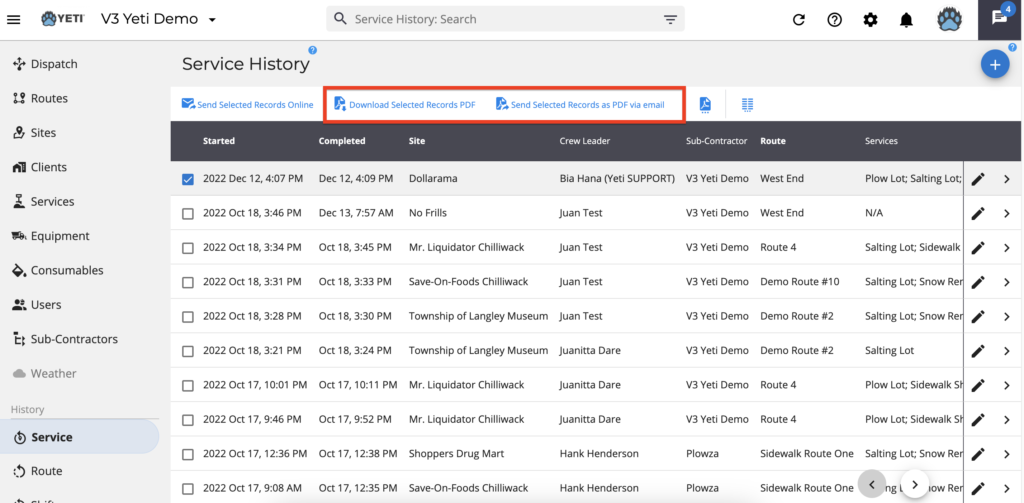
Your Sites can be exported as a spreadsheet or PDF. You can download all your Sites by clicking one of the options. If you want to export a few Sites, you can manually select the Sites or use the filter.

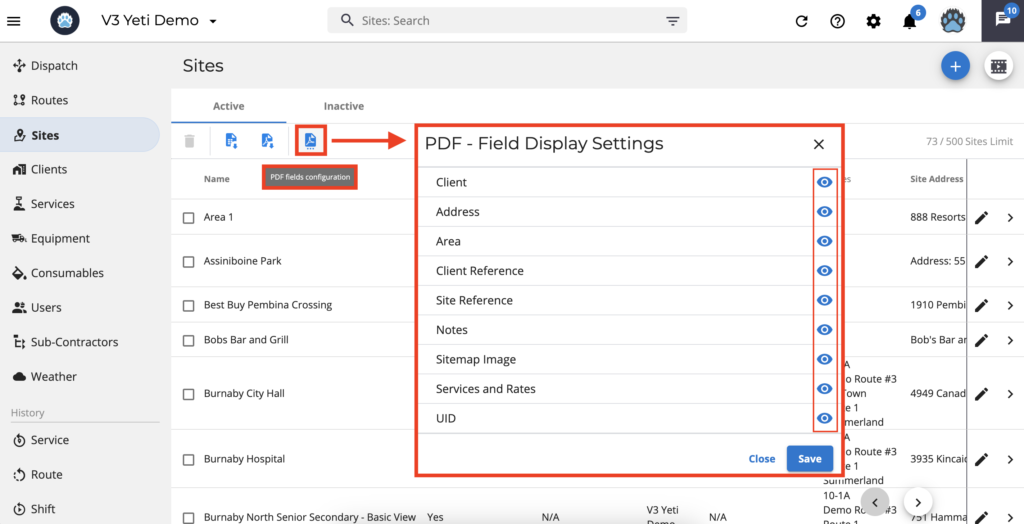
Set your PDF field configuration
The fields you wish to display in your PDF report can be enabled or disabled by clicking on the ‘eye icon’ and save it.
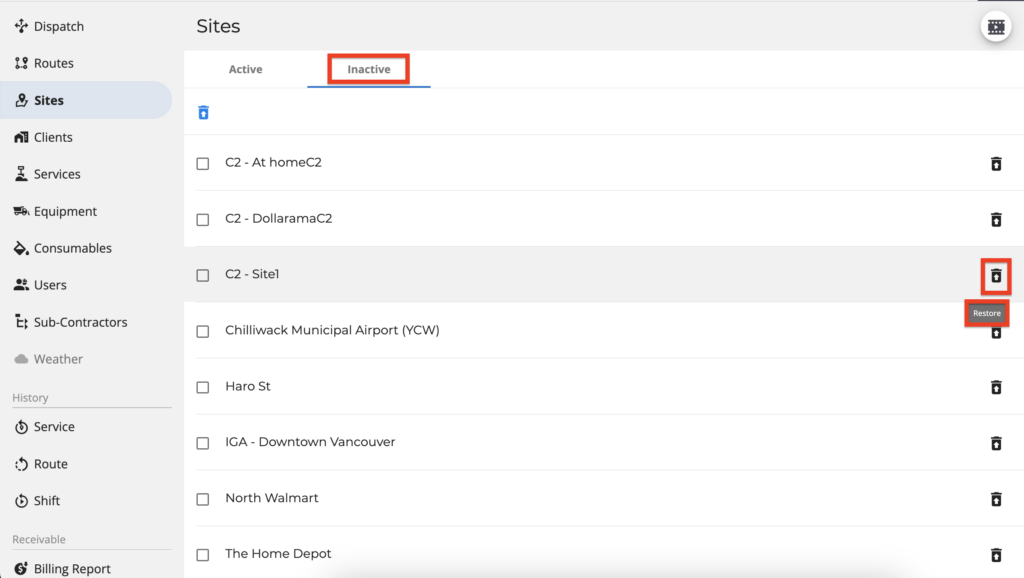
Managing archived and unarchived sites
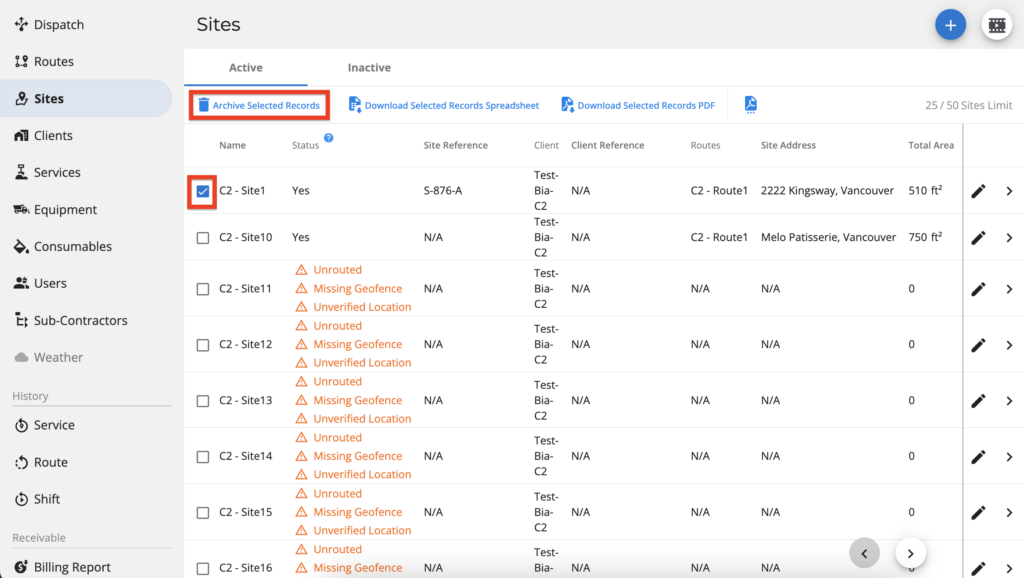
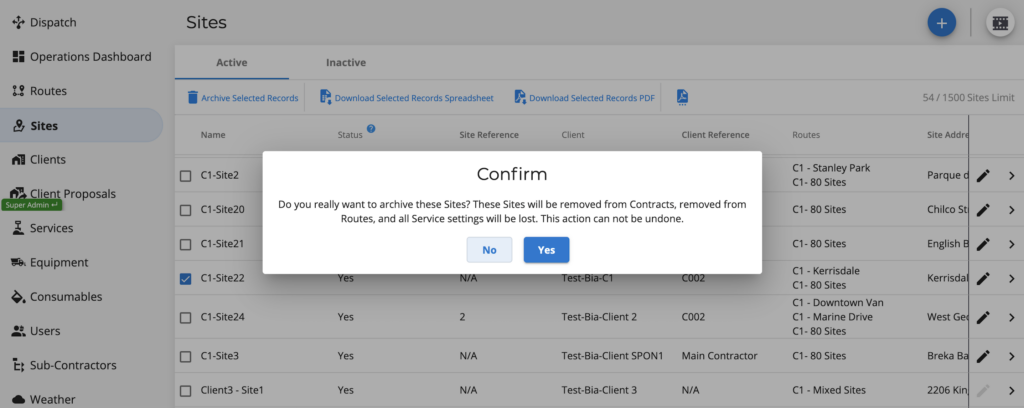
Under Snow Pro or High Performance subscriptions, archiving your Sites will lose all information stored on them, such as Contact, Site Maps, Measurement, Tags, Site and Client References, Notes, Requirements, Geofence, Map icon, Services, and the Route that had this Site. The Site name and address will remain.
Enterprise subscribers will lose the Services and Route associated with this Site, but other information will remain, such as Site name, Address, Contact, Site Maps, Measurement, Tags, Site and Client References, Notes, Requirements, Geofence, and Map icon.
To archive Sites, select the Site and click on the button ‘Archive Selected Records’.
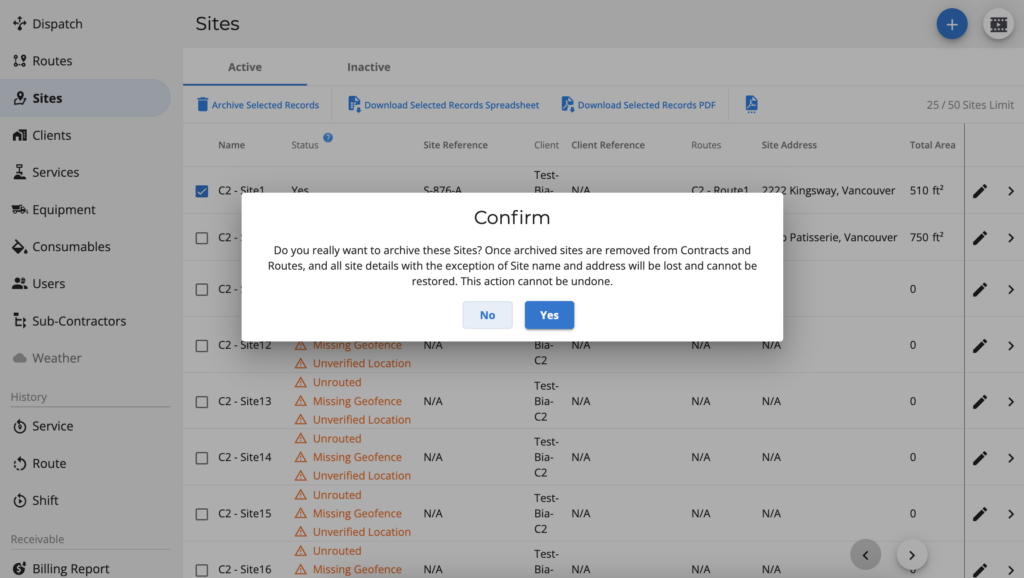
Subscribers to Snow Pro and High Performance will see this warning message when they archive their Sites.
Subscribers to Enterprise will see this warning message when they archive their Sites.
If you want to unarchive your Site, go to the ‘Inactive’ tab and click on the icon to restore your archived Site.
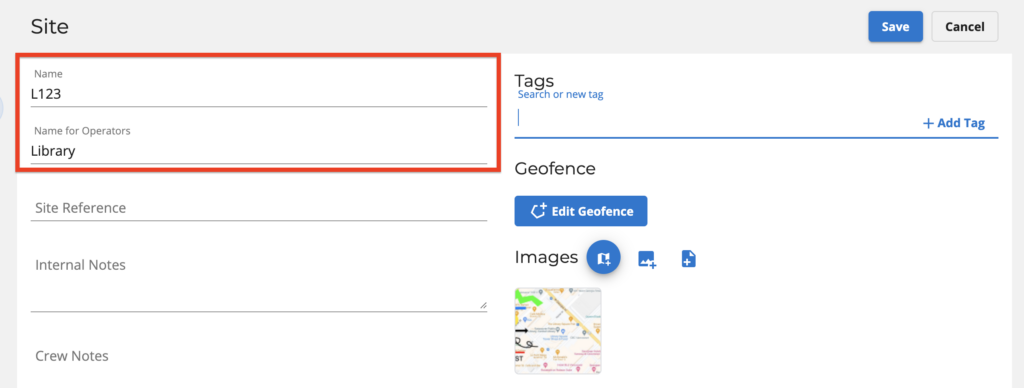
Site name
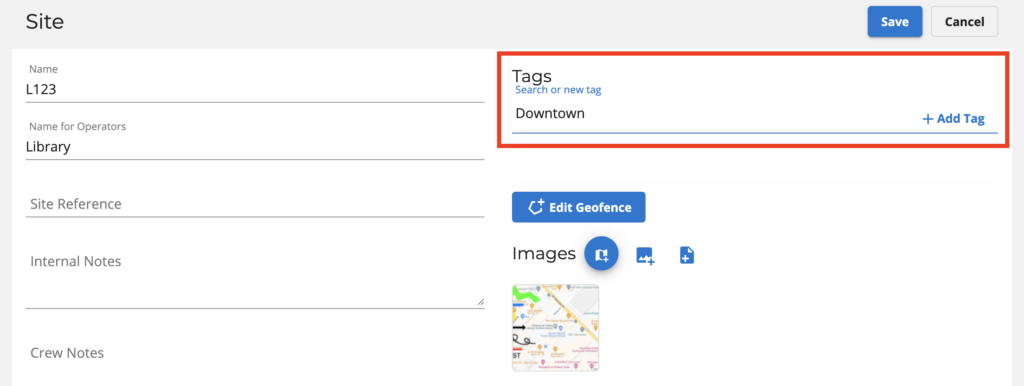
Your Site name can be different for your operators. For example, If you name your Site “L123” for internal purposes and “Library” for your Operators, they will see it as “Library” on the mobile app.
The following steps will guide you through setting up your site to take advantage of Yeti’s system.
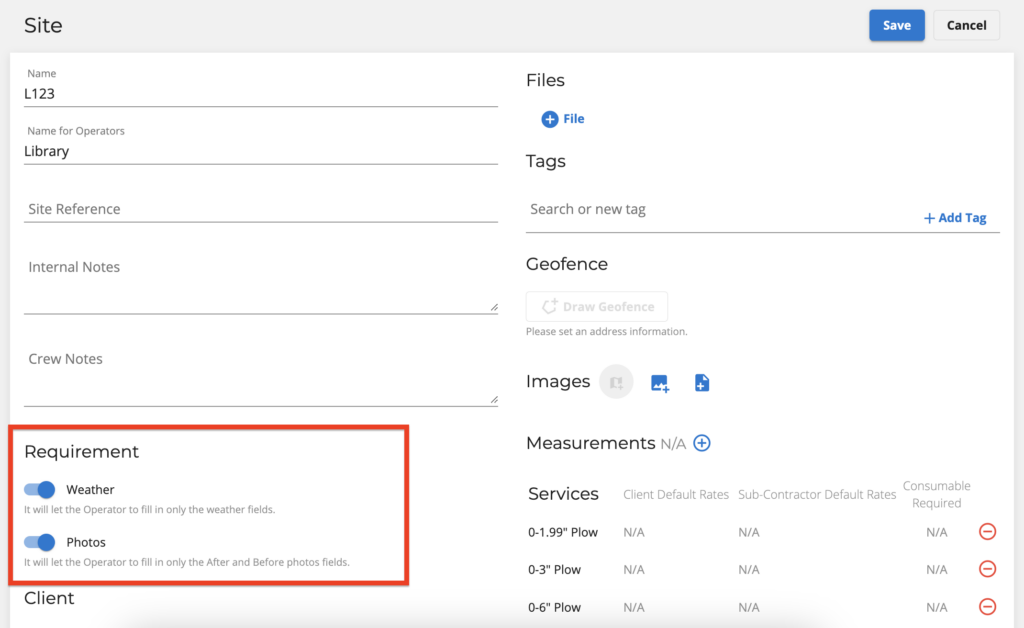
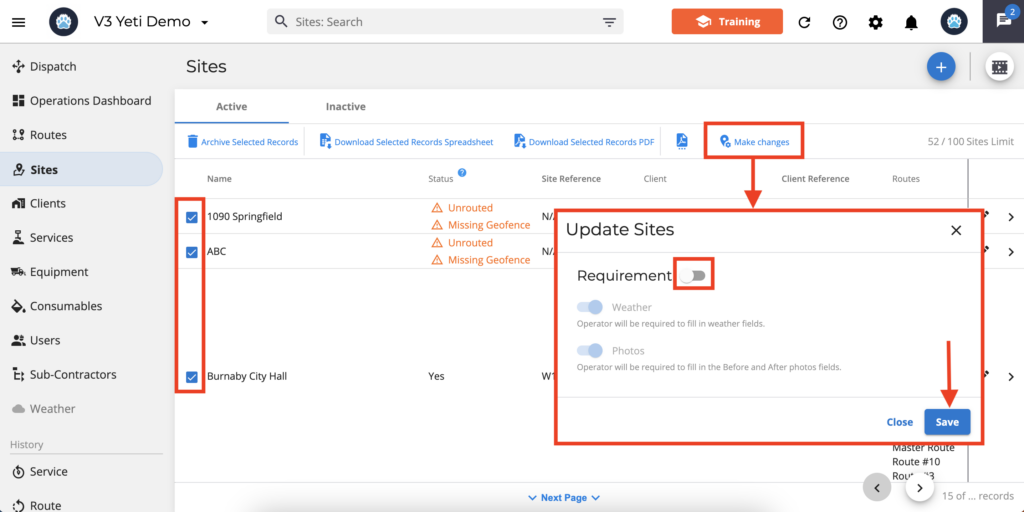
Enable or Disable weather and photos
You have the option to enable the weather and/or photos to your Operator.
By enabling the “weather” or “photos”, your crew leader needs to register on the mobile app. Otherwise, the crew leader only needs to provide the Services.
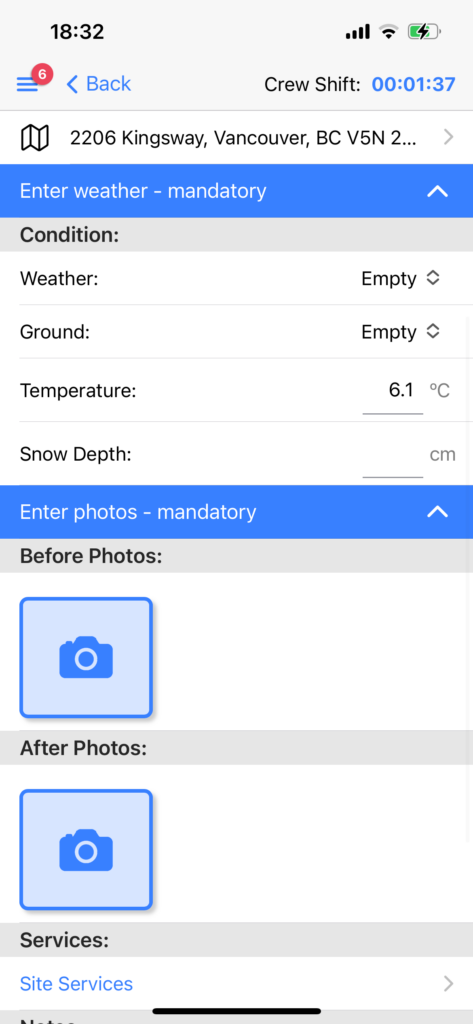
This is what your Operator will see if both options are enabled on the Site page.
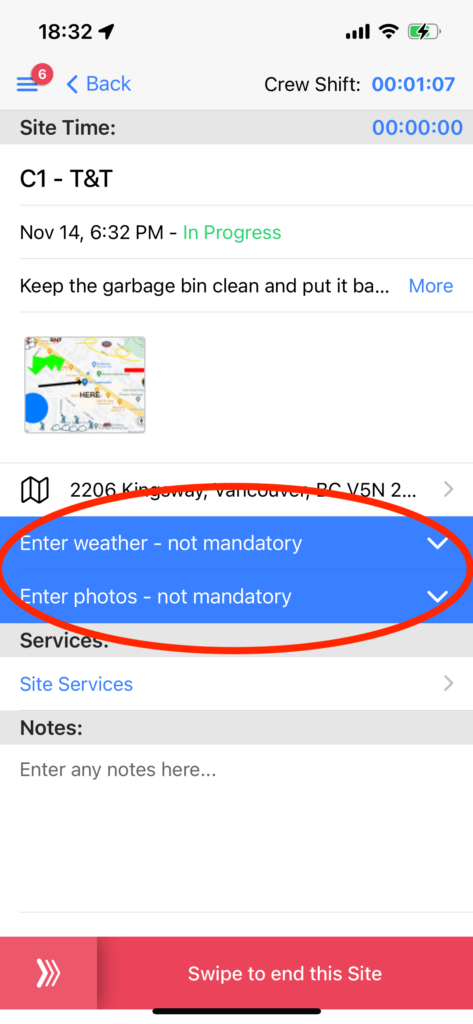
This is what your Operator will see if both options are disabled on the Site page.
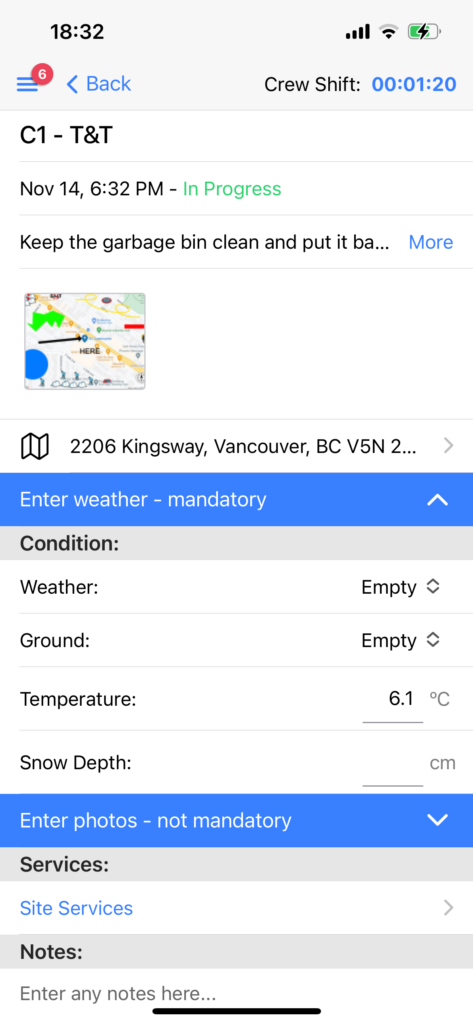
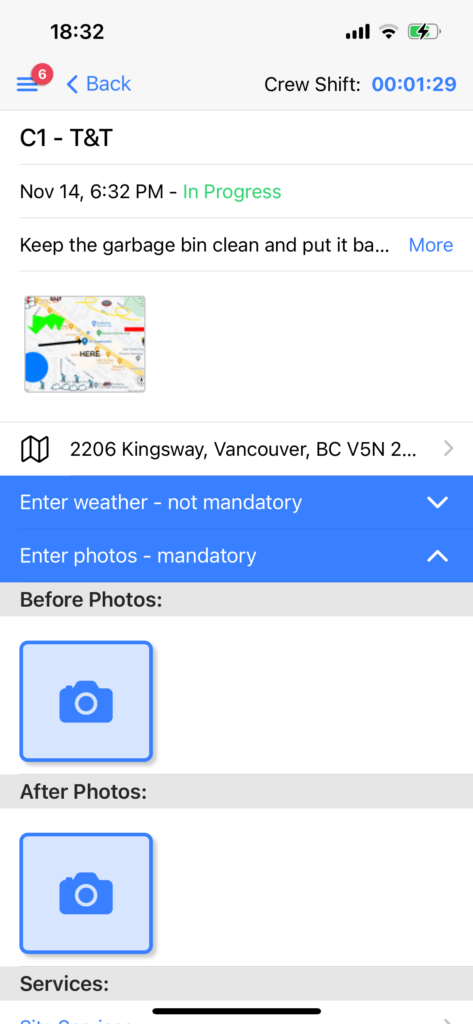
The Operator will see this if one of the options is enabled.
You can enable “weather” or “photos” to multiple Sites by selecting them or by using the filter and clicking on the icon “make changes”. The pop-up will appear, and you can enable them and save.
What is the Client field for?
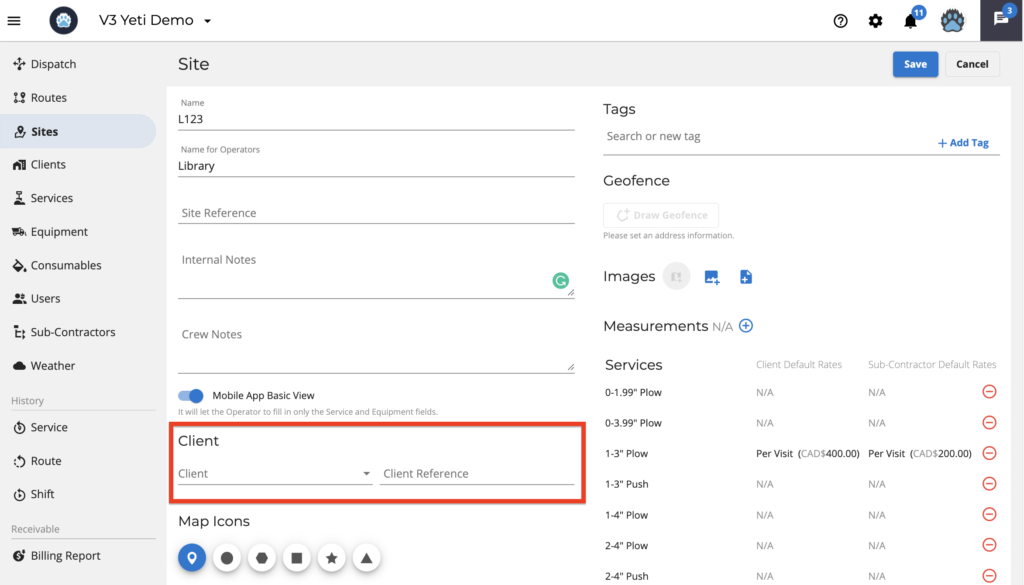
In this field, you can select the Client who will pay for your Site Services. Upon selecting a Client and performing the Sites, you can see the total amount to be received on the Billing Report.
By defining a Client on this screen, the system will also insert the Site into the contract. If you check on the Clients page, you will see this Site has been added to the contract with your Client.
Ps: The system will set your company as a Client if you don’t specify a Client.
What is the Map Icons?
You can visualize these icons in different ways on the dispatch page’s global map and route map.
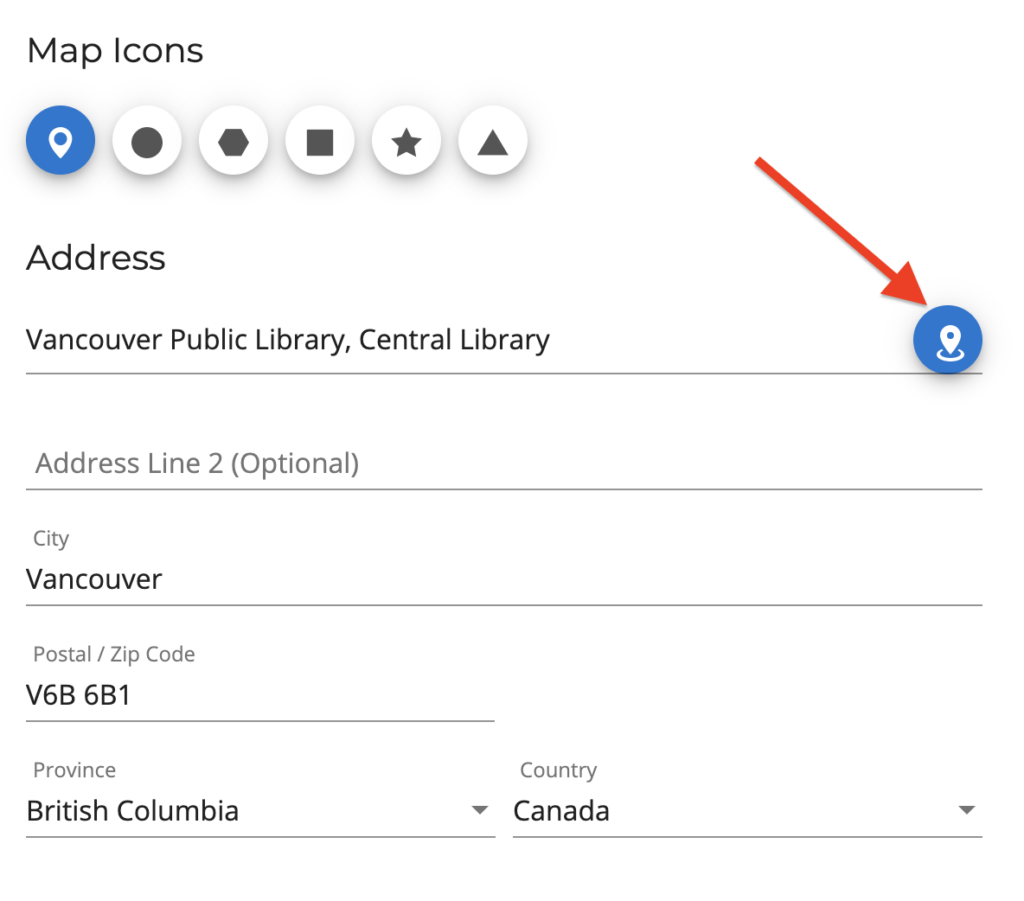
Setting your address Site
When you enter the site’s address, Google will provide you with some suggestions. To ensure the accuracy of your Site location, enter the city of your Site. Once the address is verified by Google, the Geolocation and Geofencing button will be enabled.

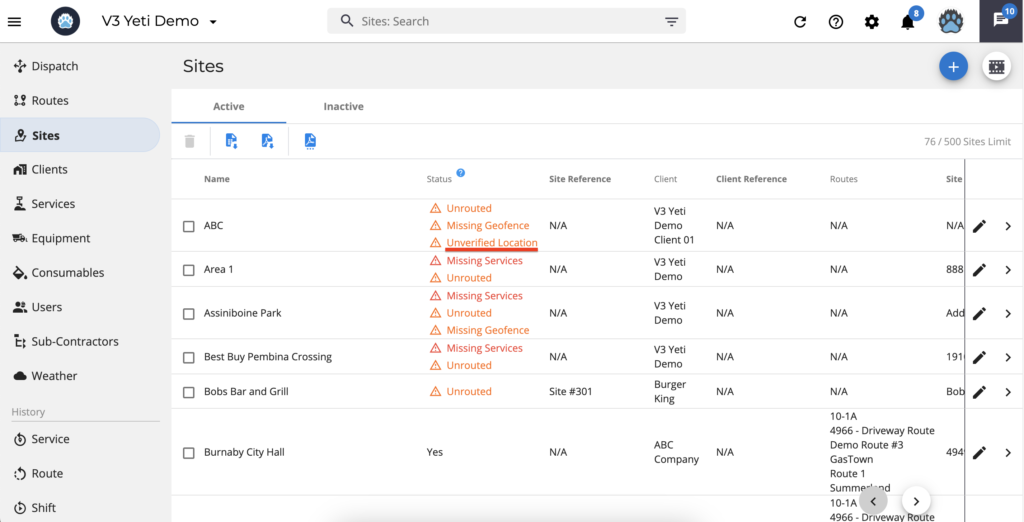
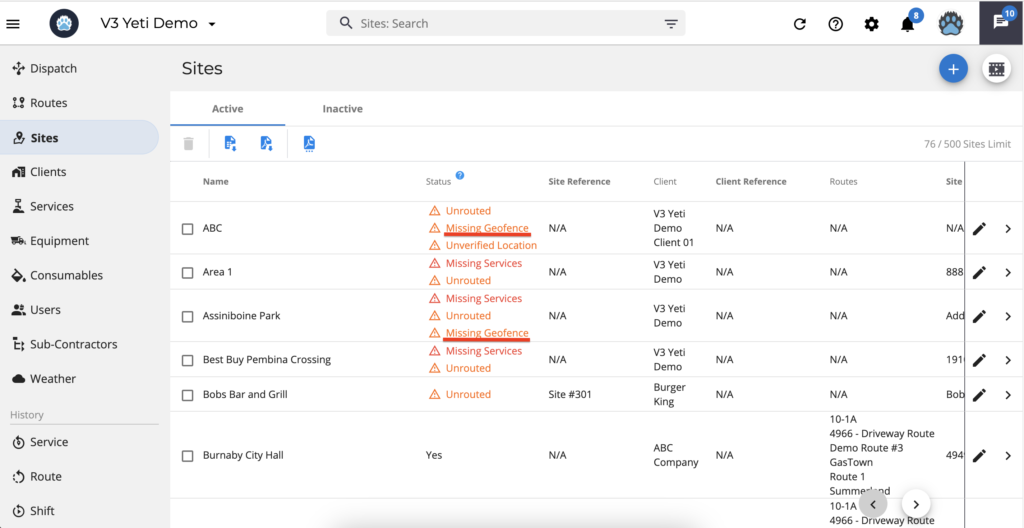
Sites without addresses will show as ‘Unverified Location’.
Setting your address geolocation
By typing in the address Google will bring you some suggestions, and by clicking on the suggestion, Google will show the Site’s location through a pin on the map. With this pin, you can locate the Site easily and reposition it. If Google doesn’t suggest an address option, type the address and move the pin manually. As a result of this geolocation, the operator can find the way through the Site in a more accurate manner on the map.
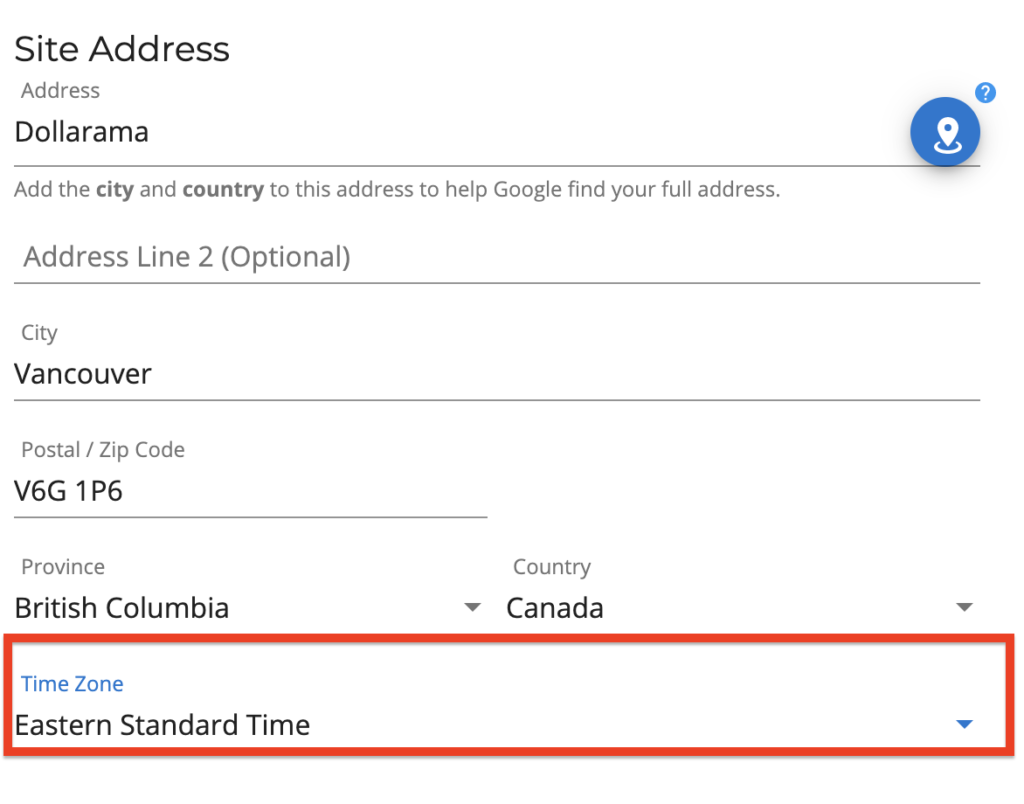
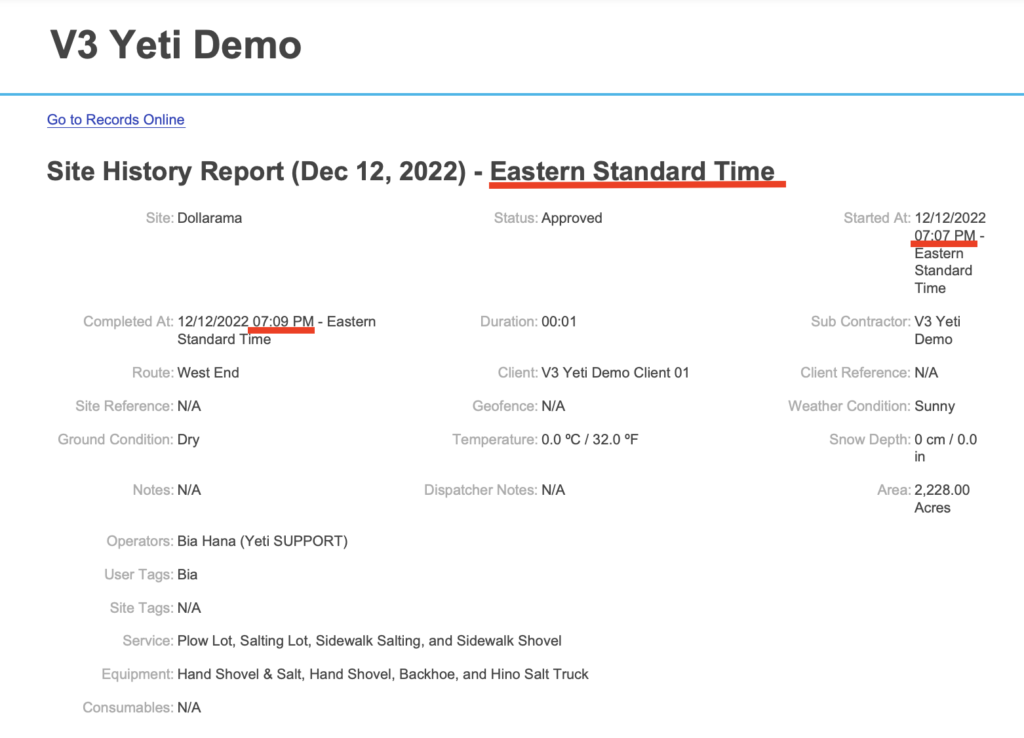
How does this Time Zone work?
This field allows you to change the time zone of your site. We have provided this time zone approach on the Site for two reasons.
1) Since reports can be set to generate automatically without any linked users, the system can generate reports according to the province or state of your Site.
2) Different time zones exist within the same province/state.
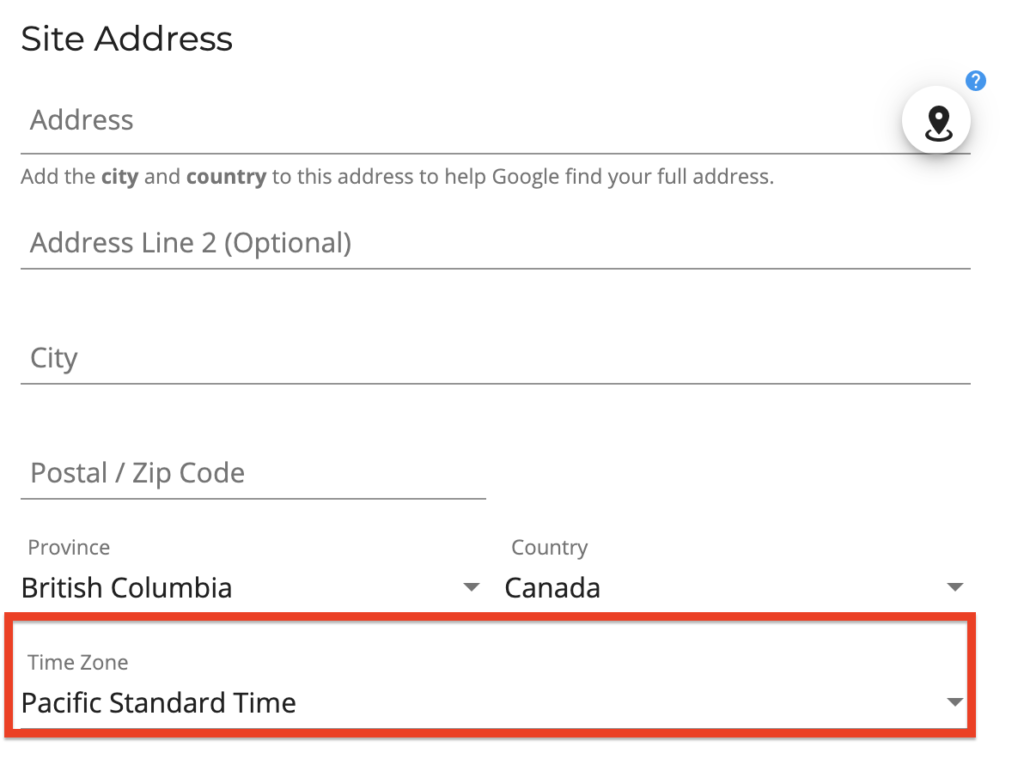
Reports will be generated as indicated in the “Time Zone” field if your time zone is different from the province/state of your Site. As an example, the Site below is registered in British Columbia. If the Time Zone is set to “Eastern Standard Time”, your report will show Eastern time zone. It is important to note that there is a 3-hour time difference between Pacific Standard Time and Eastern Standard Time.
This time is based on the user’s time zone.
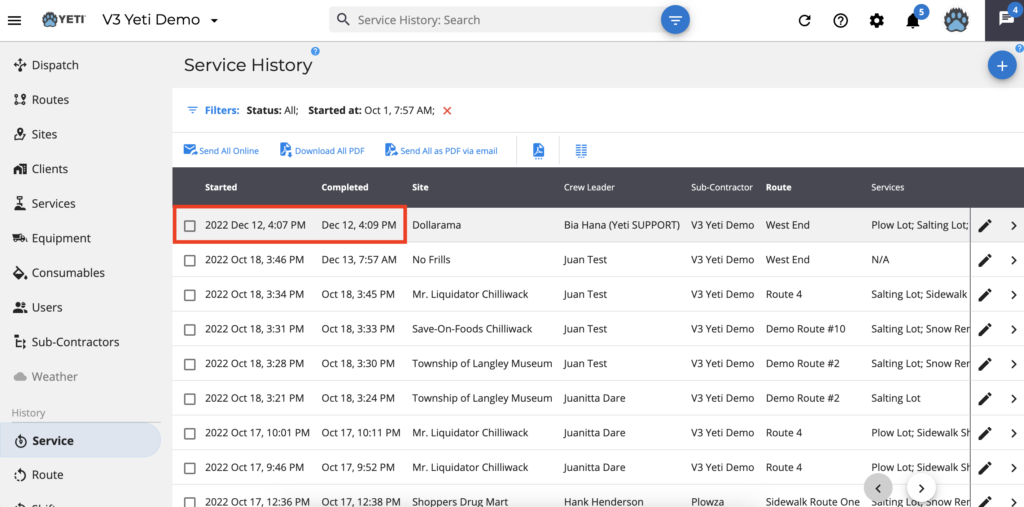
This is the Service History Report in PDF format. The system displays the time zone according to what you have selected on the Site pages under “Time Zone”.
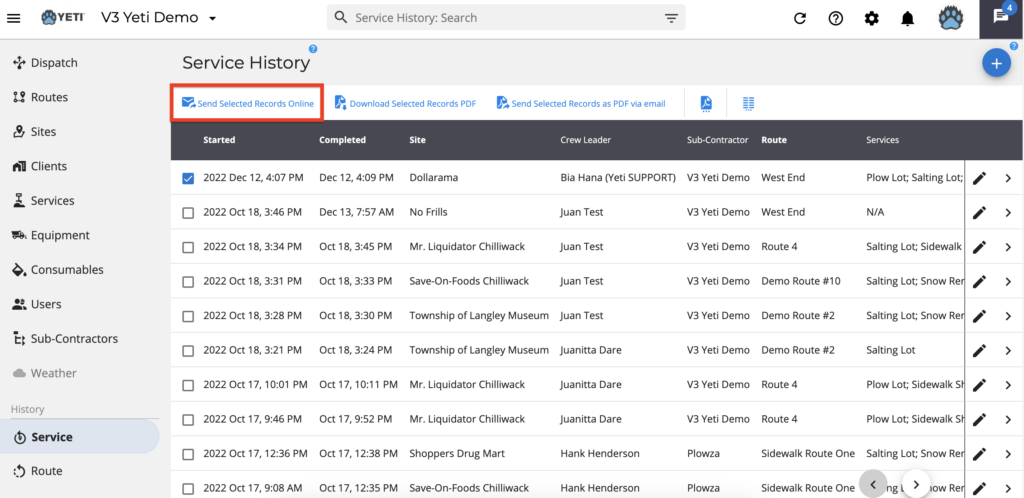
This is the Service History Report online option. The system displays the time zone according to what you have selected on the Site pages under “Time Zone”.

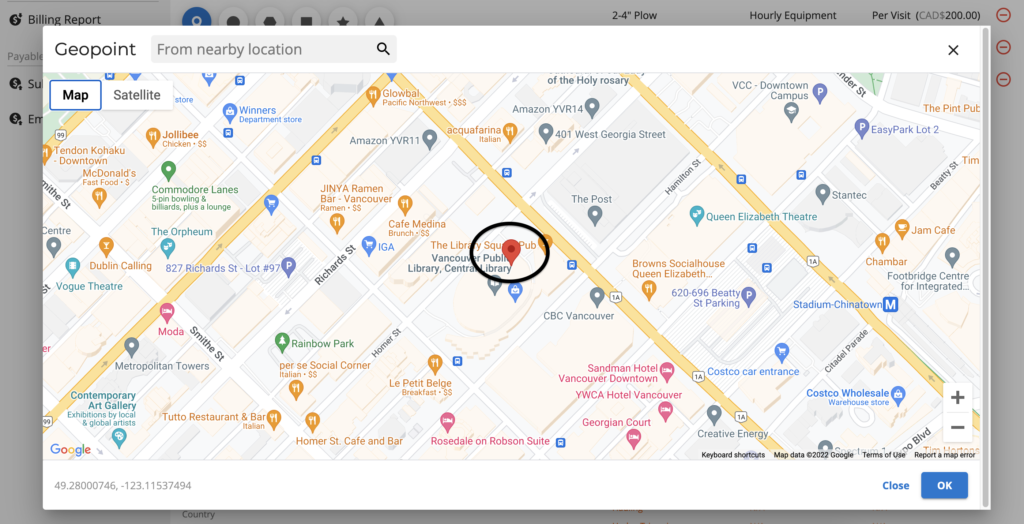
How to set the geofence?
When you inform the Site address, the field “Draw Geofence” will enable you to edit the area.
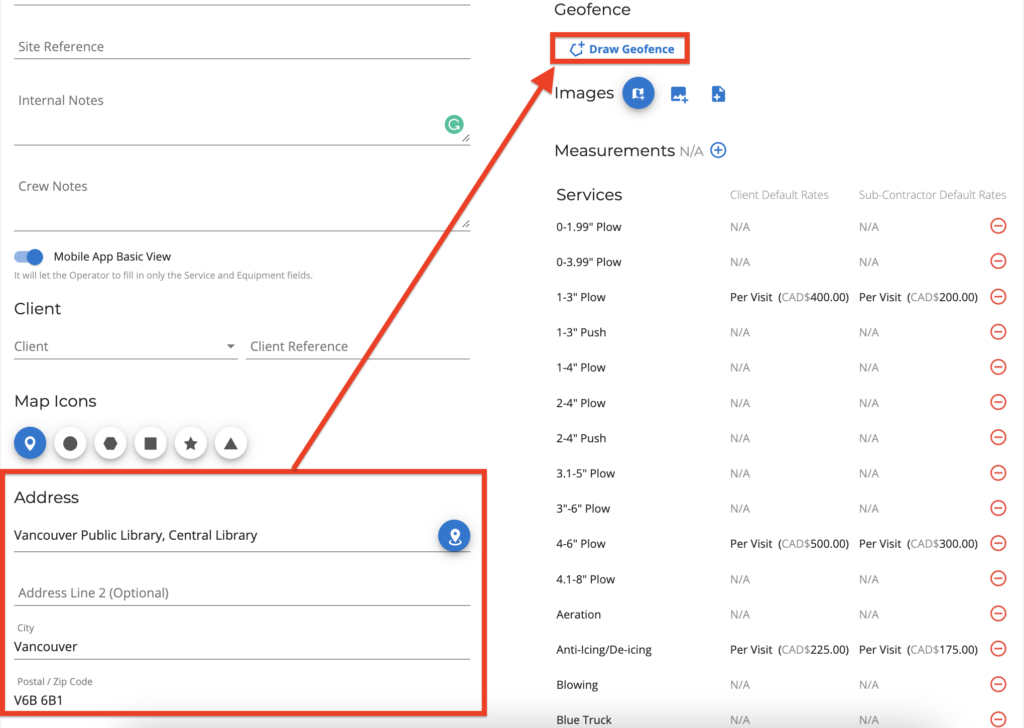
Click on “Draw Geofence” to set the site’s perimeter and click on “ok”.
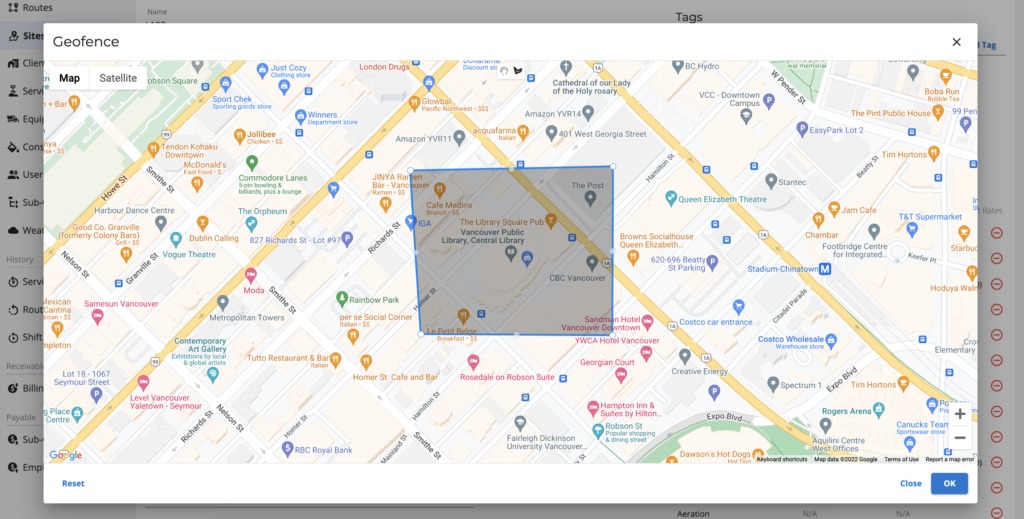
Sites without geofence will show as ‘Missing Geofence’.
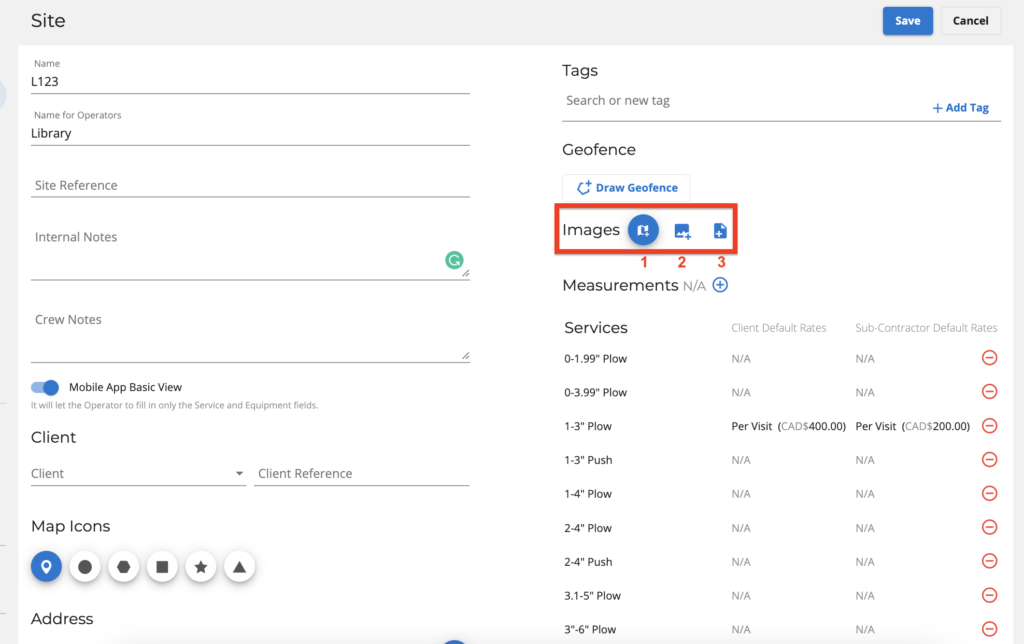
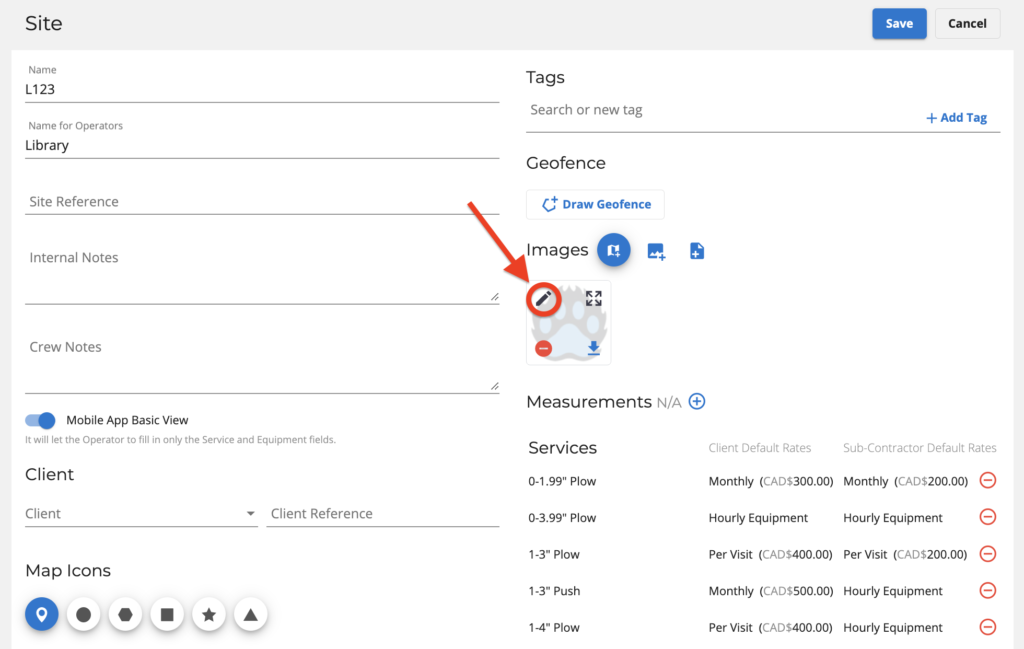
How to edit your Site map image?
You have 3 options to edit your Site map image:
- Taking the image from the map by clicking on the first icon.
- Uploading an image from your device by clicking on the second icon.
- Uploading a PDF file from your device by clicking on the third icon.
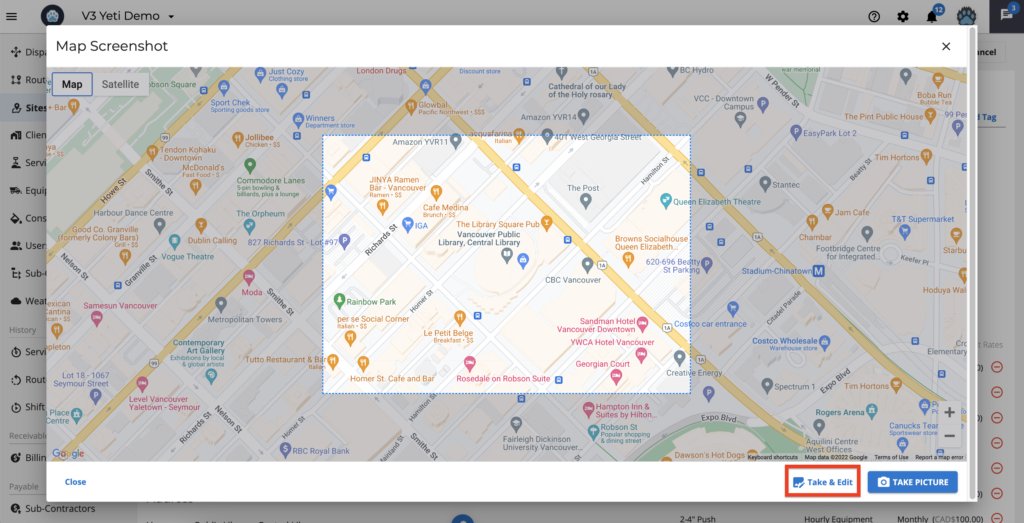
By choosing option 1, you will see a pop-up window with your map. Click “Take & Edit”.
If you choose option 2 or 3 to upload an image, you can see the pencil icon to edit the image.
You can now see the Image editor. Your image can be drawn using the options on the left side.
By clicking on the last icon, the symbols to add to your image will appear on the right side of the screen.
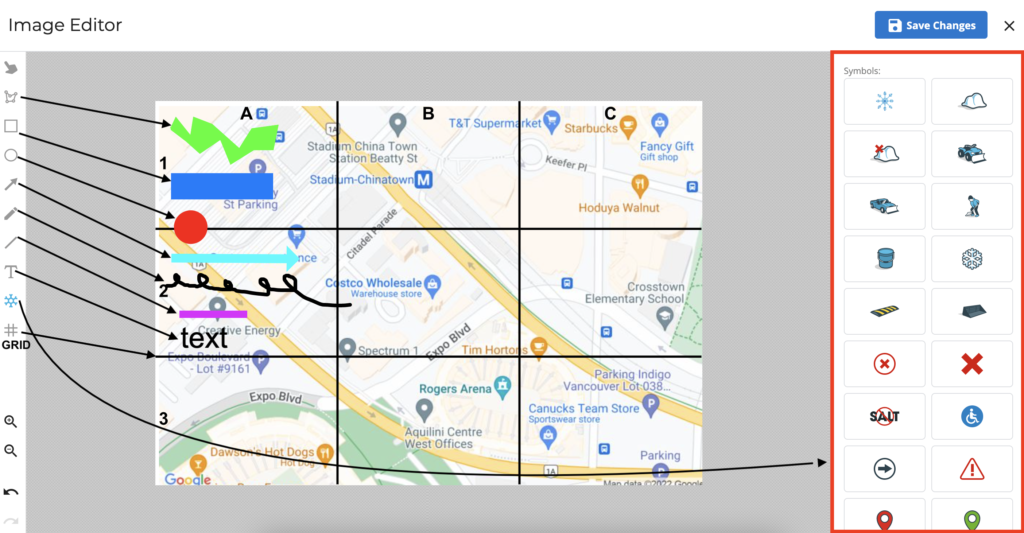
A grid can now be placed over the Site image to facilitate communication with the operator. As an example, you could instruct your operator that it does not need to perform the area “C3”.
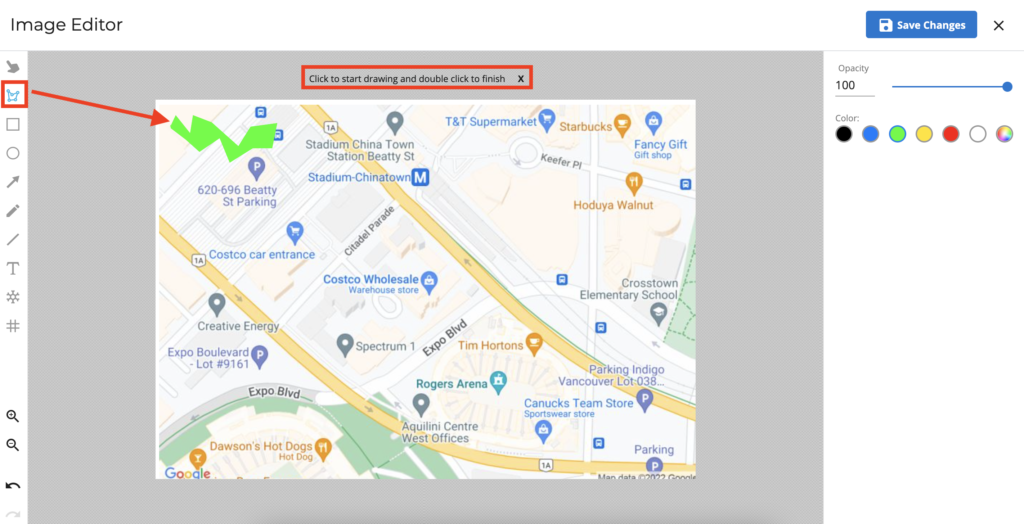
Polygons allow you to draw irregular shapes. Click the second icon in the menu on the left to determine your polygon. Click twice to end your polygon.
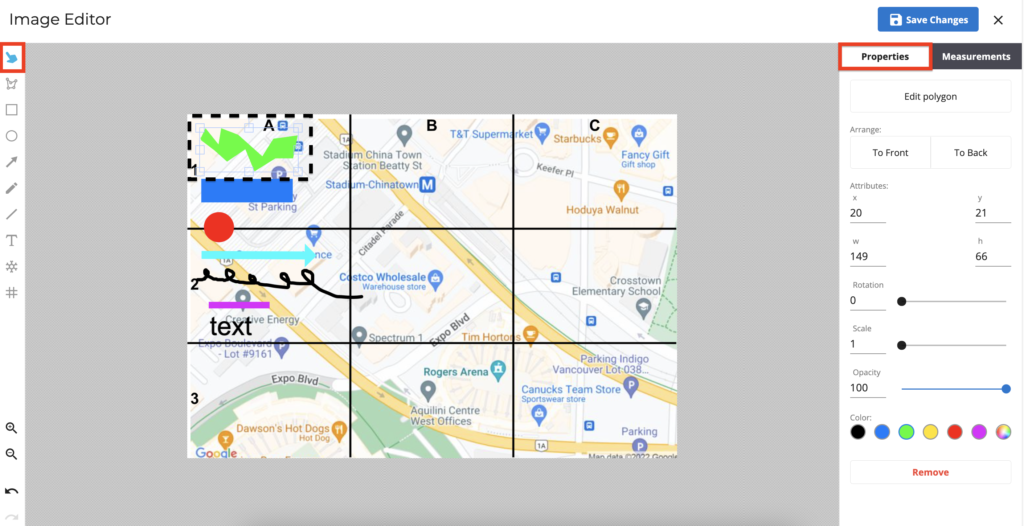
If you want to edit a specific object, click on the hand icon to see its properties.
- To change the object’s format, click on “Edit polygon”.
- To move the object, set the number on the field “x” and “y”.
- To change the size of the object, set the number on the field “w” and “h”.
- To rotate the object, slide the bar on “Rotation”.
- To increase the object size, slide the bar on “Scale”.
- To make the object more transparent, slide the bar on “Opacity”.
- To change the object’s colour, click on “Color”.
Don’t forget to click on the button “Save Changes”.
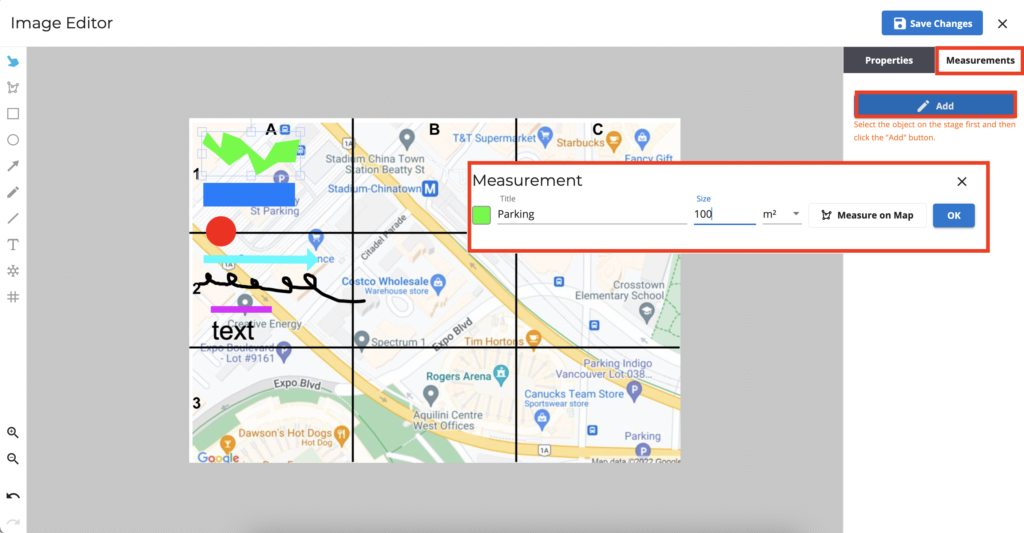
You can also click on the tab “Measurements” to set the area of your object.
- Select an object, then click on the button “Add” and you will see a pop-up window to insert your object Title, Area value and Area unit.
- You can type a value to the size field or draw on the map, by clicking “Measure on Map”, to get the area calculated by the Google tool.
- Click on “ok” and “Save Changes”.
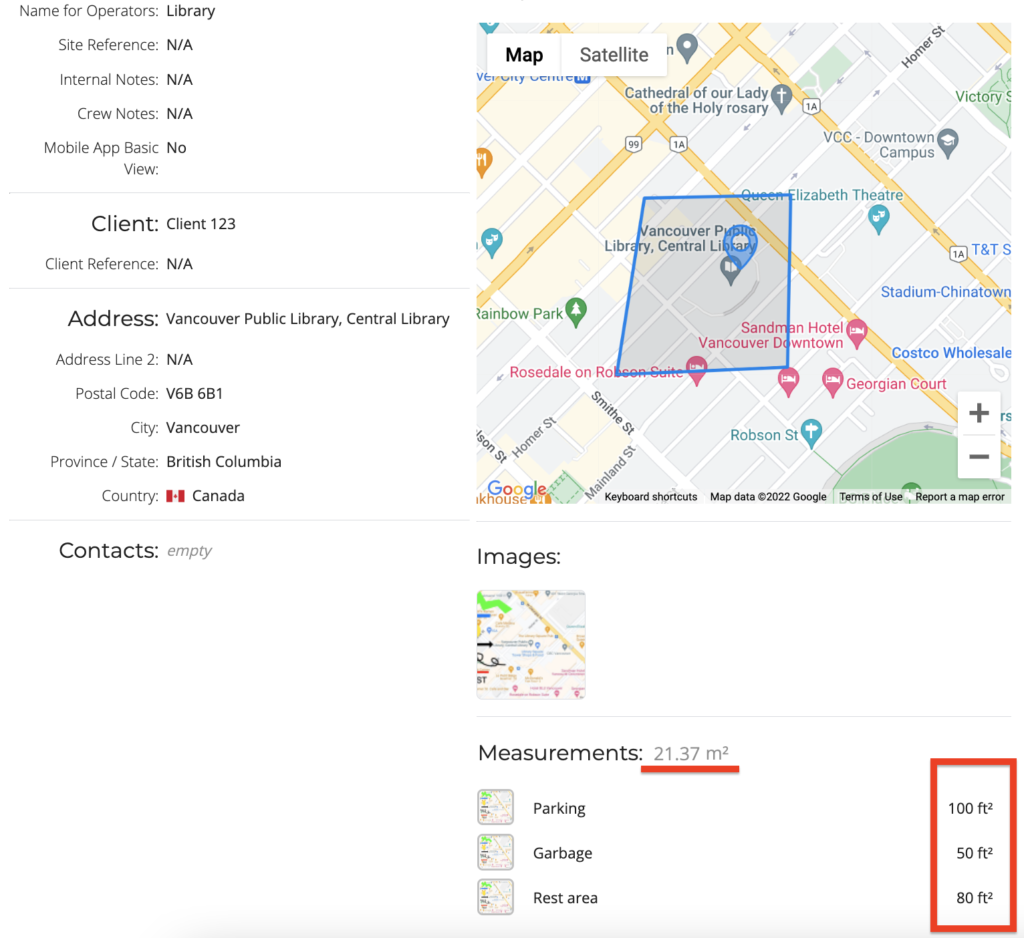
You can check all measurements related to the image on the right tab. If you select an object, it will be highlighted in bold. As you can see below, the “Rest area” object has been selected.
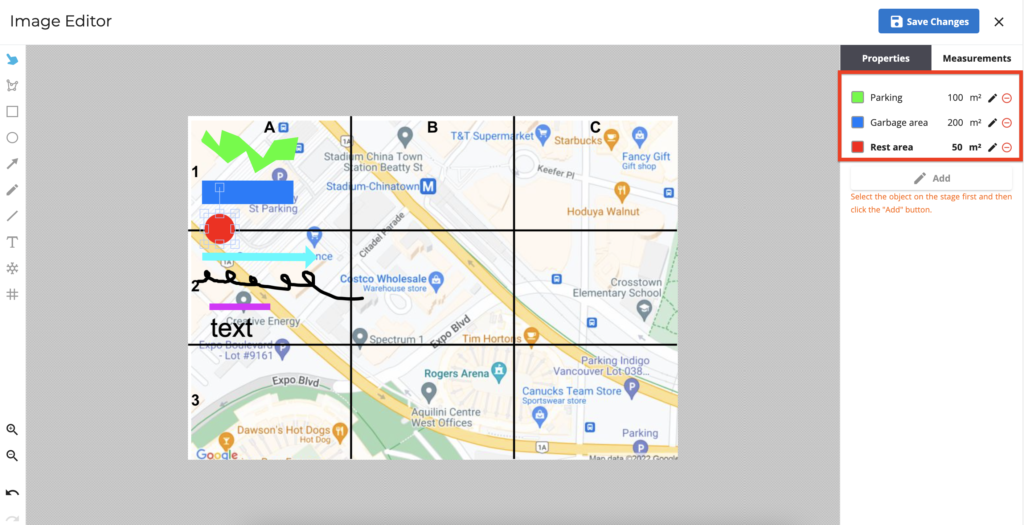
You can see your Image measurements on the Site page. This object can be removed from the Image Editor by clicking the pencil icon.
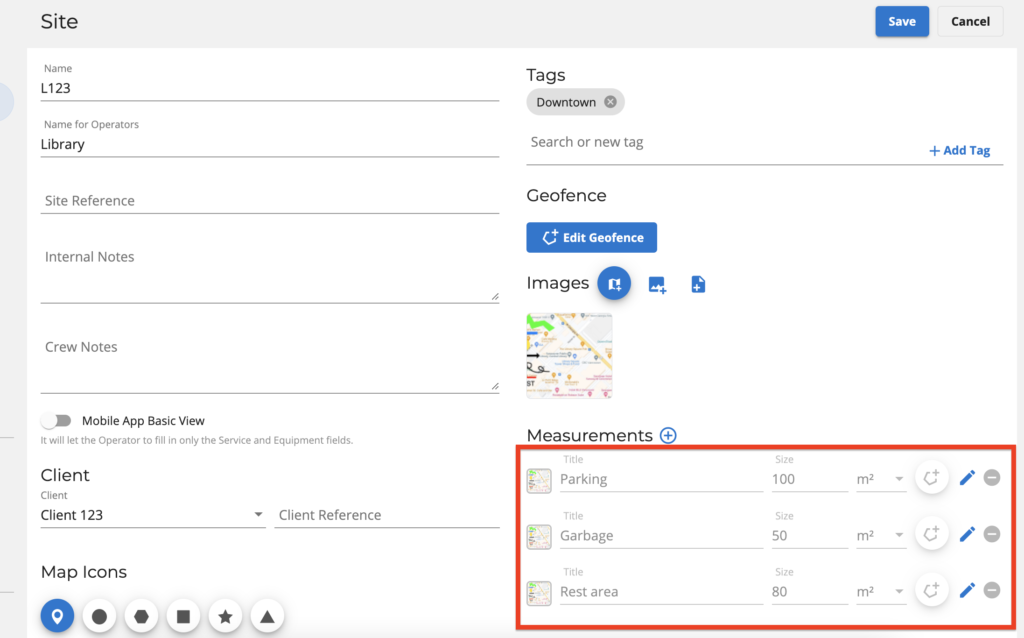
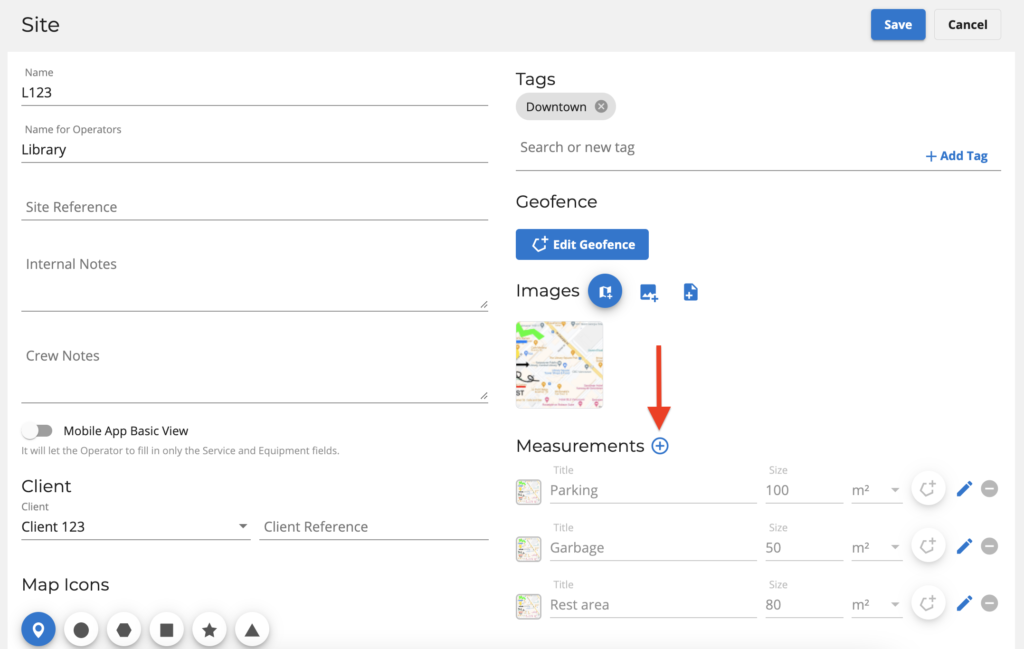
You can also create a Site measurement that is not related to any image. To do that, click on “+” button next to Measurements.
*** Important information ***
If you select any standard unit of measurement (meters, square feet, acres) and the system will convert them according to the company’s settings. As an example, “parking area”, “garbage area”, and “rest area” are informed in square feet, and the company is set in meters, so the total amount appears in meters.
What is Contacts Information for?
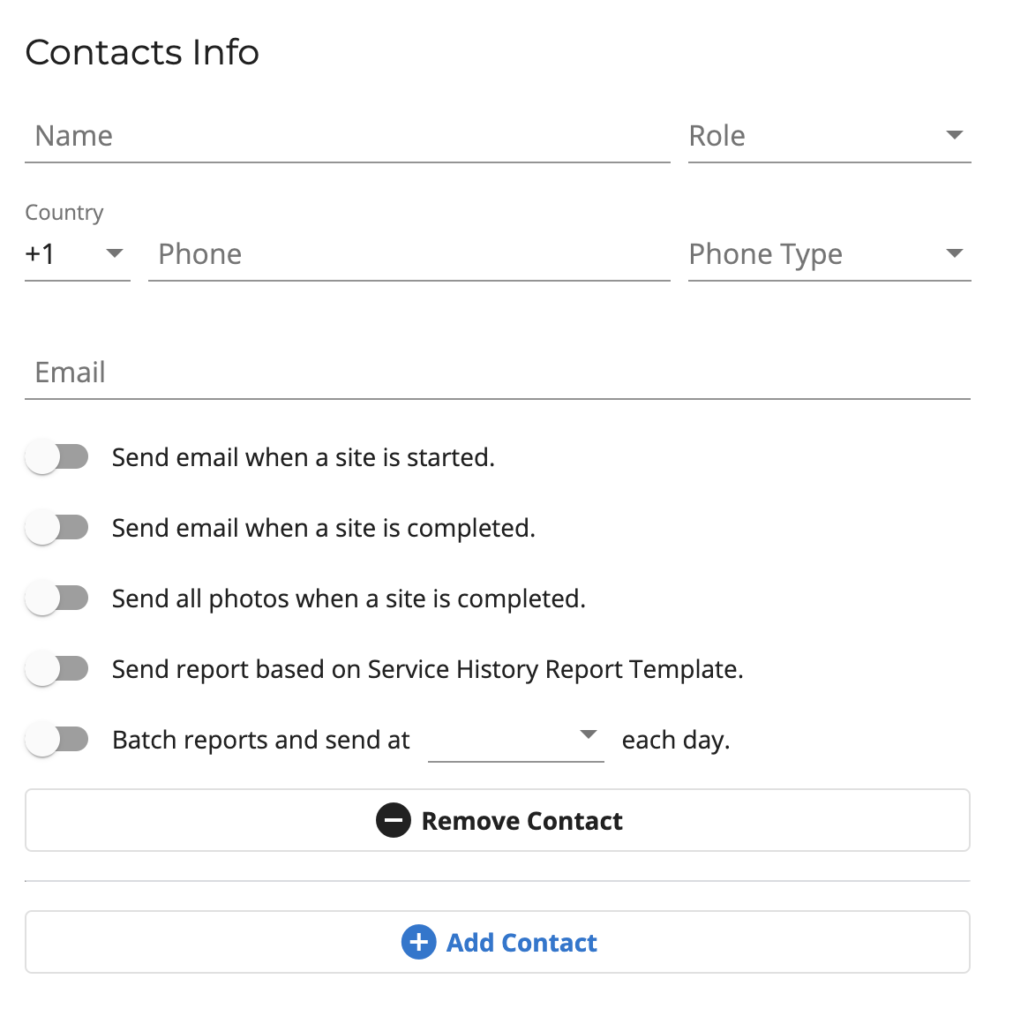
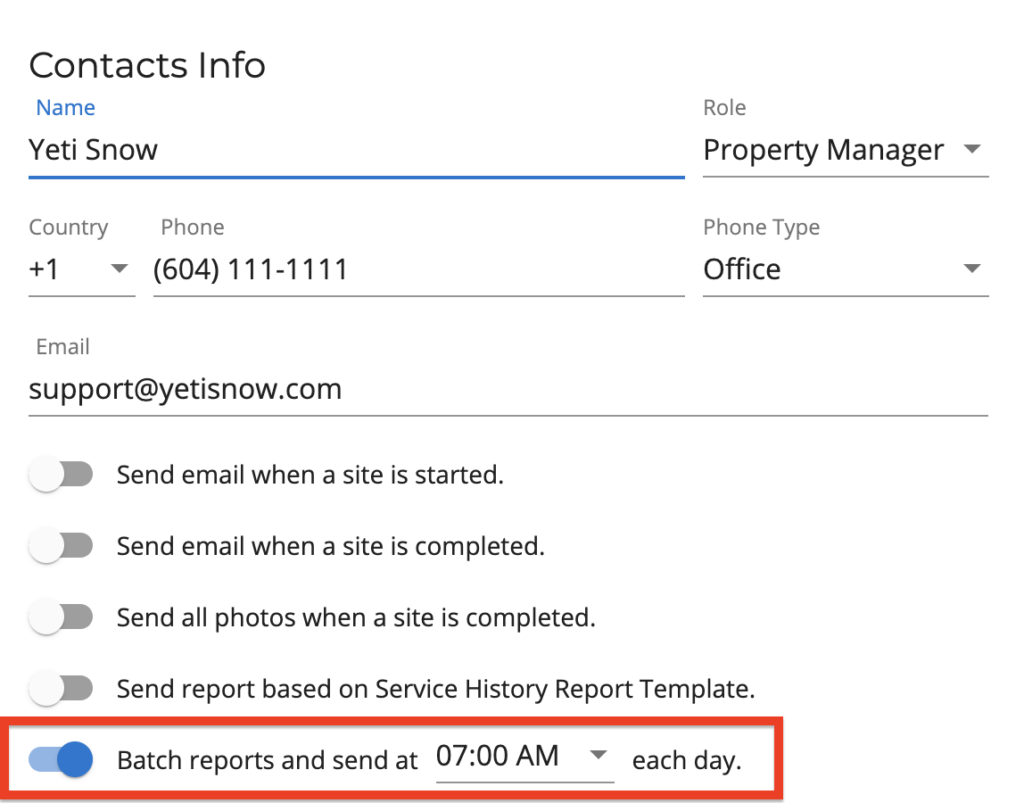
You can enable notification emails for your customers or other people involved with the Site to receive when the Site is started, ended, or to receive reports as PDF files from the Service History Report.
It is also possible to create batch reports. When you select this option, your contact will receive an email every day at the time you specified. An email with a PDF file will be sent with the information and the number of times this Site has been performed. In the example below, the person will receive the batch report every day at 7 am.
Setting up Site tags on your Site
You can put a tag for your Site to facilitate the search for Sites in a specific area. As an example, all Sites located in the “Downtown” area have the “Downtown” tag. Then, you can search for the filter through the tag. After you write the tag name, click on “+ Add Tag”.
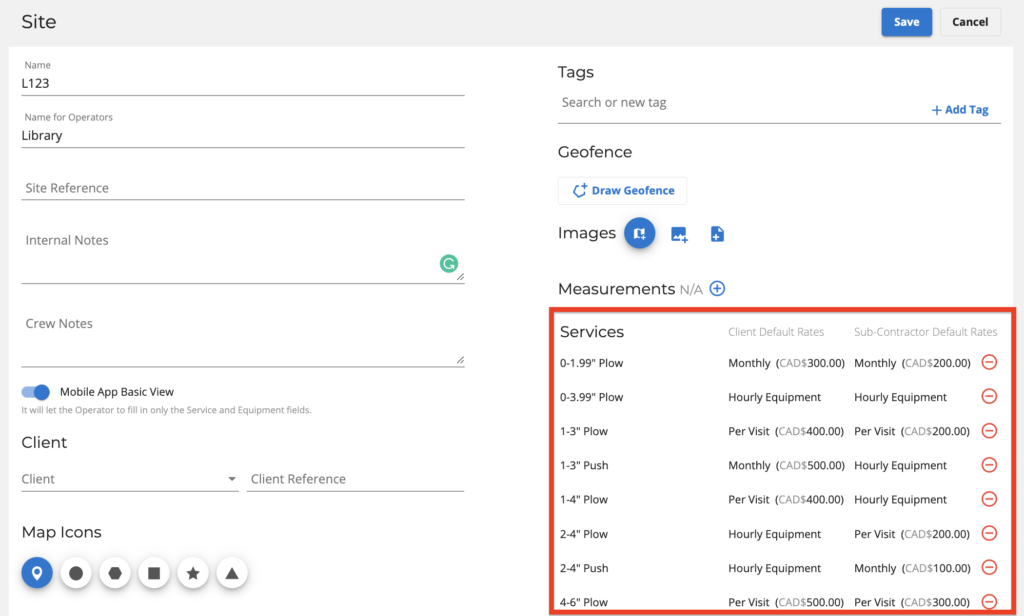
How to set up the Services for this Site?
When the Site is created, by default it will get the Services and their respective rates registered on the Services page. By doing this, default Services and rates can be created widely among the Sites. These Services and rates can be changed in this Site builder.
As you create Services and rates on this page, they will be used as defaults when creating contracts with your Clients and Sub-contractors. In this way, whenever you create a contract, this information will be pre-populated and you can edit it at any time. Changes made in the contract will not affect this Site page.
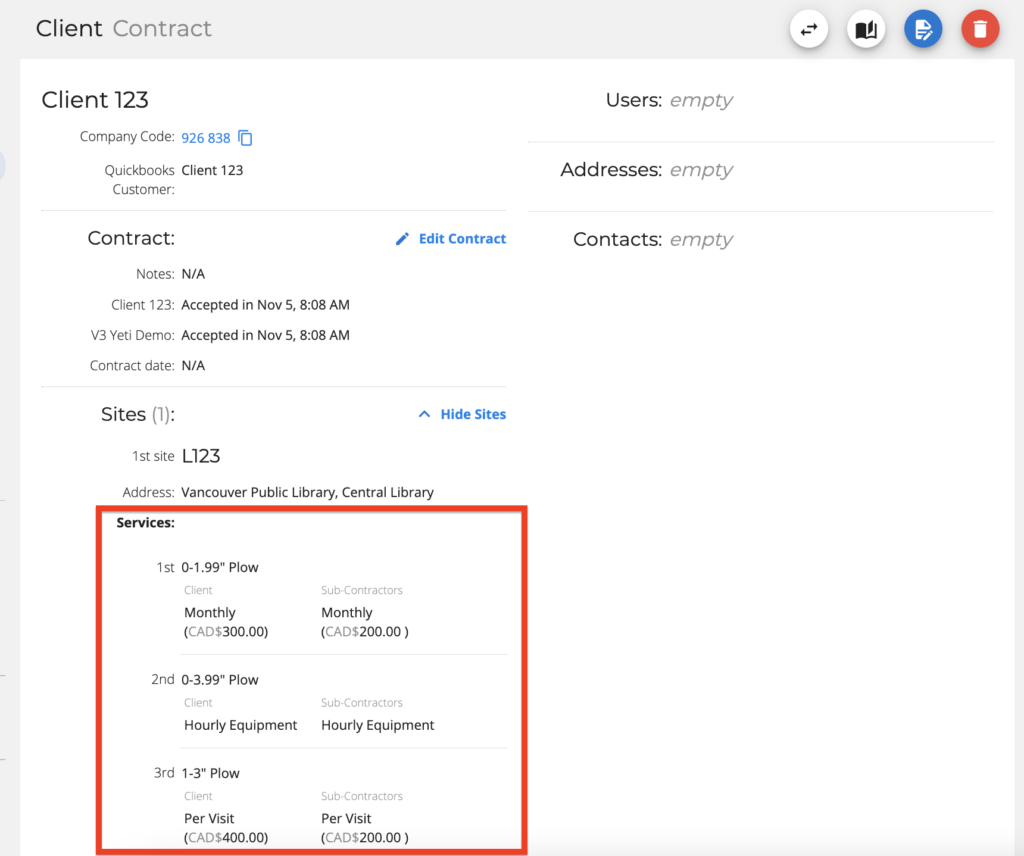
This is how the Service rate appears on the contract.
If there are any questions, please contact Yeti Support (support@yetisnow.com).