February 29, 2024
February 29, 2024
Quickbooks online Integration
Yeti has integration with Quickbooks online. It is a user-friendly tool to link your Customer, Subcontractor, and User records. This integration is one-way only, from Yeti to Quickbooks online. The information you add or change in your Quickbooks online environment will not be updated in Yeti.
Below you will see instructions for
- How to integrate your Yeti with your Quickbooks online account
- Sync your Yeti Client with your Quickbooks Customer
- Sync your Yeti Sub-Contractor with your Quickbooks Suppliers
- Sync your Yeti and Quickbooks Services
- Sync your Yeti Consumables
- Sync your Yeti Users with your Quickbooks Employees
- Push your Yeti Billing Report records to your Quickbooks Invoice
- Push your Yeti Sub-contractor Report records to your Quickbooks Bill
- Push your Yeti Employee Timesheet Report records to your Quickbooks Time Activities report
- Managing your invoice number
- Understanding Quickbooks online currency
- Video
How to integrate your Yeti with your Quickbooks online account
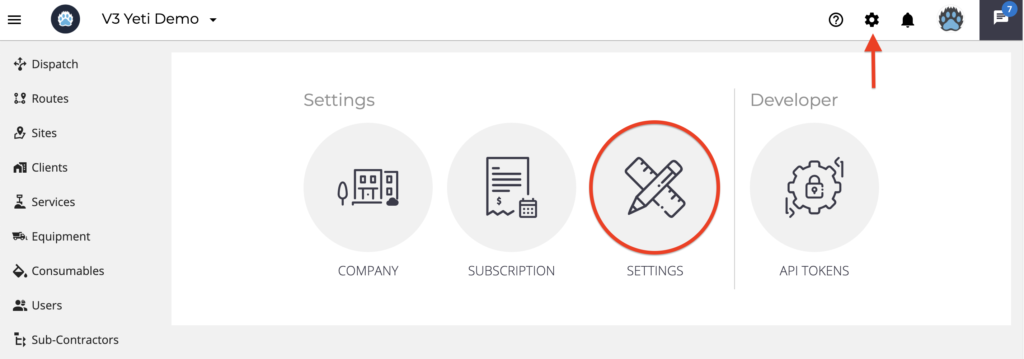
- Click on tools and Settings.
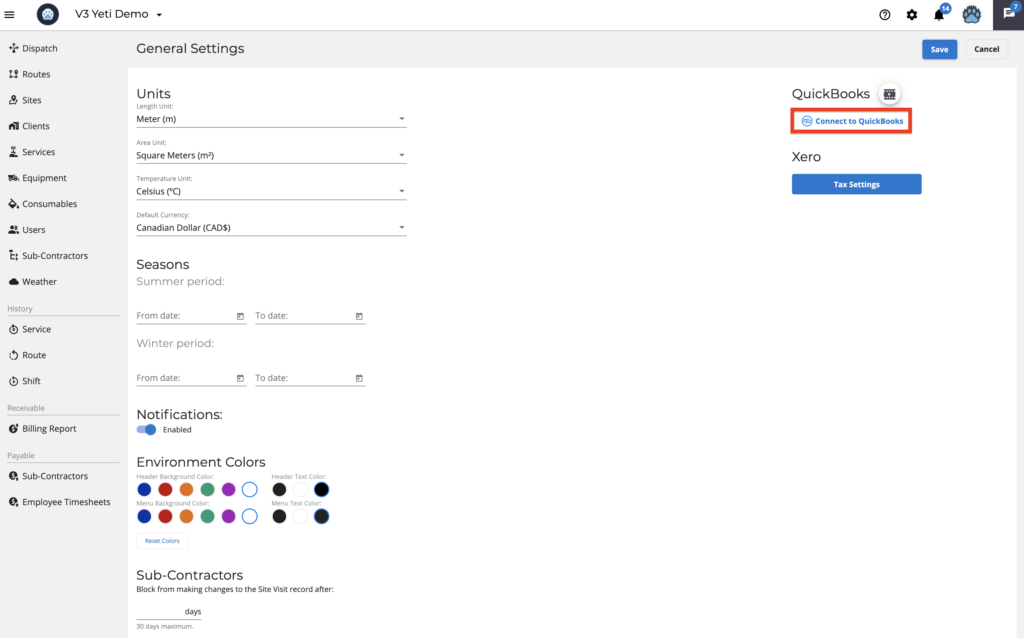
2. Click on ‘Connect to Quickbooks’.
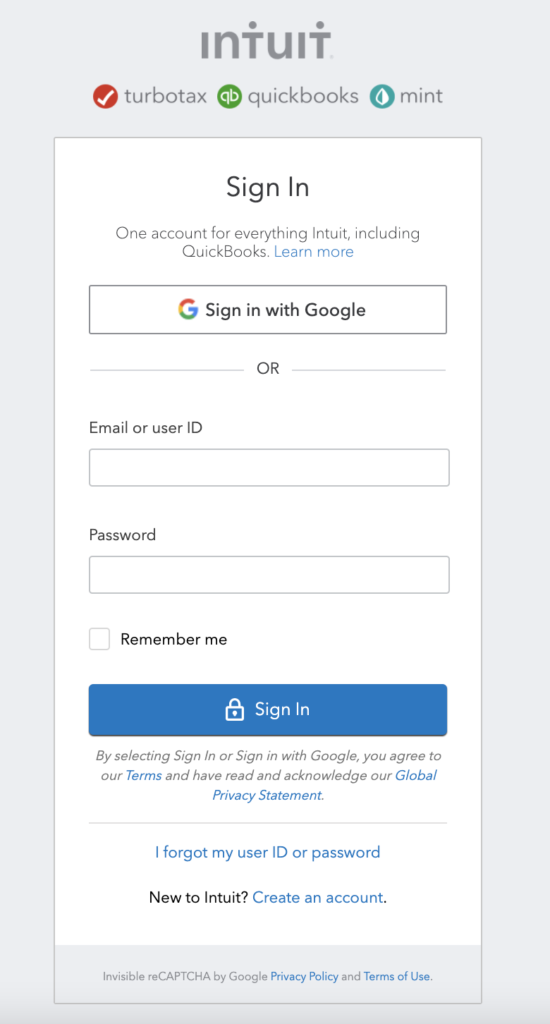
3. Insert your Quickbooks login and password.
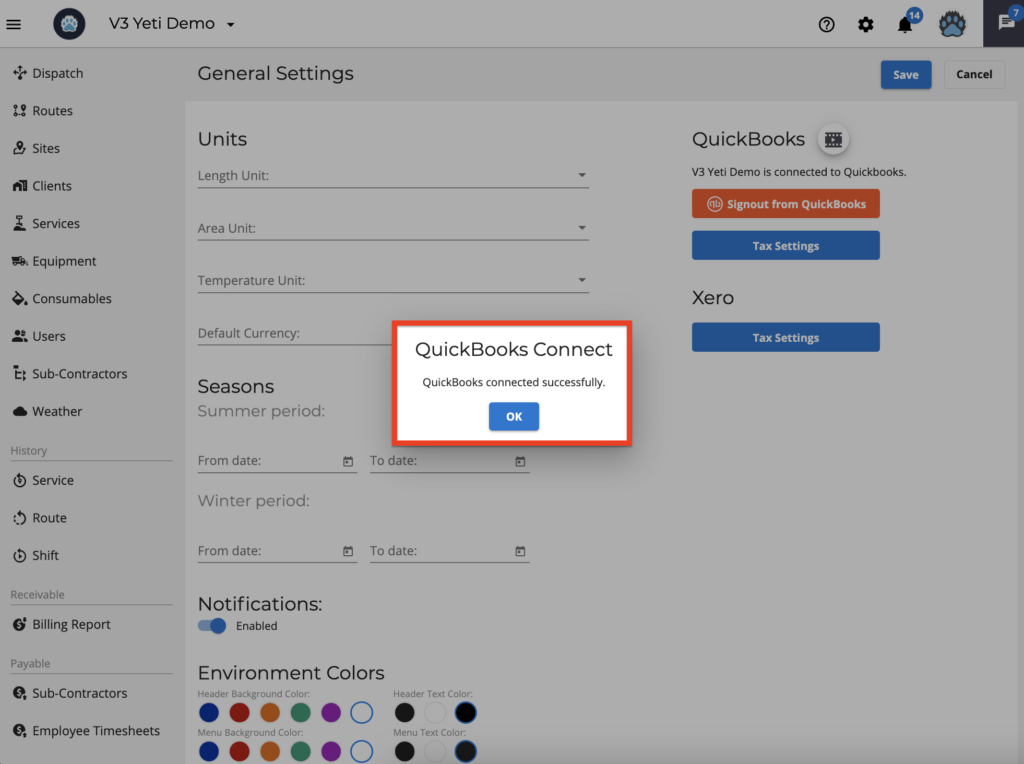
4. You will see the message confirming the integration.
Sync your Yeti Client with your Quickbooks Customer
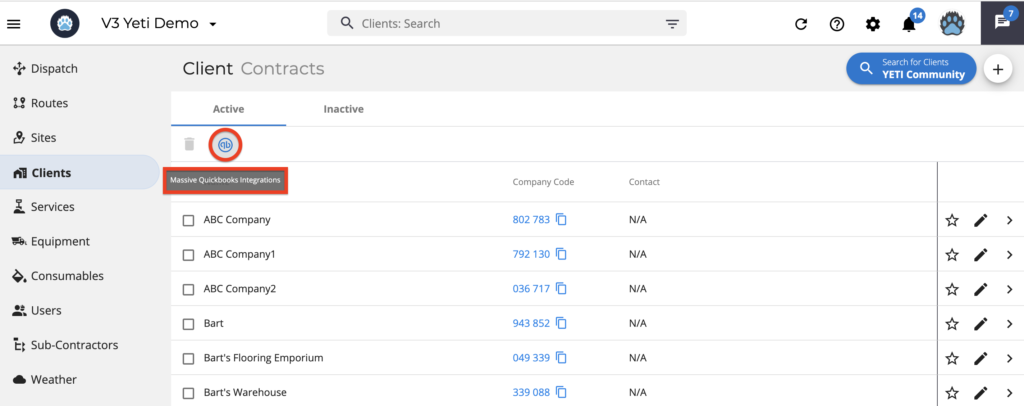
Go to your Client’s page and click on the Quickbooks icon to see the relationship between your Client in Yeti and your Customer in Quickbooks.
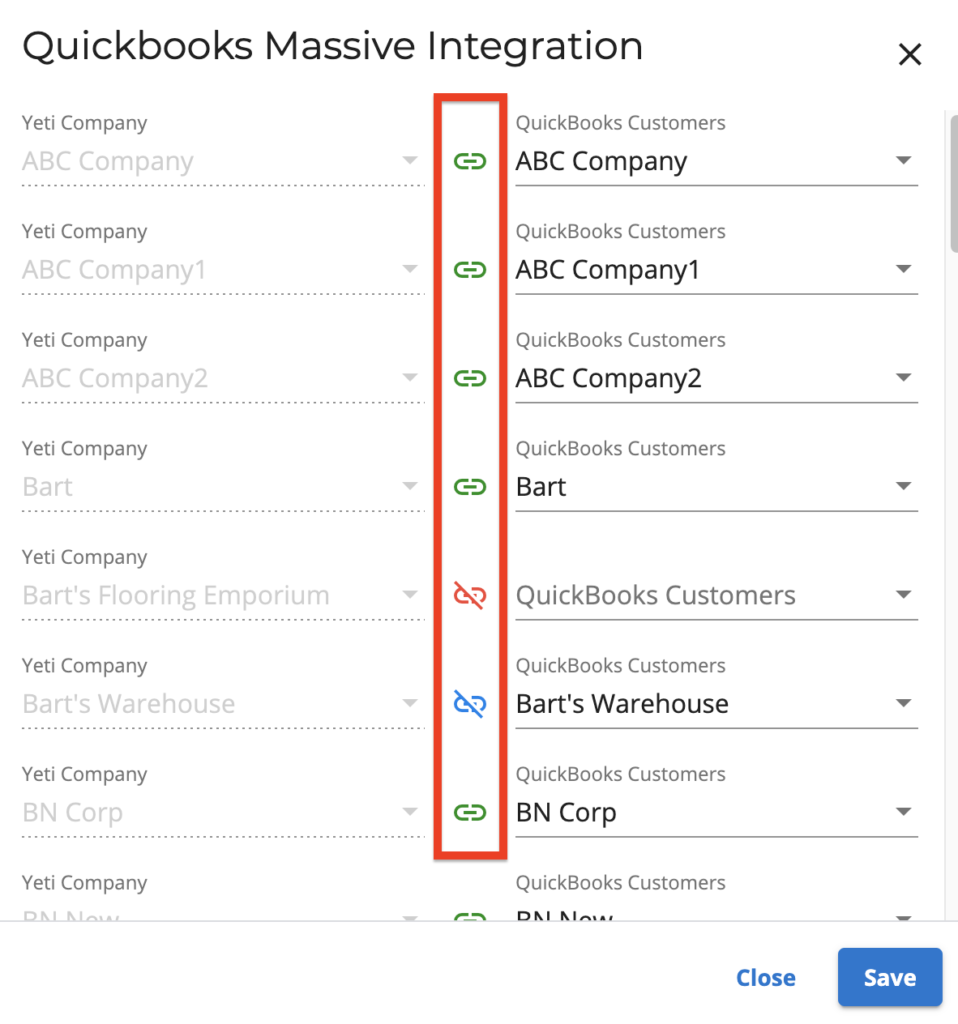
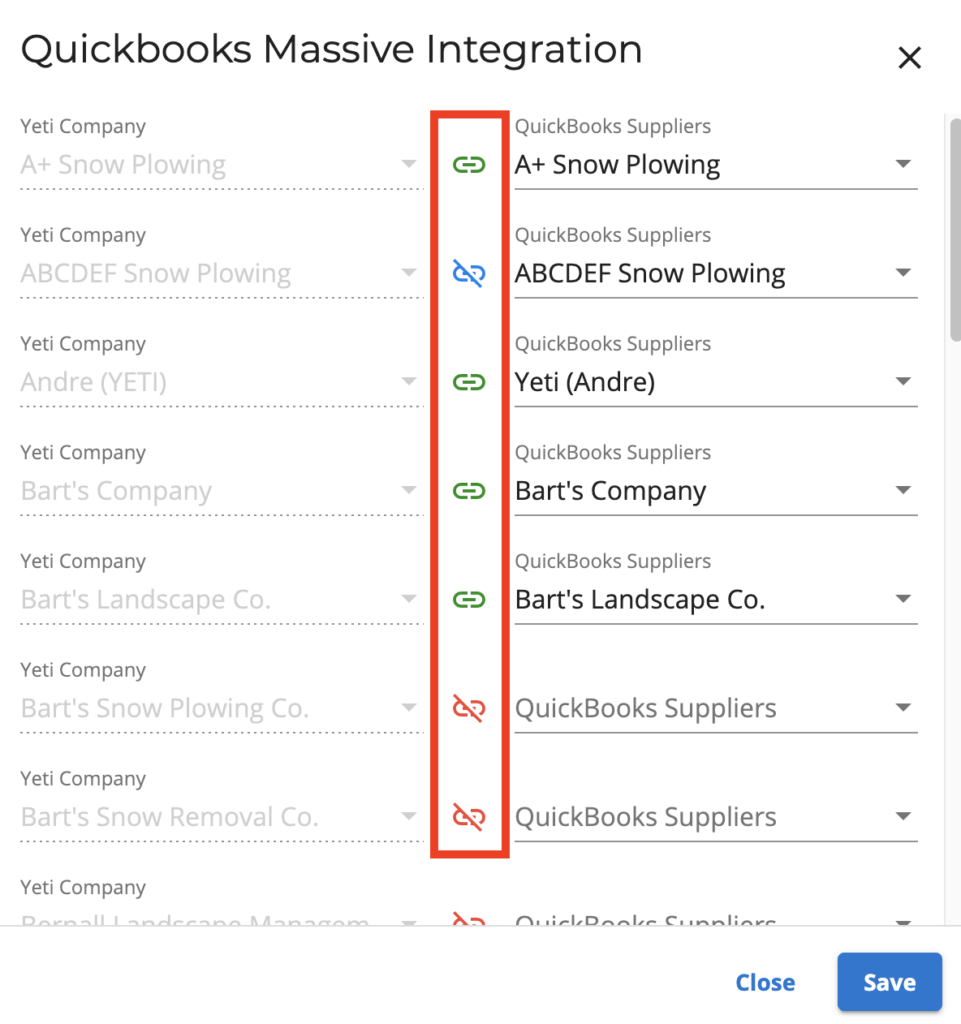
The green arrow shows companies that were integrated; the blue arrow notifies a similar company name that the system selects for you, and the red arrow means that you need to make the association.
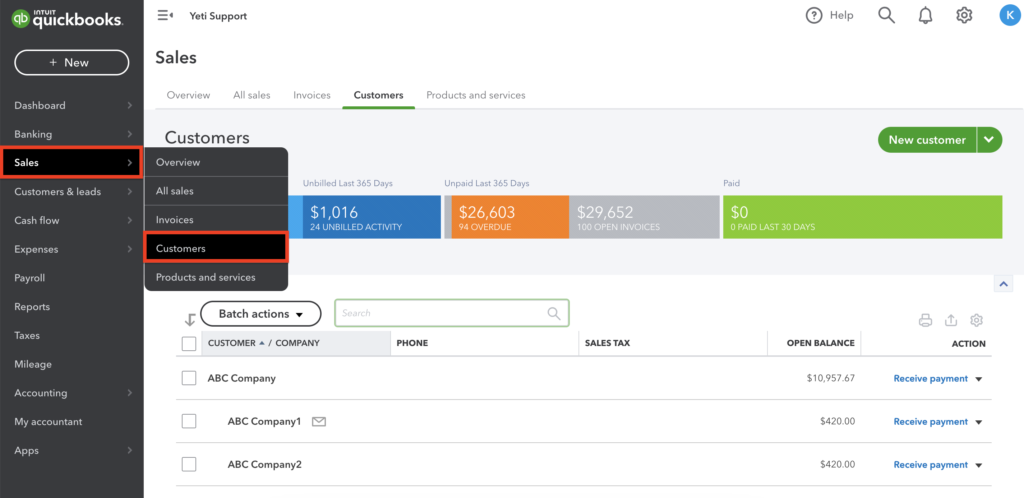
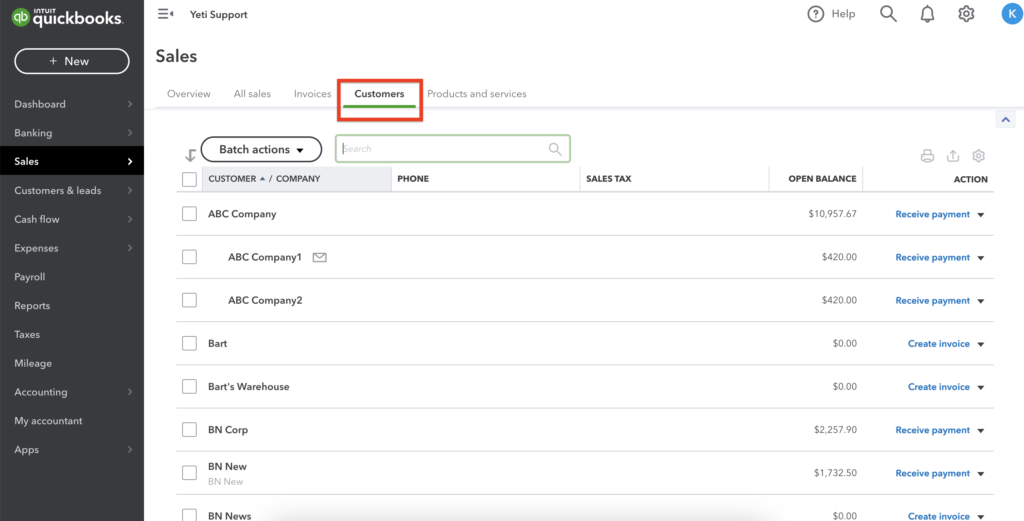
Check your Clients on the Quickbooks Sales.
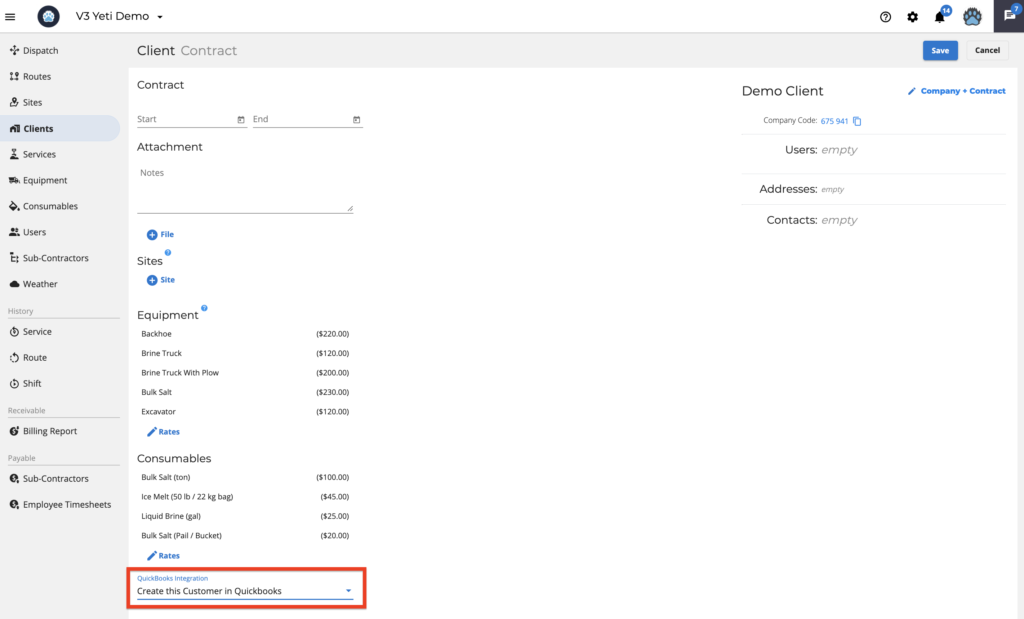
To create a customer in your Quickbooks account that exists in Yeti, edit your Client and select ‘Create this Customer in Quickbooks’.
Sync your Yeti Sub-Contractor with your Quickbooks Suppliers
Your sub-contractors can be associated in the same way.
On the Sub-Contractor page, click on Quickbooks to view the association.
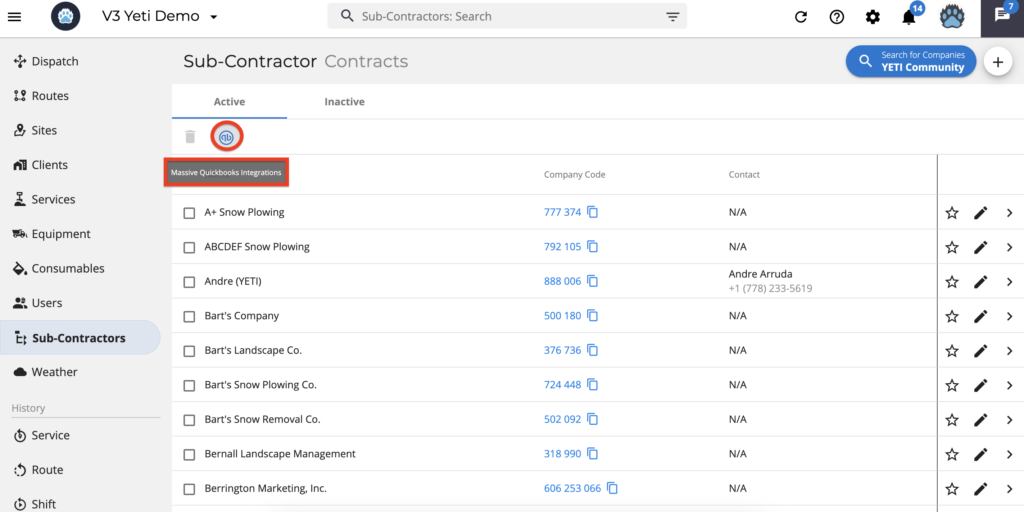
The green arrow shows companies that were integrated; the blue arrow notifies a similar company name that the system selects for you, and the red arrow means that you need to make the association.
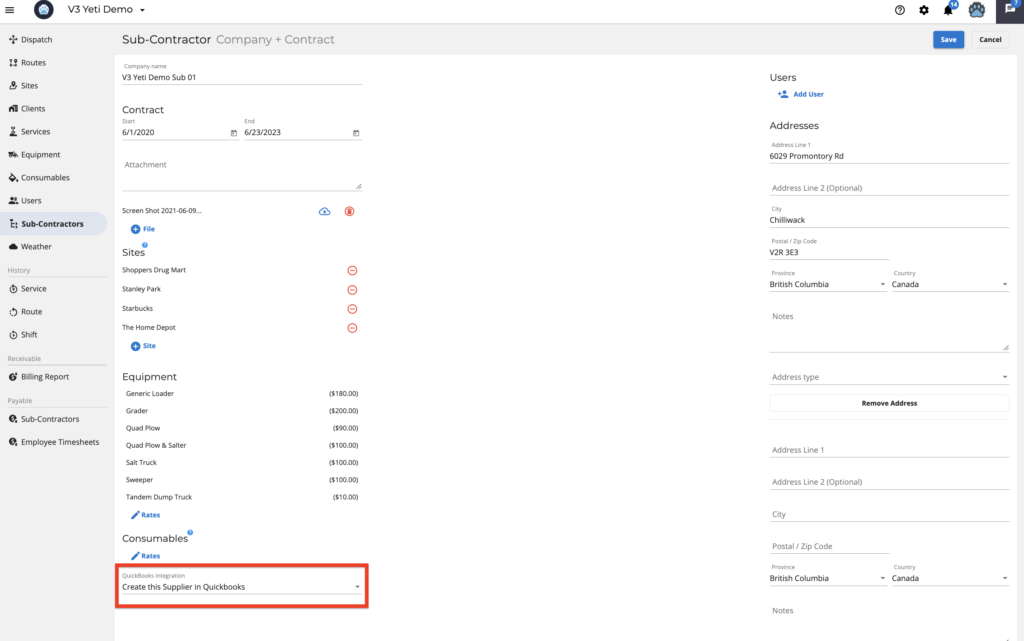
To create a Sub-Contractor in your Quickbooks account that exists in Yeti, edit your Client and select ‘Create this Supplier in Quickbooks’.
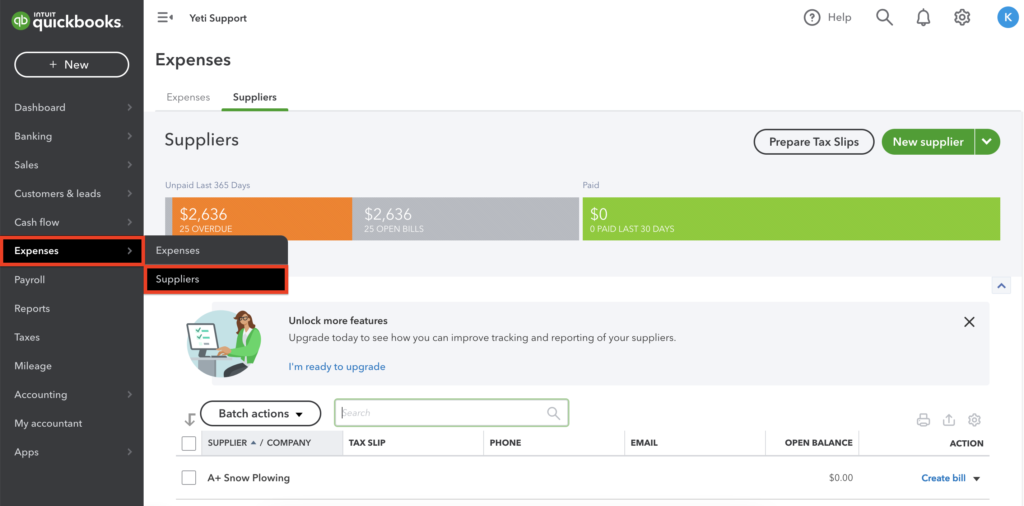
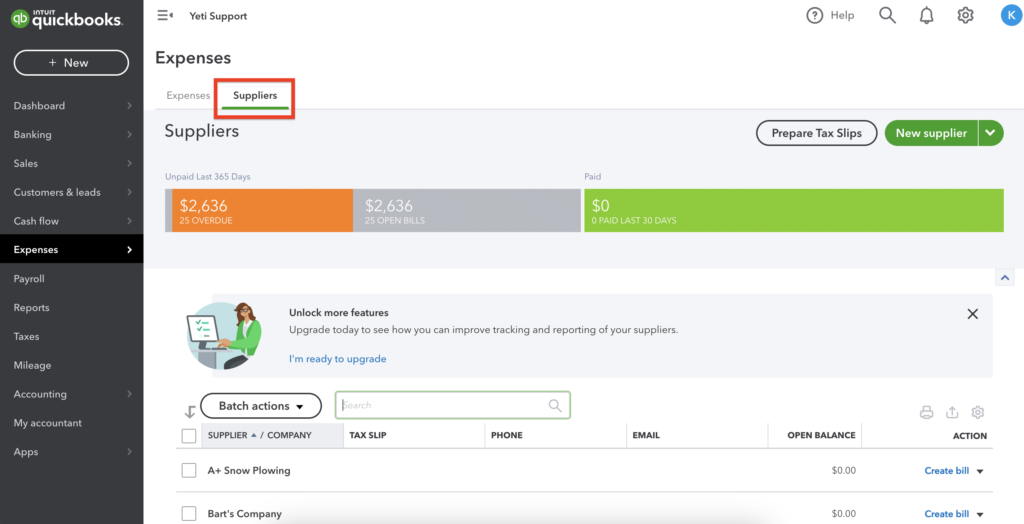
Check your Sub-Contractor on the Quickbooks Expenses > Suppliers.
Sync your Yeti and Quickbooks Services
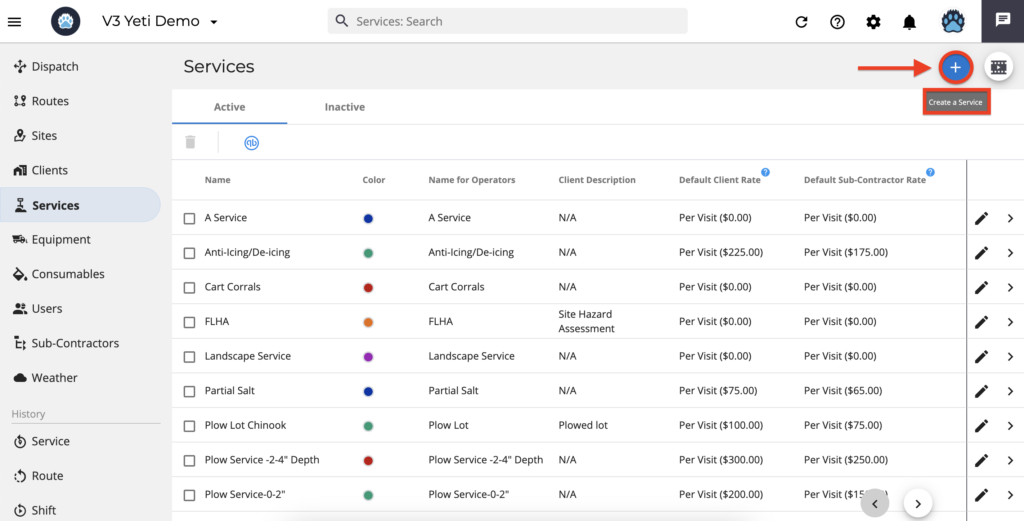
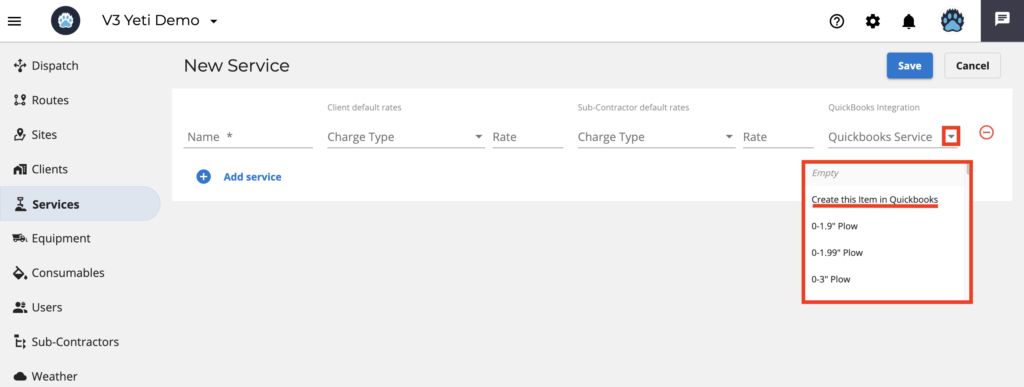
You can also sync your Services on the Quickbooks icon or create a Service in your Quickbooks account that exists in Yeti.
Click on the ‘add button’ to create a new Service.
Select ‘Create this item in Quickbooks’.
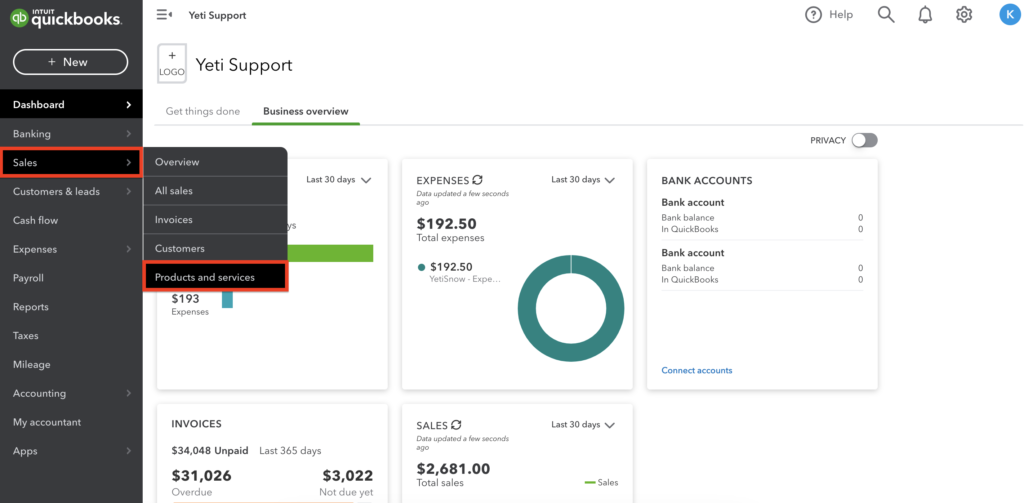
Check your Service on Quickbooks by clicking on Sales > Products and Services.
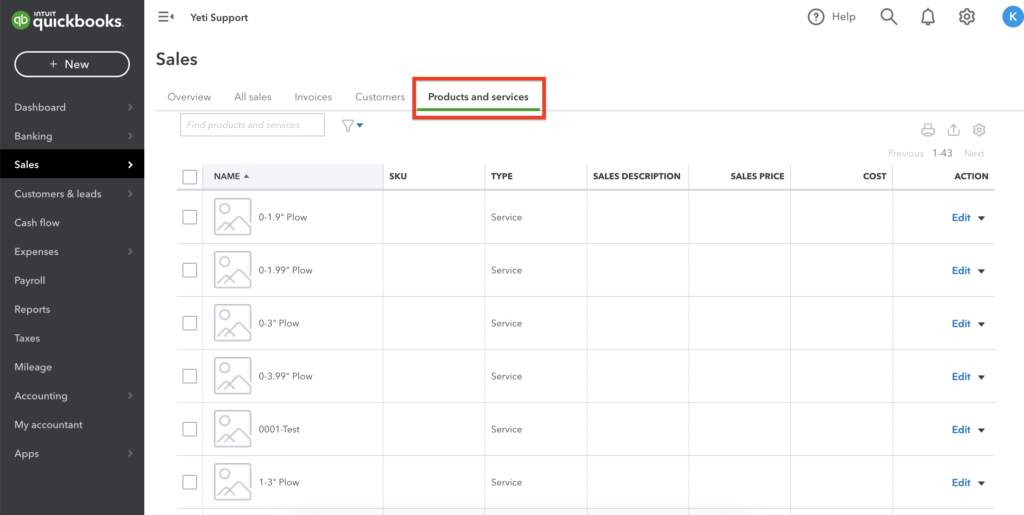
You will see your Quickbooks Services on this page.
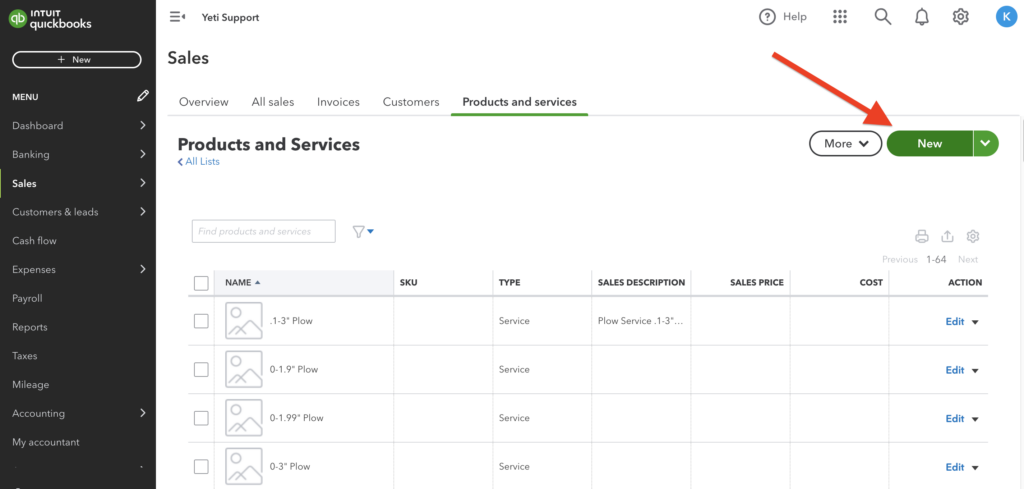
*** Important Information ***
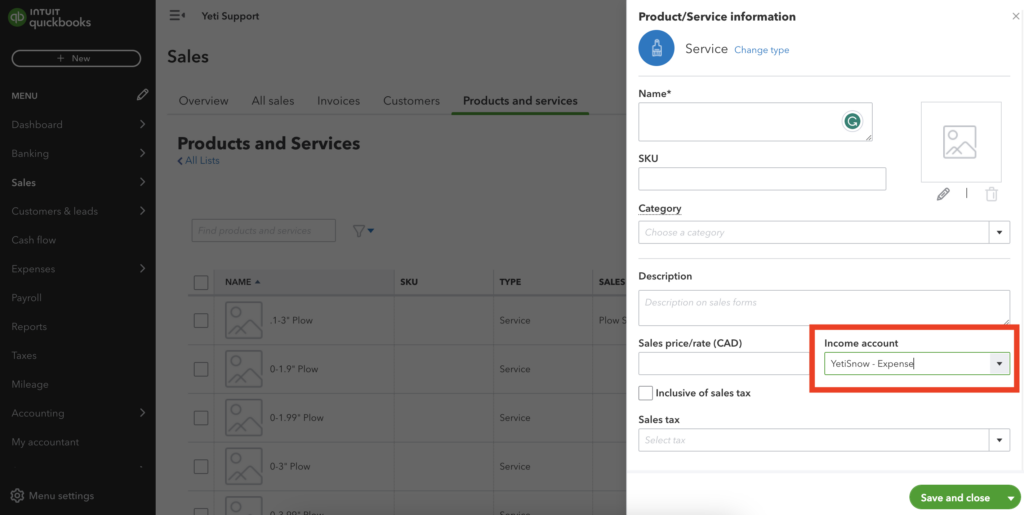
If you create a Service on Quickbooks online, you must inform the “Income account”. Next, you need to sync this Service with Yeti.
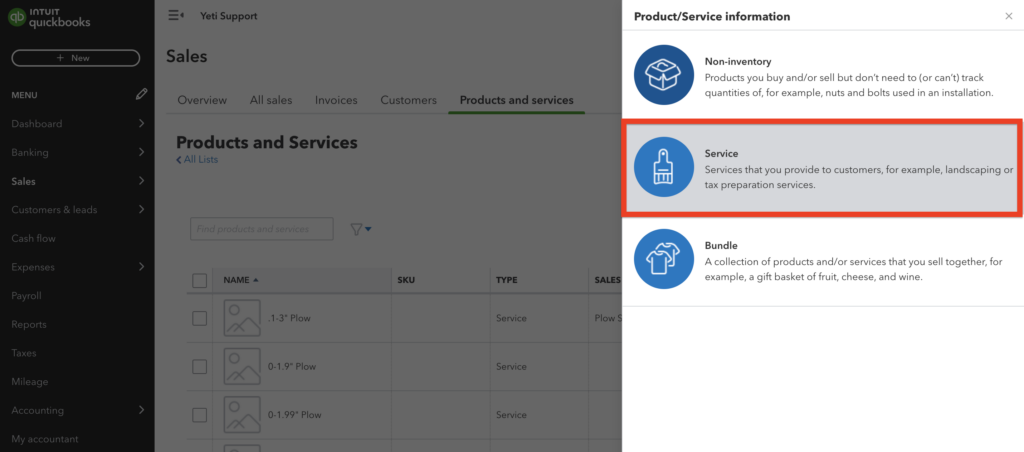
On the field “Income account”, select the option “YetiSnow – Expense”.
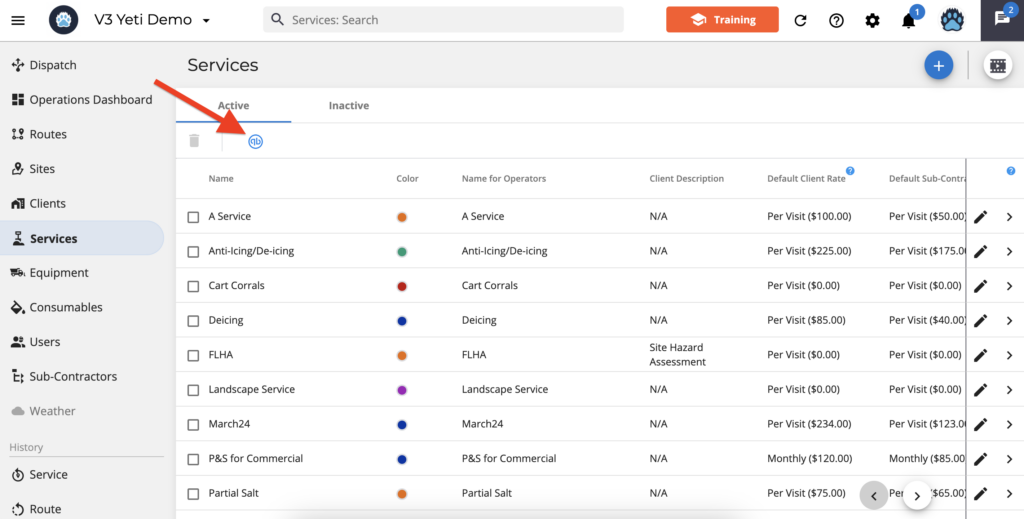
To sync the Services, click on the Quickbooks icon.
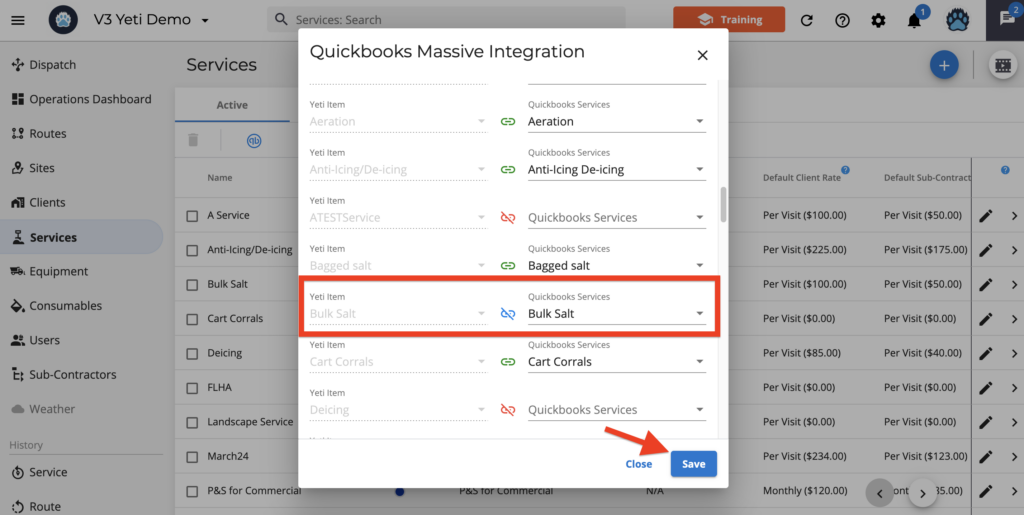
It appears in blue when Yeti and Quickbooks Services have the same name.
Click on the save button to sync the service.
Sync your Yeti Consumables
Sync your Consumables with Quickbooks or create a Consumable in your Quickbooks account that exists in Yeti.
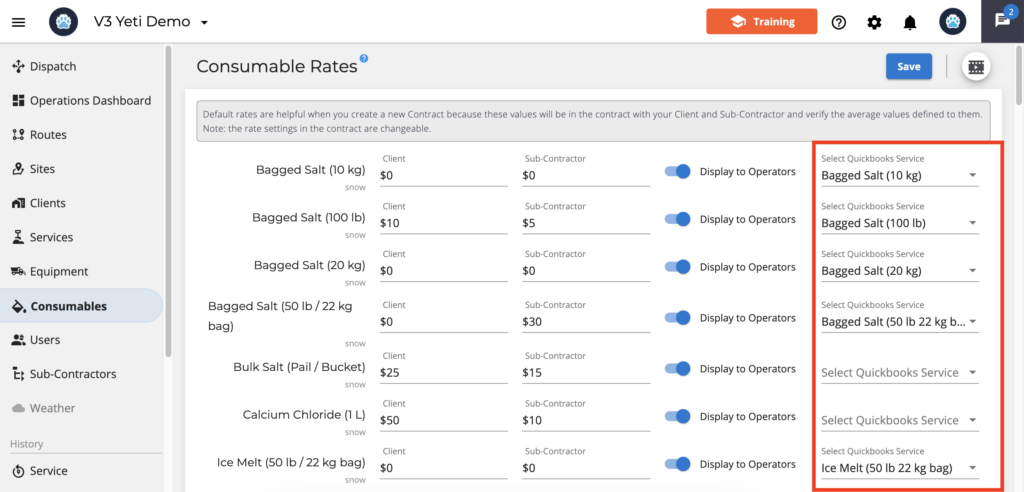
By clicking on the select box arrow, you can sync your Consumables or choose “Create this item in Quickbooks”.
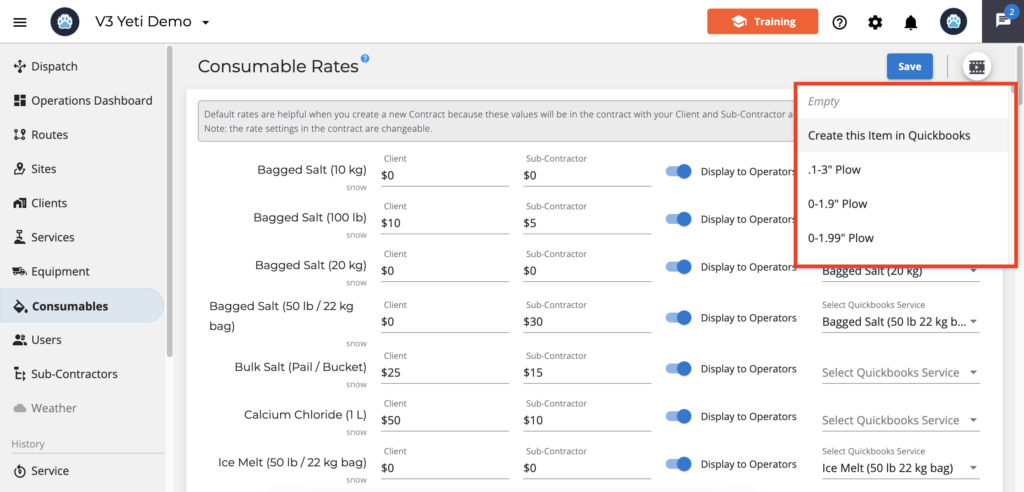
Adding Consumables to your Quickbooks online account is the same process as adding Services.
Go to your Quickbooks online and click on Sales > Products and Services.

You will see your Quickbooks Consumables on this page.

*** Important Information ***
If you create a Consumables on Quickbooks online, you must inform the “Income account”. Next, you need to sync this Consumable with Yeti.


On the field “Income account”, select the option “YetiSnow – Expense”.

Sync this Consumable on your Yeti account.
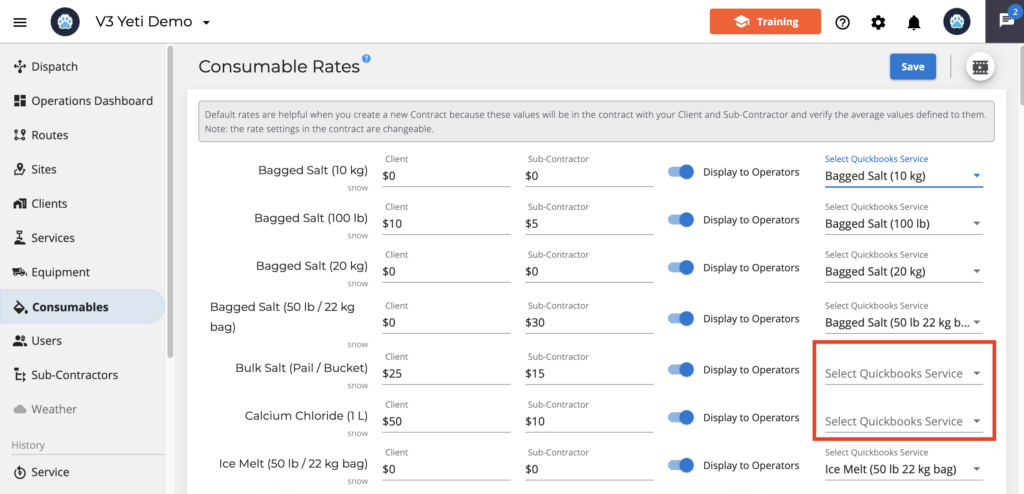
Sync your Yeti Users with your Quickbooks Employees
You can also sync your users on the Quickbooks icon or create a user in your Quickbooks account that exists in Yeti. Edit your user and select ‘Create this Employee in Quickbooks’.
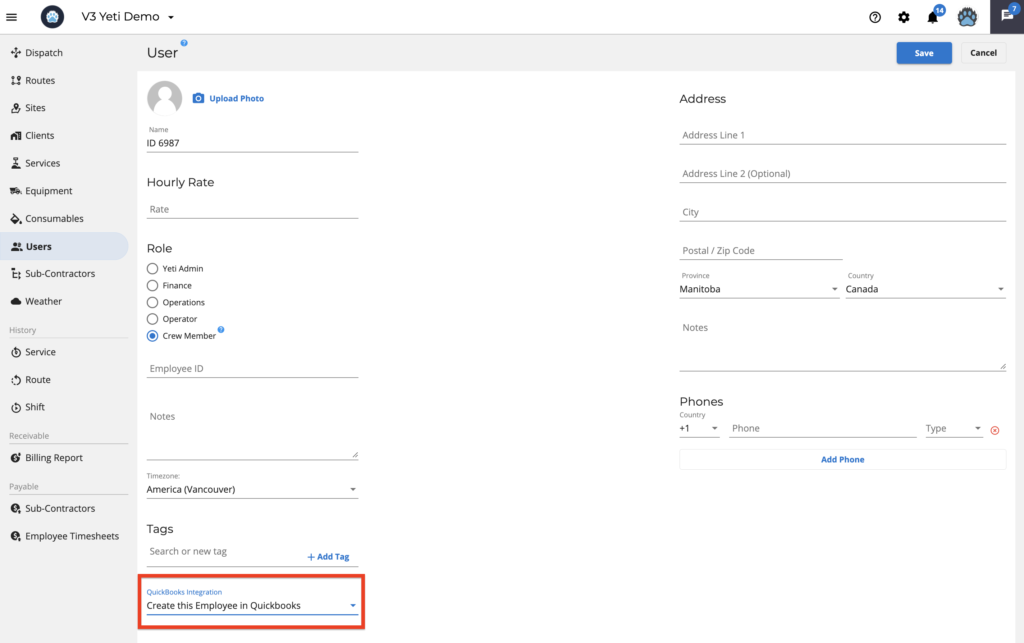
Check your Users on the Quickbooks Payroll.
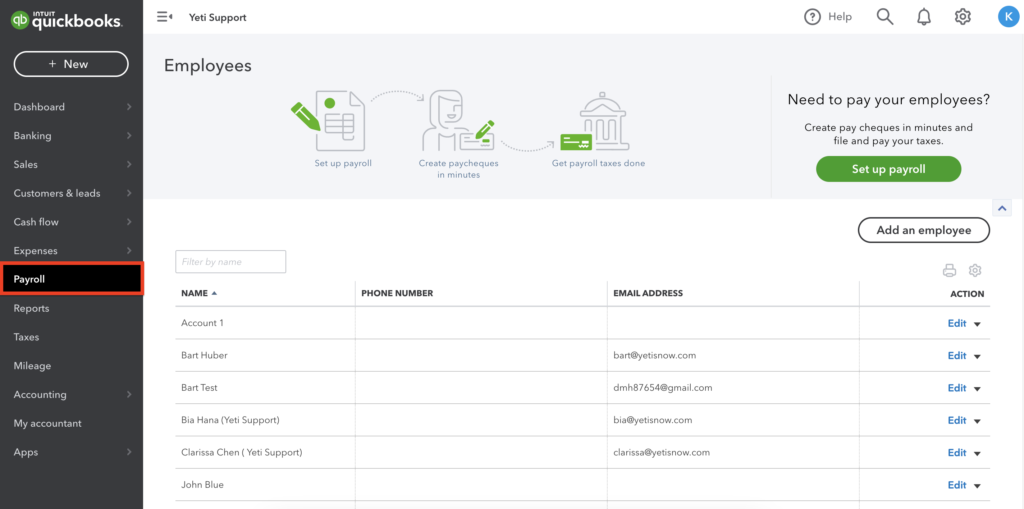
REPORTS
You can push 3 reports into Quickbooks from Yeti: Billing Report, Sub-Contractor Report, and Employee Timesheets Report.
Note: Records can only be pushed to your Quickbooks account once. If you need to make any changes after pushing your records, you will need to go to your Quickbooks account and manually make the changes there.
Pushing your Yeti Billing Report records to your Quickbooks Invoice
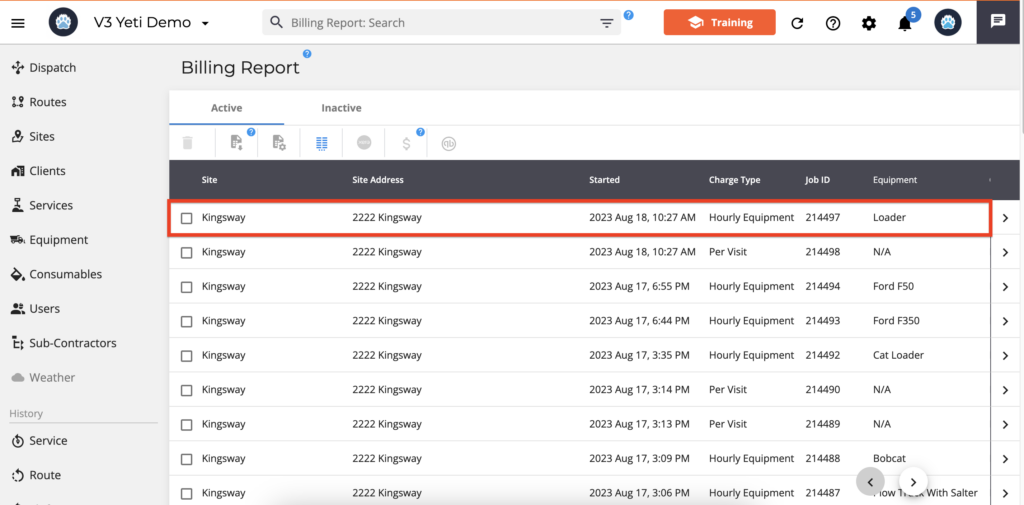
Go to your Billing Report page, select the record, and click on the Quickbooks icon to push this record. For your records to be pushed, you must meet the following requirements:
- The record should be approved.
- The invoice amount cannot be zero.
- The Client should be the same.
- The invoice number should be the same. If you have already pushed records to Quickbooks online and renamed the invoice number in Yeti, and want to push it again, you can do it according to the invoice number in Quickbooks. As an example, you push two records with invoice numbers 123 and 456, respectively. Then, you renamed both invoices in Yeti to ‘999’. The records can be pushed again to Quickbooks separately (one record per time). In other words, you cannot select both records in Yeti and try to push them to Quickbooks since they have different invoice numbers in Quickbooks.
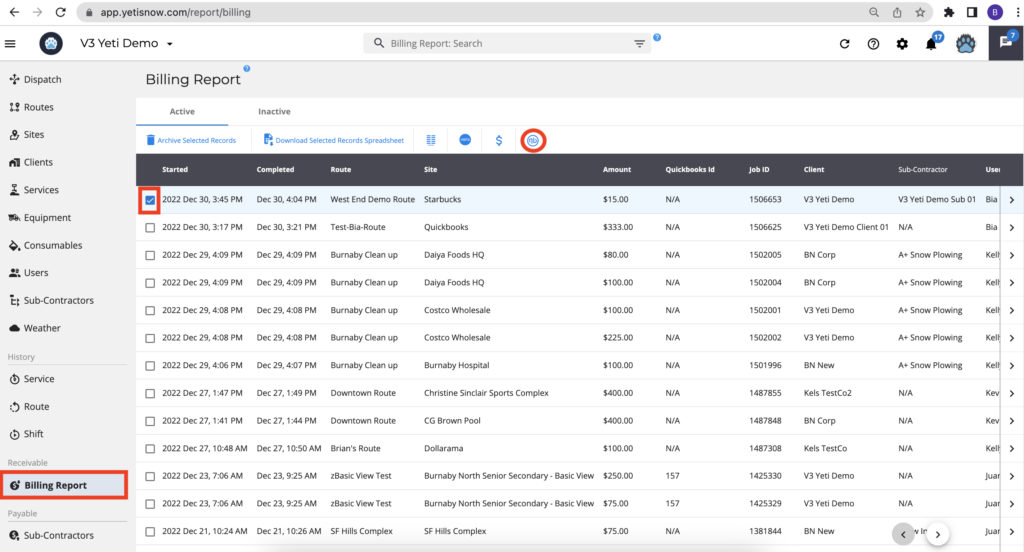
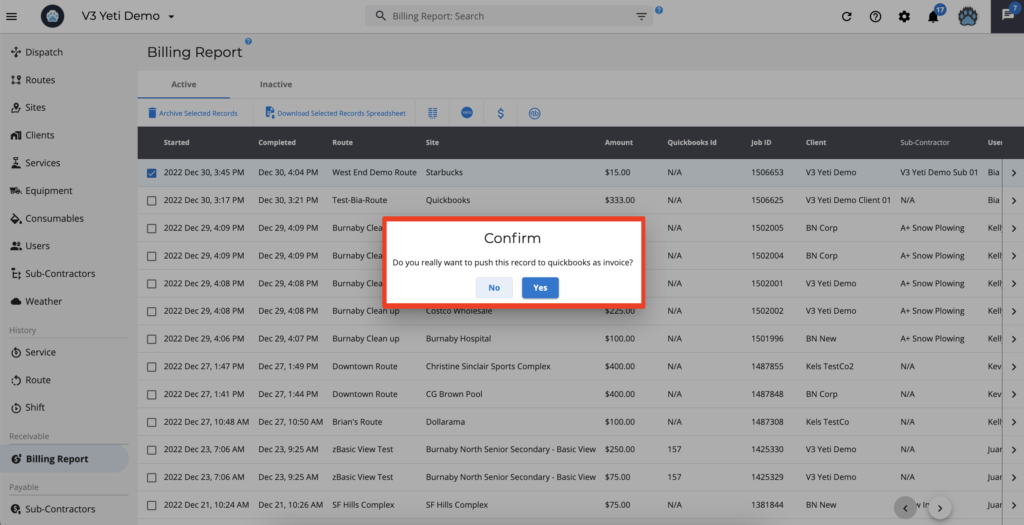
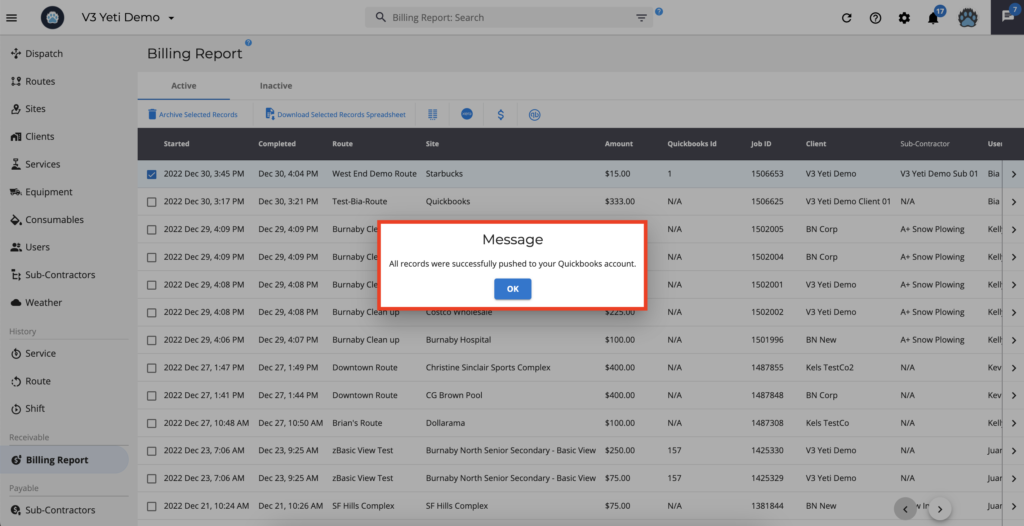
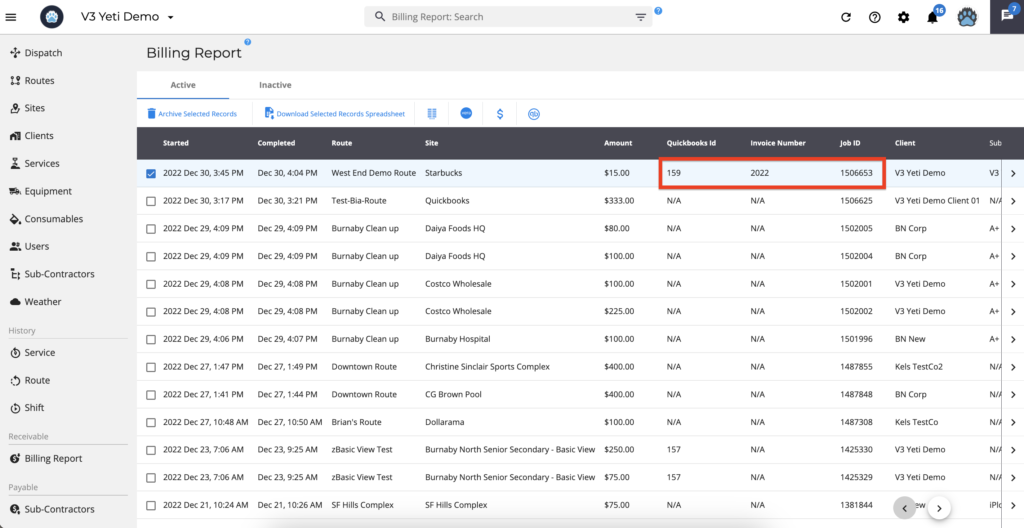
The ‘Quickbooks Id’ number will appear after the record has been pushed to Quickbooks.
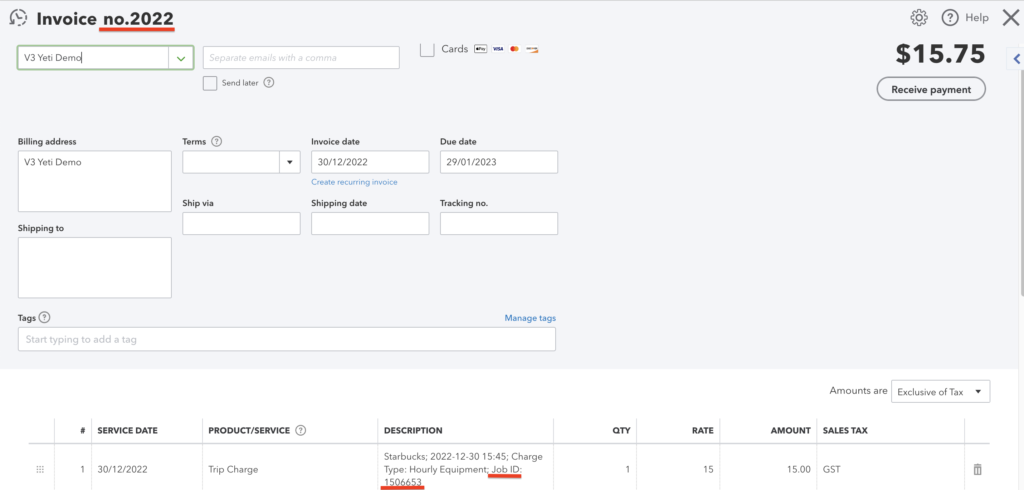
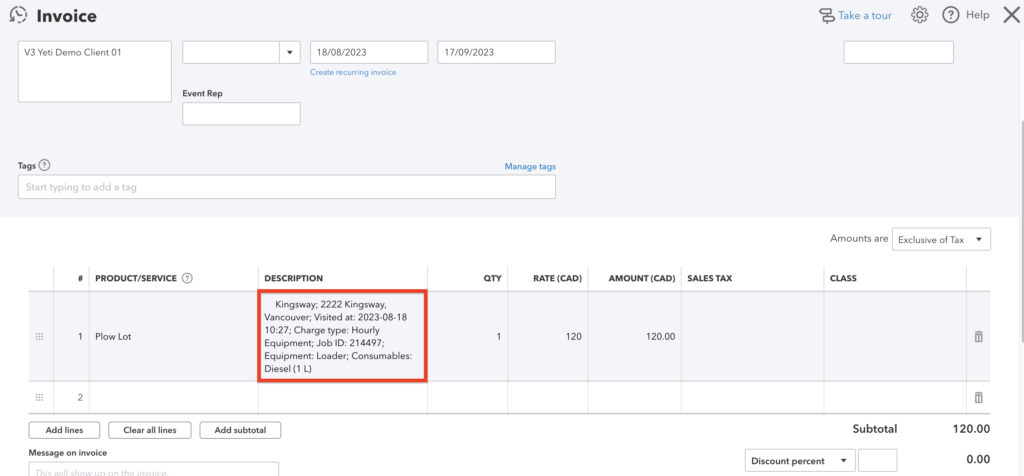
The ‘Invoice Number’ and the ‘Job ID’ will be pushed to Quickbooks.
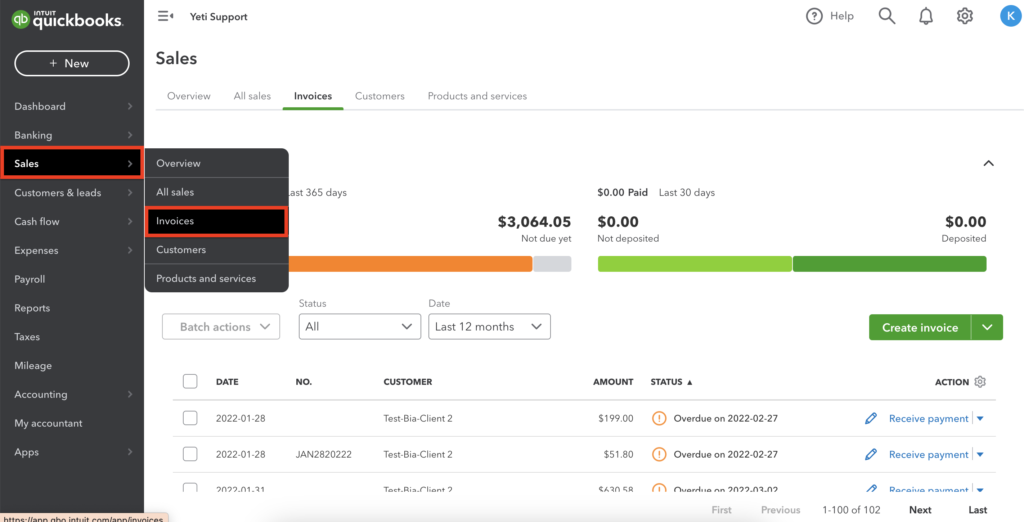
You can check the record in your Quickbooks account.
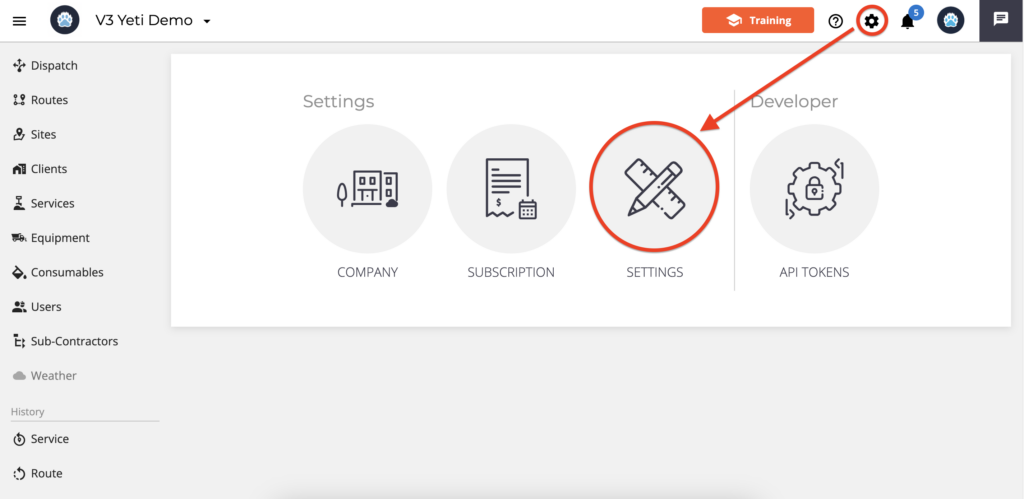
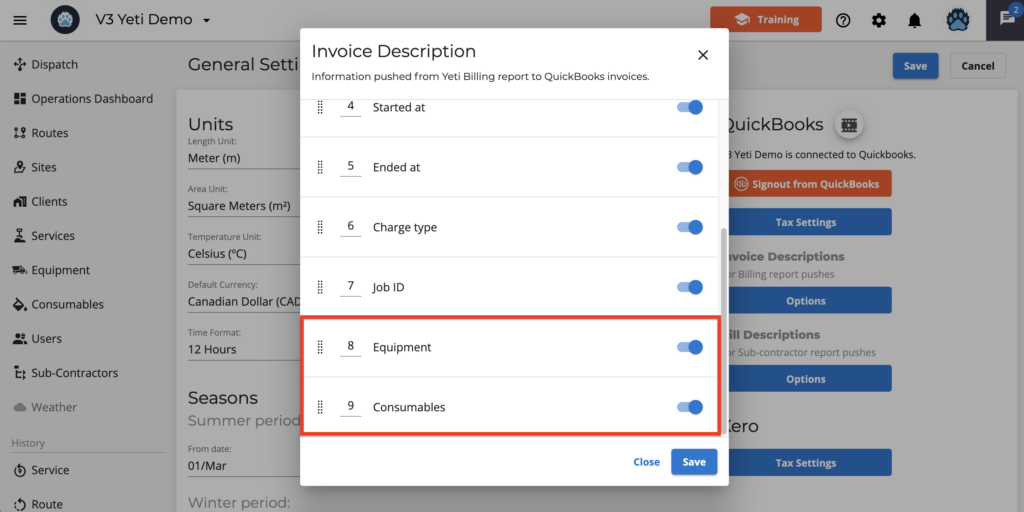
In Yeti settings, you can also choose which information to push to Quickbooks online.
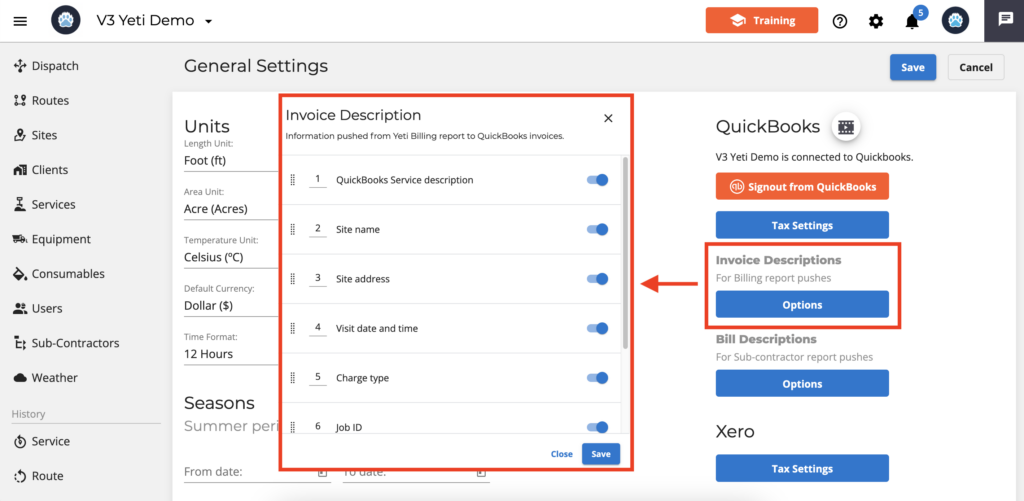
Here are the options you can push from the Yeti Billing Report to your Quickbooks online Invoice. As you can see here, you can also push your Equipment and Consumables amount.
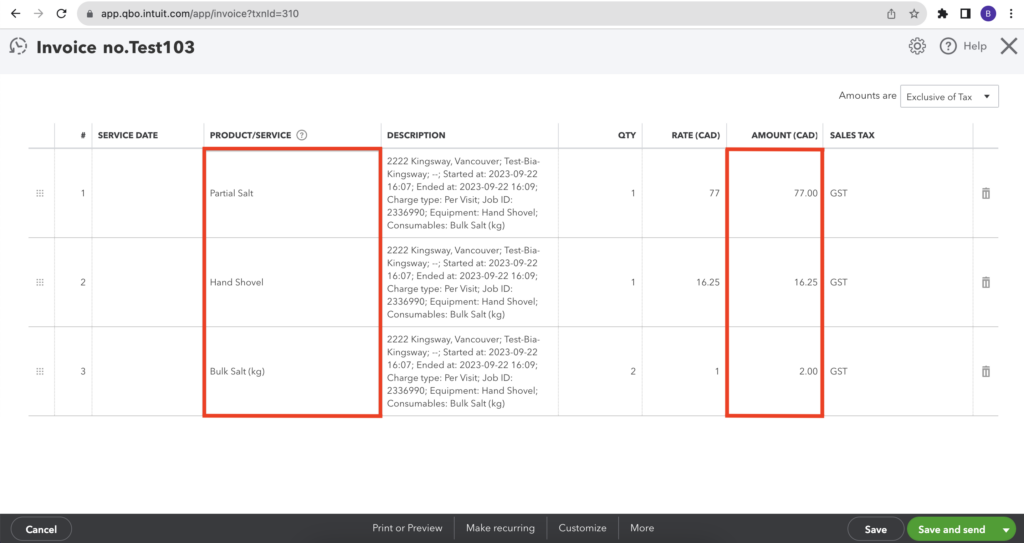
Below is an example of a record that was pushed to Quickbooks Online.
This is how you can view your Invoice in Quickbooks online.
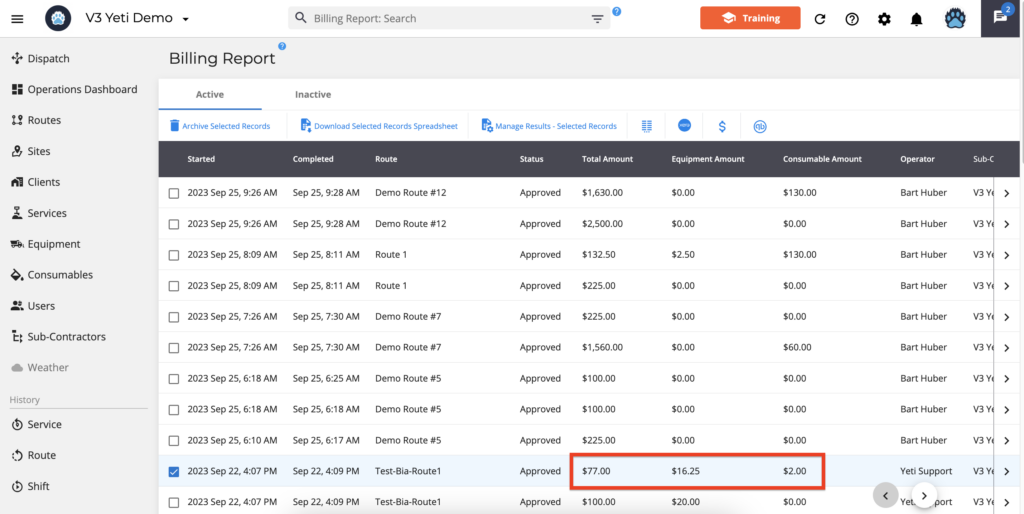
Also, selecting “Equipment” and “Consumables” will push your “Equipment amount” and “Consumables amount” respectively.
*** Important Information ***
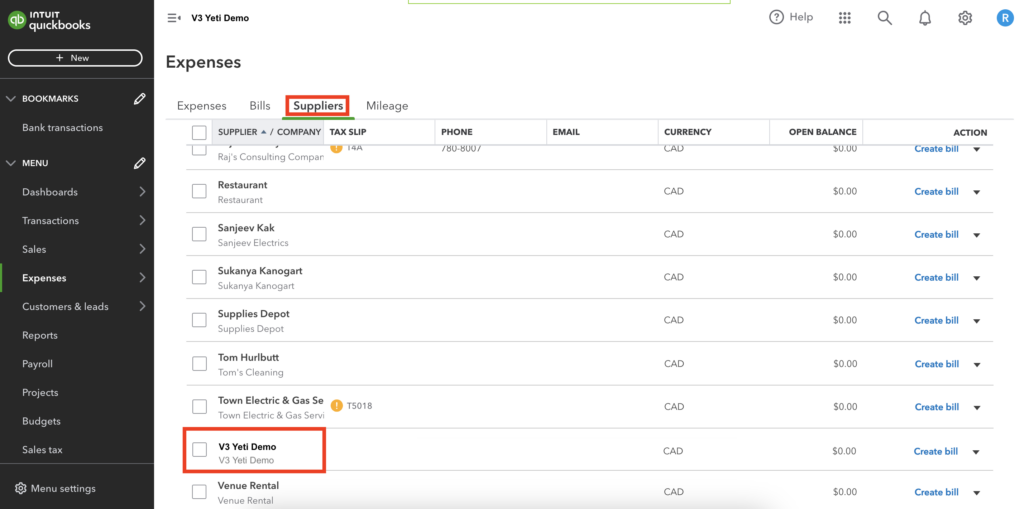
In your Quickbooks online account, if you already have a supplier or customer registered with your company’s name, when you push your records from the Yeti Billing Report or Sub-Contractor report, Yeti will create a customer as “your company name – as customer” or a supplier as “your company name – as vendor.”
In the example below, “V3 Yeti Demo” is already listed in Quickbooks online as a supplier.
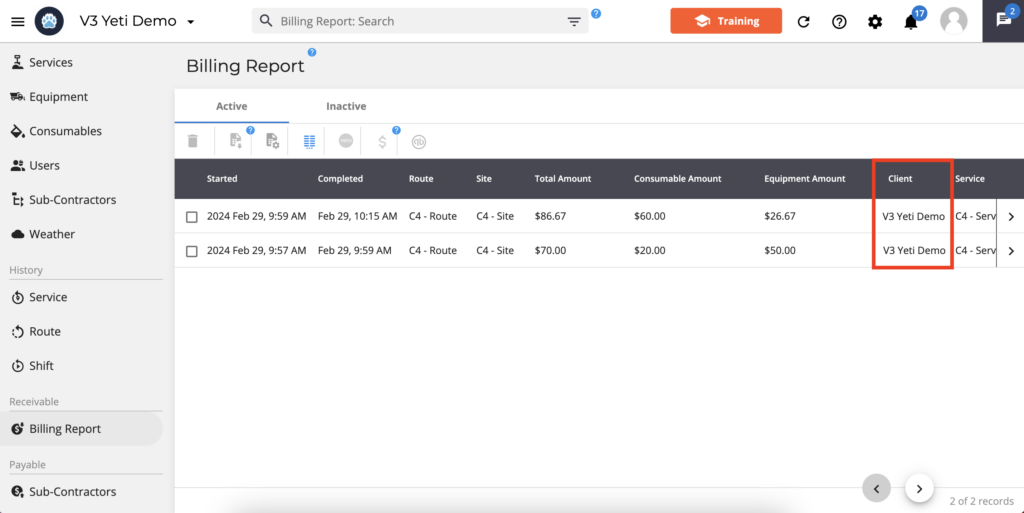
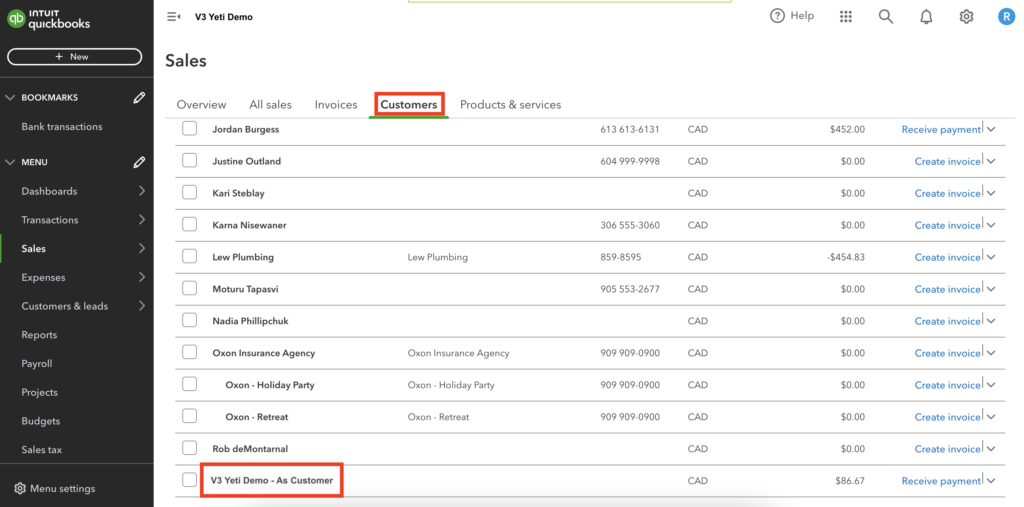
When pushing a record from Billing Report whose Client is “V3 Yeti Demo”, the system creates a customer “V3 Yeti Demo – As customer”.
Check here for more scenarios and rules when pushing records from the Yeti Billing Report into Quickbooks Online.
Pushing your Yeti Sub-contractor Report records to your Quickbooks Bill
Go to your Sub-Contractor Report page, select the record, and click on the Quickbooks icon to push this record. For your records to be pushed, you must meet the following requirements:
- The record should be approved.
- The amount cannot be zero.
- The Sub-Contractor should be the same.
- The invoice number should be the same.
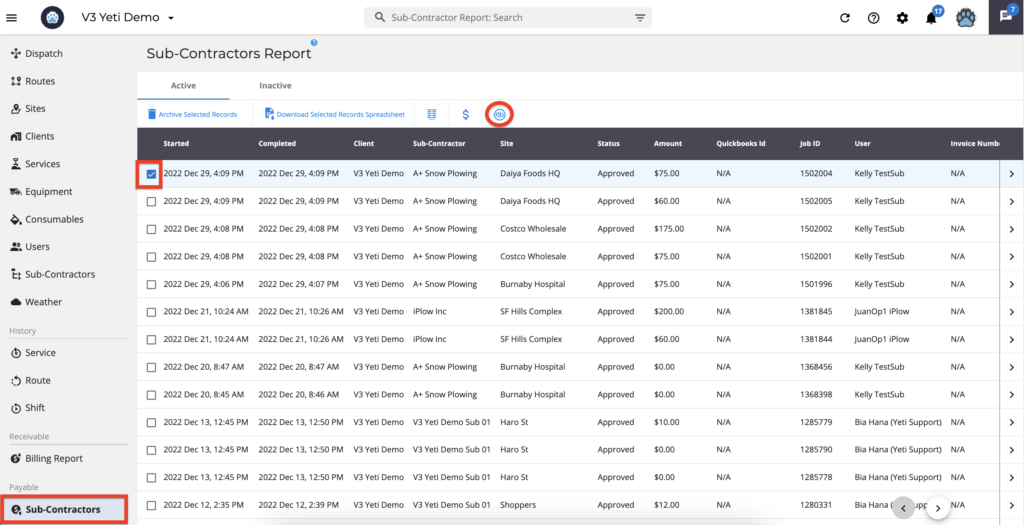
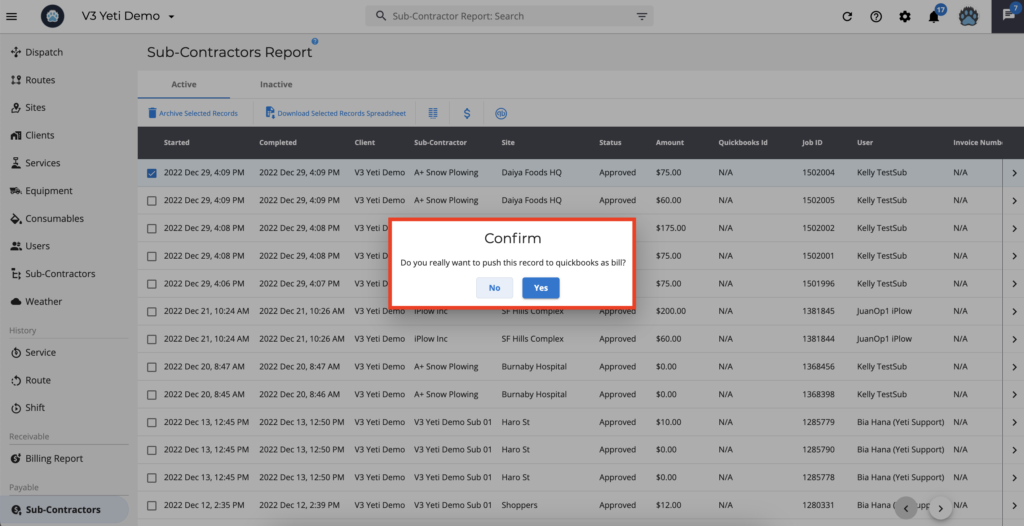
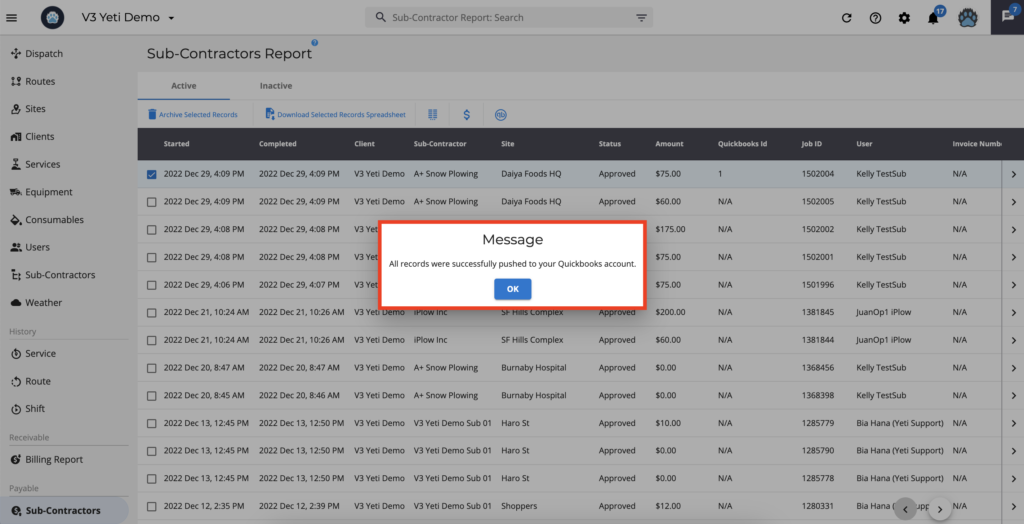
After you push the record to Quickbooks, you will see the ‘Quickbooks Id’ number.
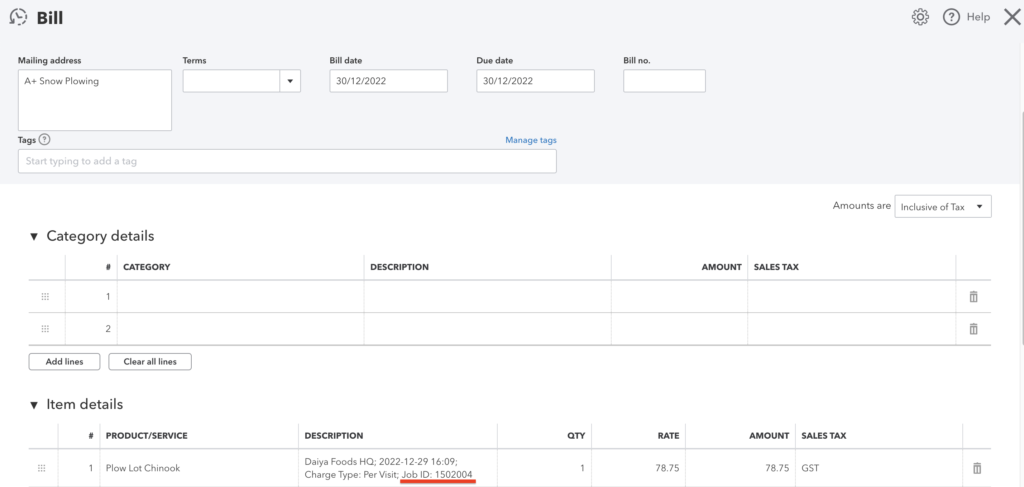
The ‘Job ID’ will also show on your Quickbooks.
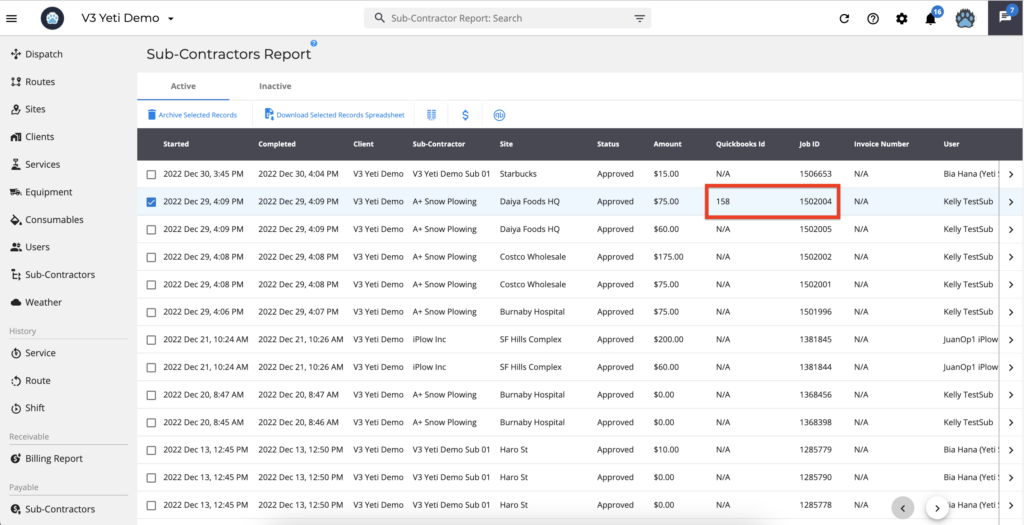
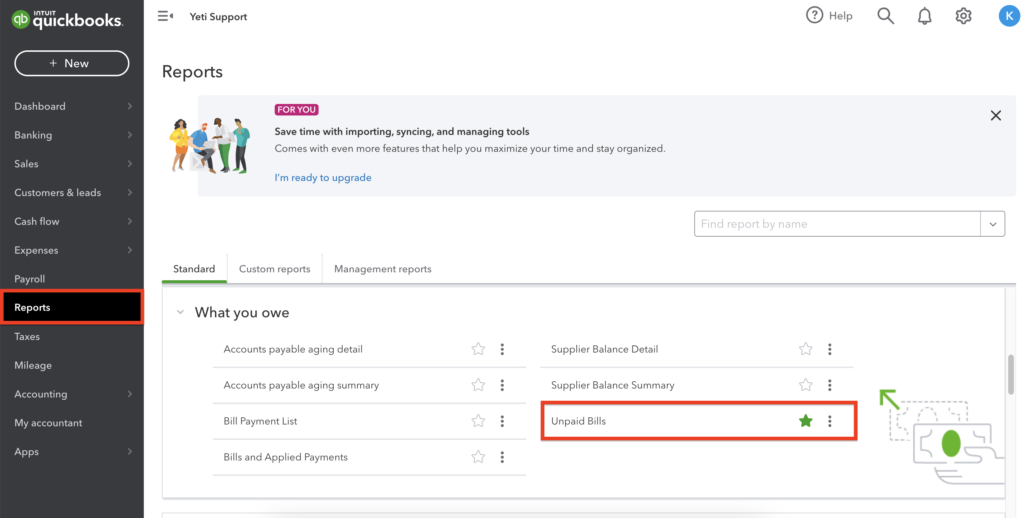
You can check the record in your Quickbooks account.
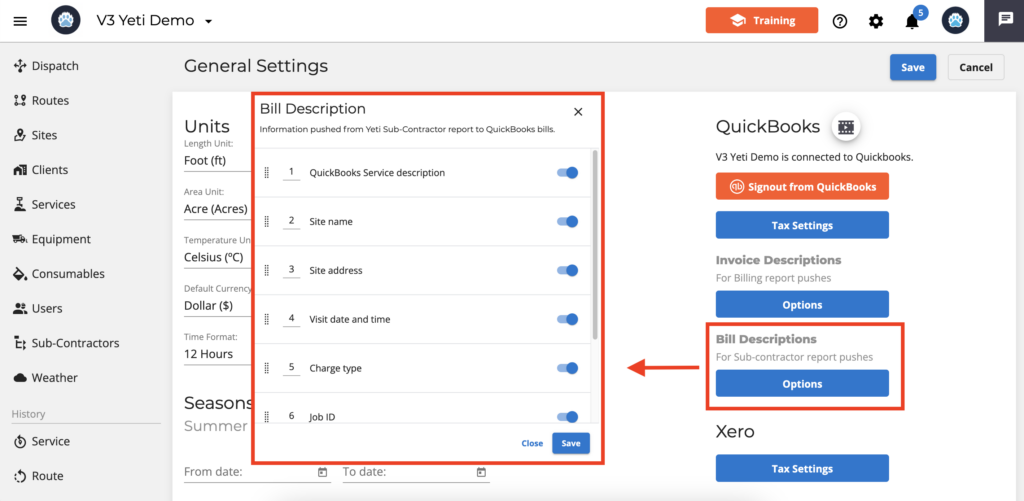
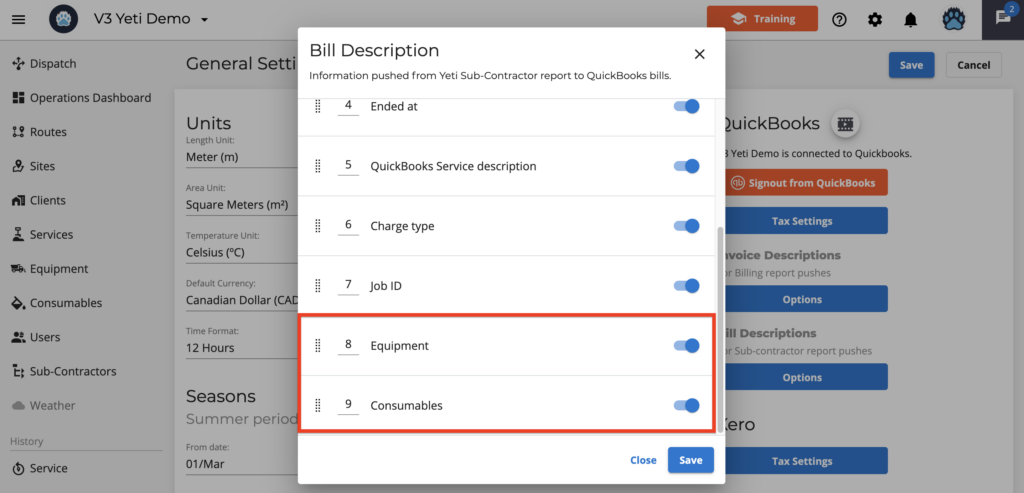
You can also choose which information from the Yeti Sub-Contractor Report should be pushed to your Quickbooks online Bill. As you can see here, you can also push your Equipment and Consumables amount.
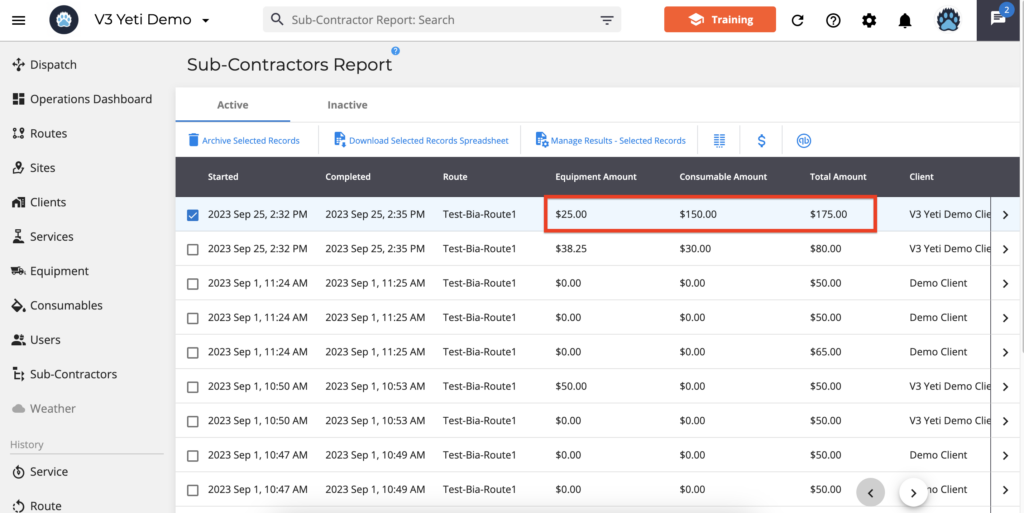
Below is an example of a record that was pushed to Quickbooks Online.
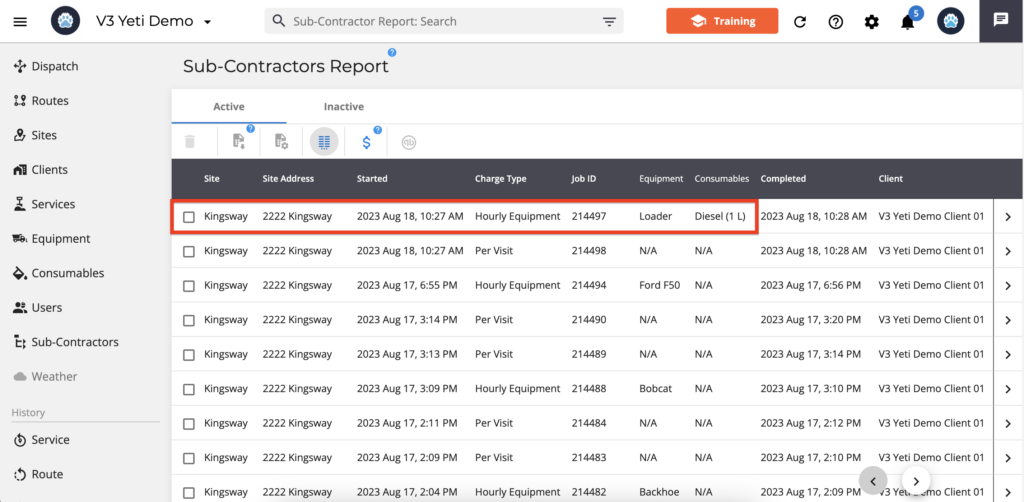
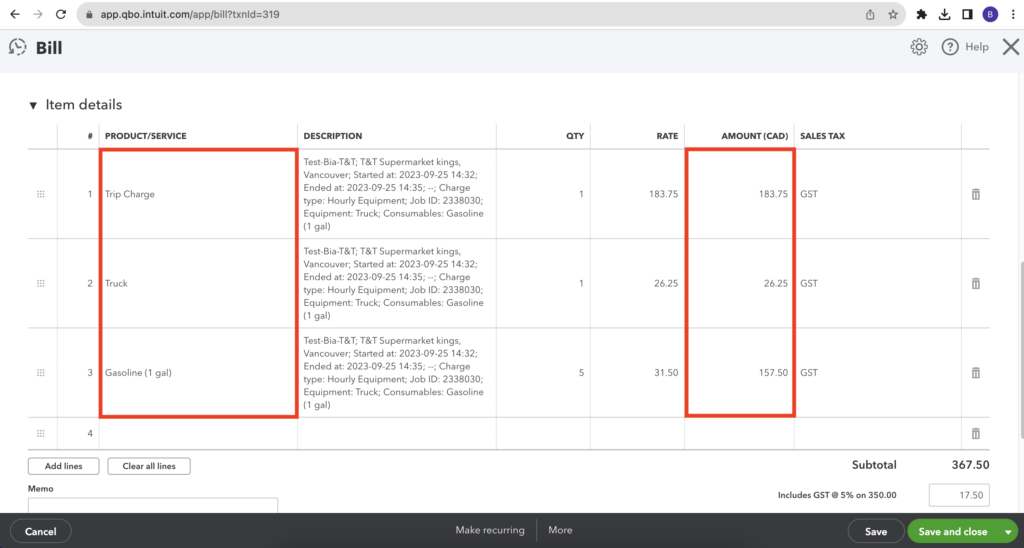
This is how you can view your Bill in Quickbooks online.
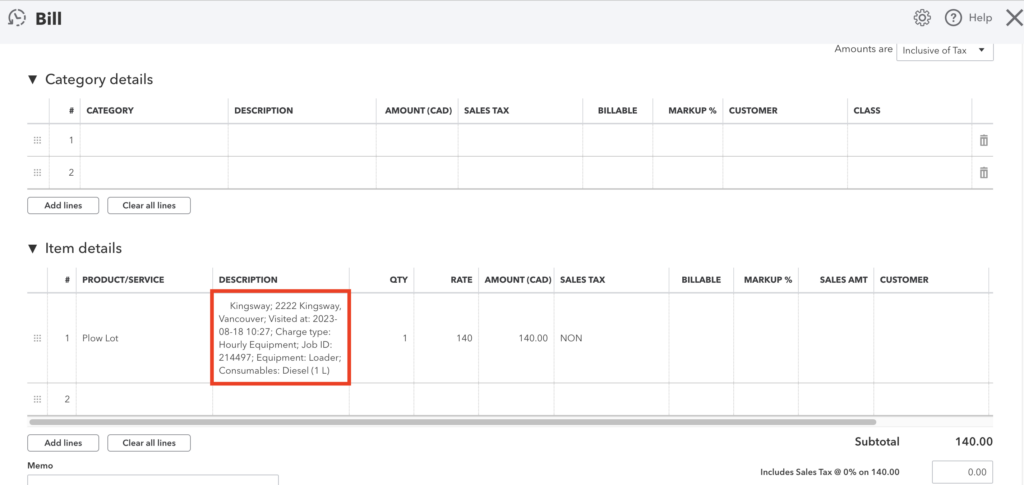
Also, selecting “Equipment” and “Consumables” will push your “Equipment amount” and “Consumables amount” respectively.
Pushing your Yeti Employee Timesheet Report records to your Quickbooks Time Activities report
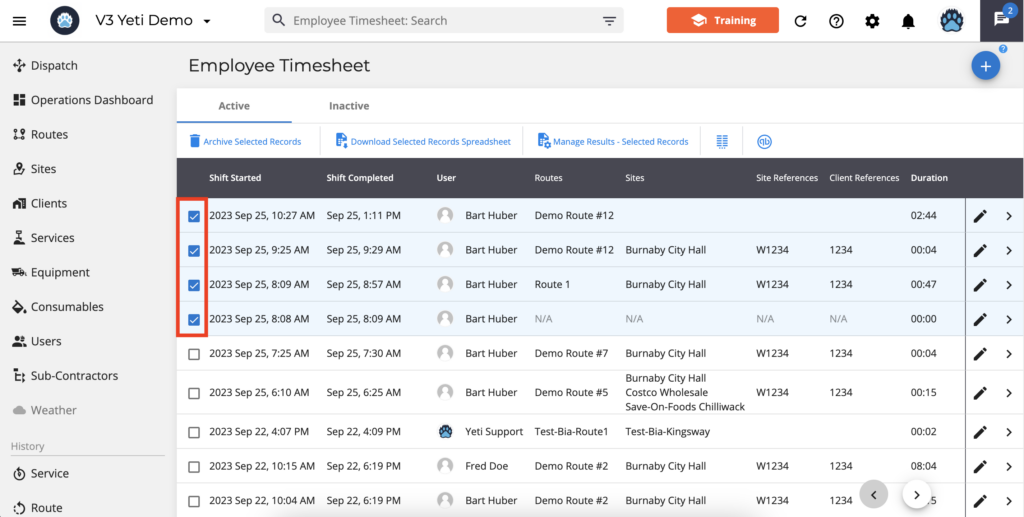
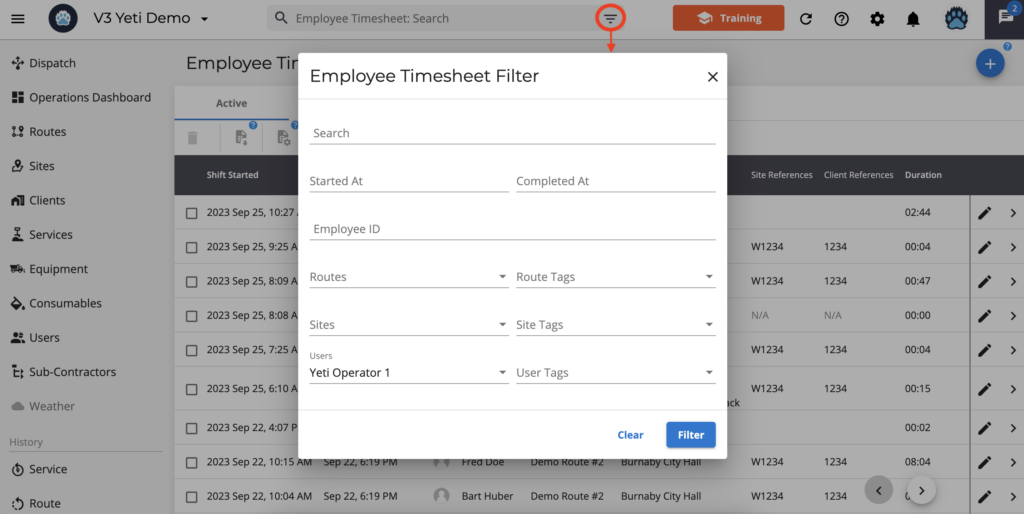
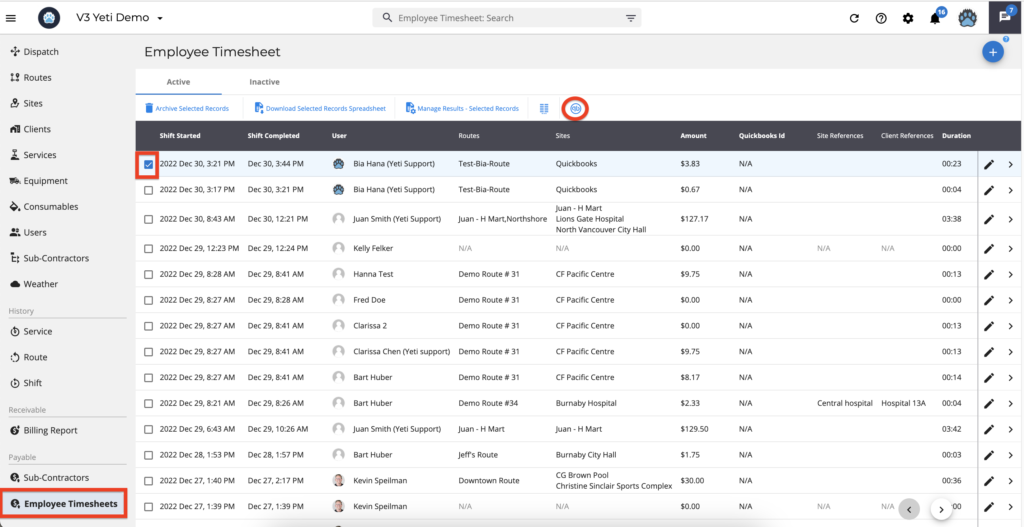
Go to your Employee Timesheets Report page, select the record, and click on the Quickbooks icon to push this record. Also, you can select several records or push them with the filter as you can see below.
By selecting many records:
By filtering and, for instance, selecting by user:
Here is an example of selecting only one record. Using the filter or selecting many records is the same as following the steps below.
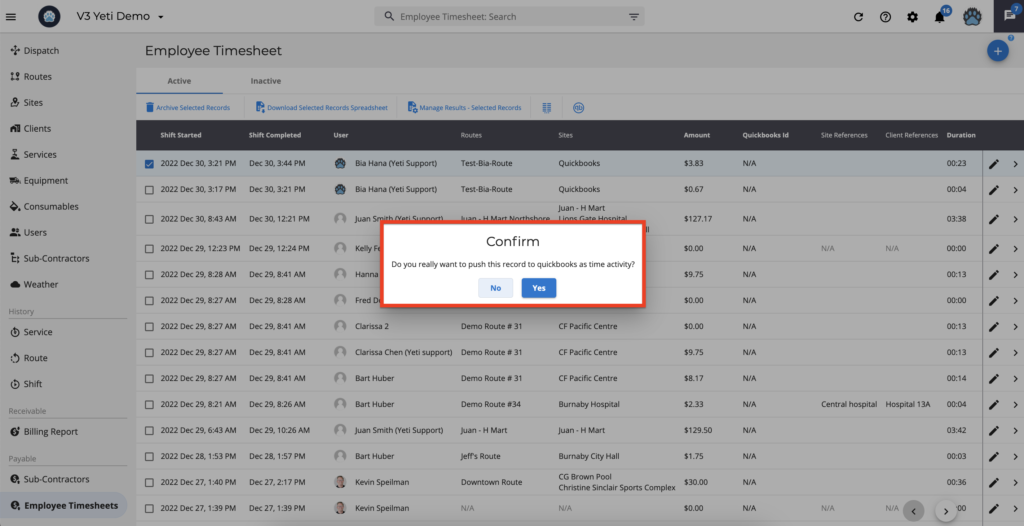
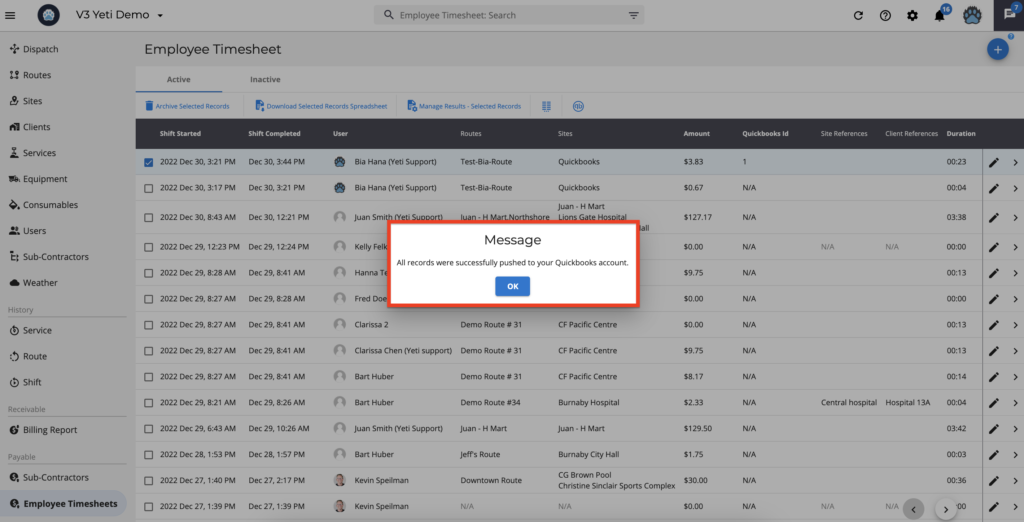
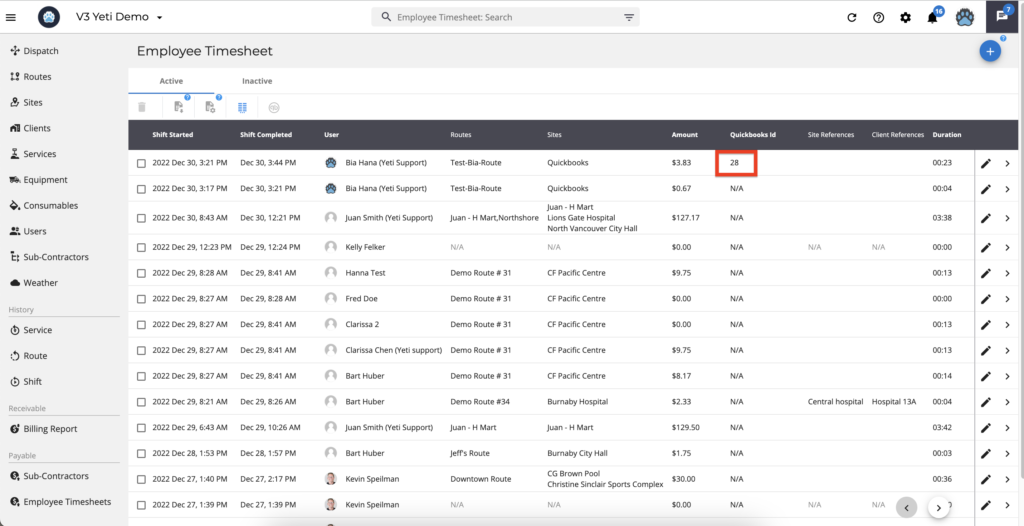
After you push the record to Quickbooks, you will see the ‘Quickbooks Id’ number.
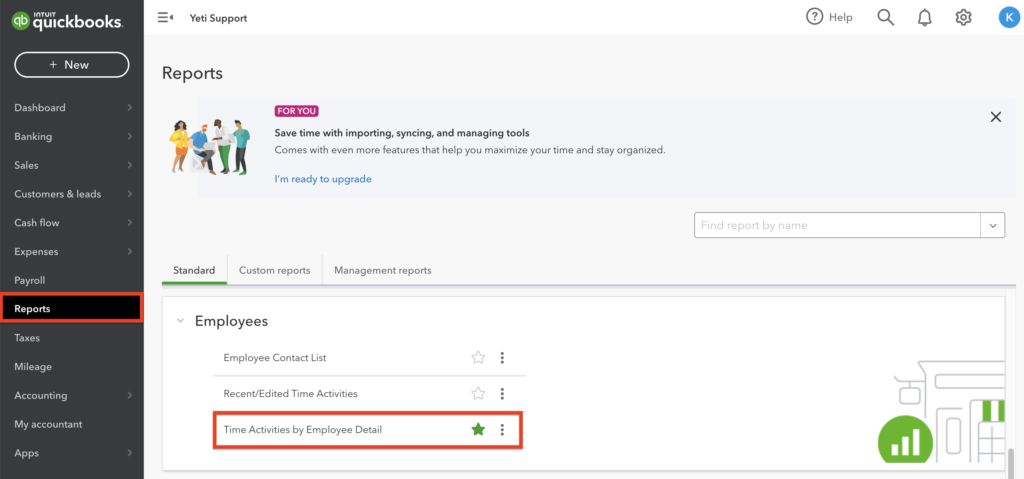
You can check the record in your Quickbooks account.
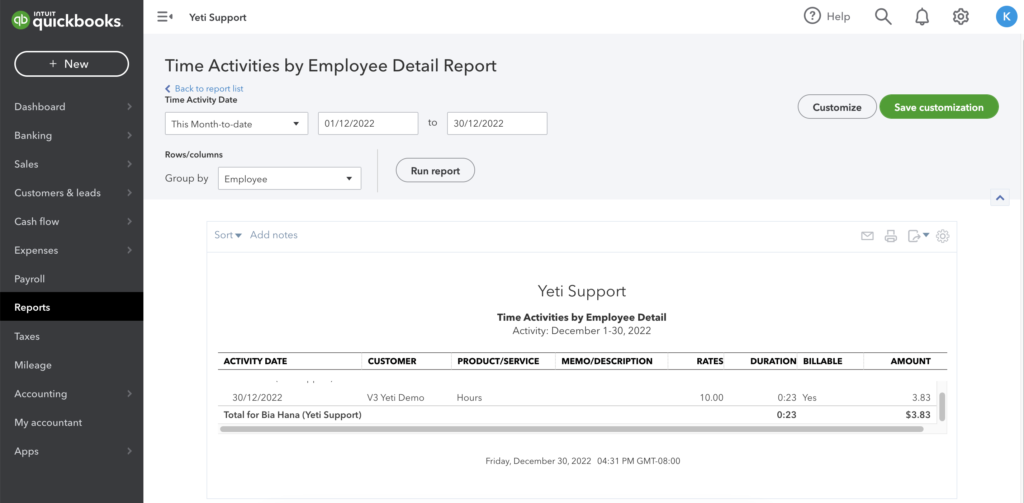
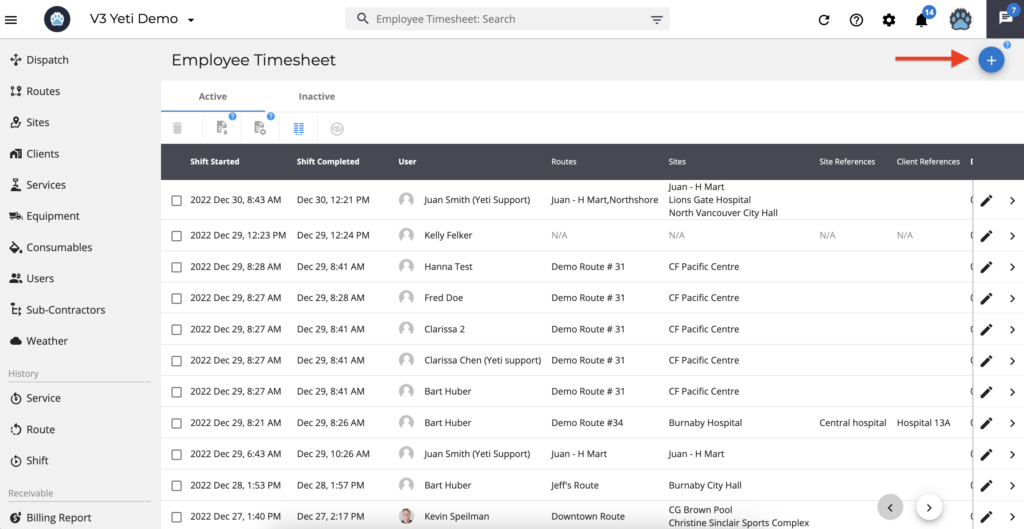
When you register a new record on the Employee Timesheet report, you can also push it to Quickbooks.
Managing your invoice number
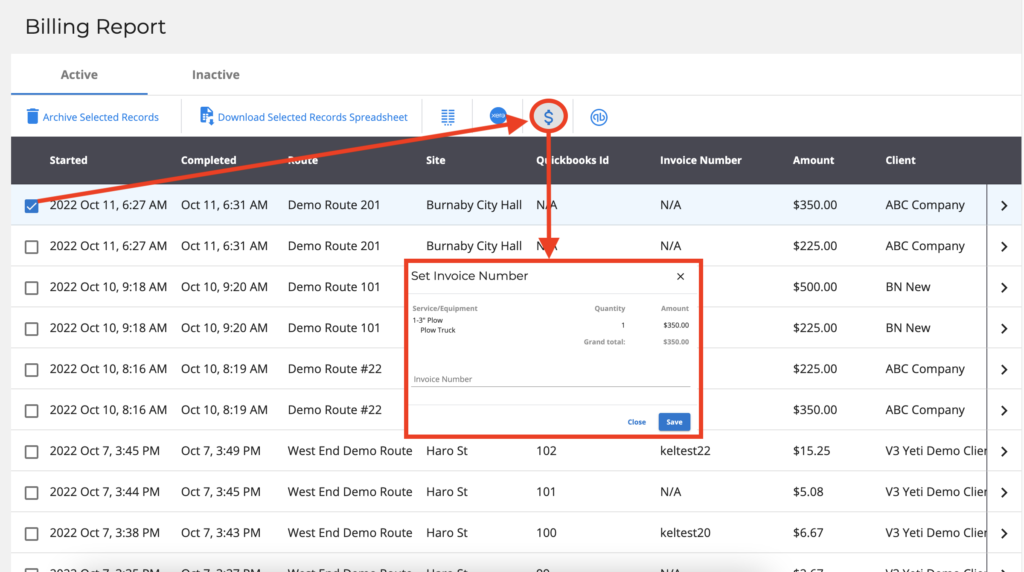
In Yeti, the invoice number is set in the Billing Report.
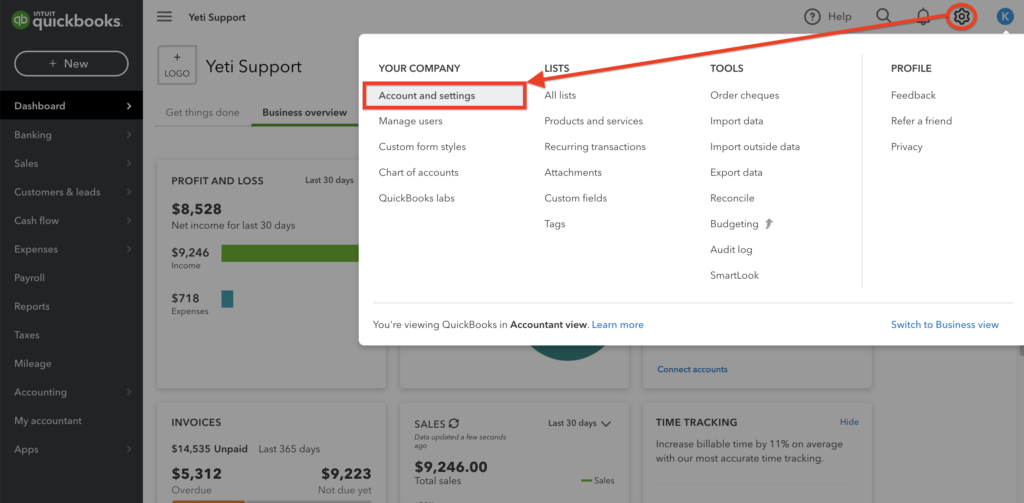
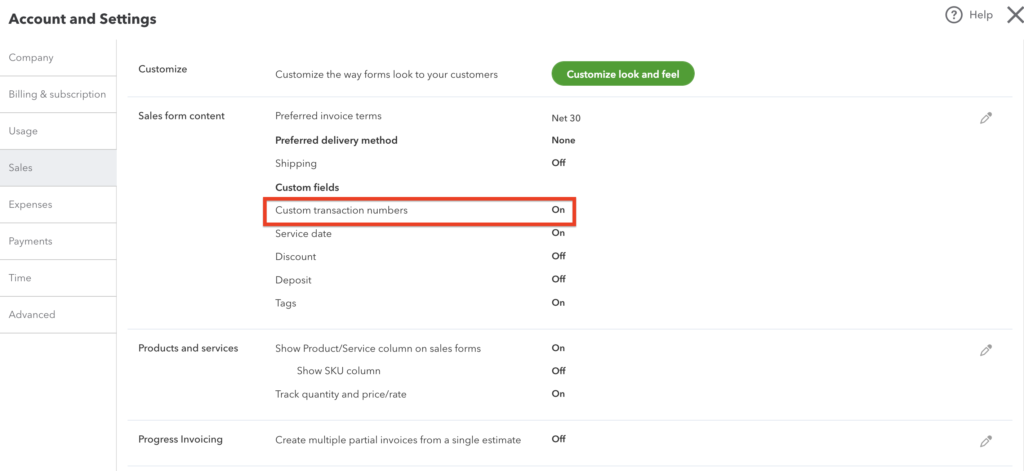
In Quickbooks, you can set it up to generate invoice numbers automatically by clicking on gear > account and settings > sales.
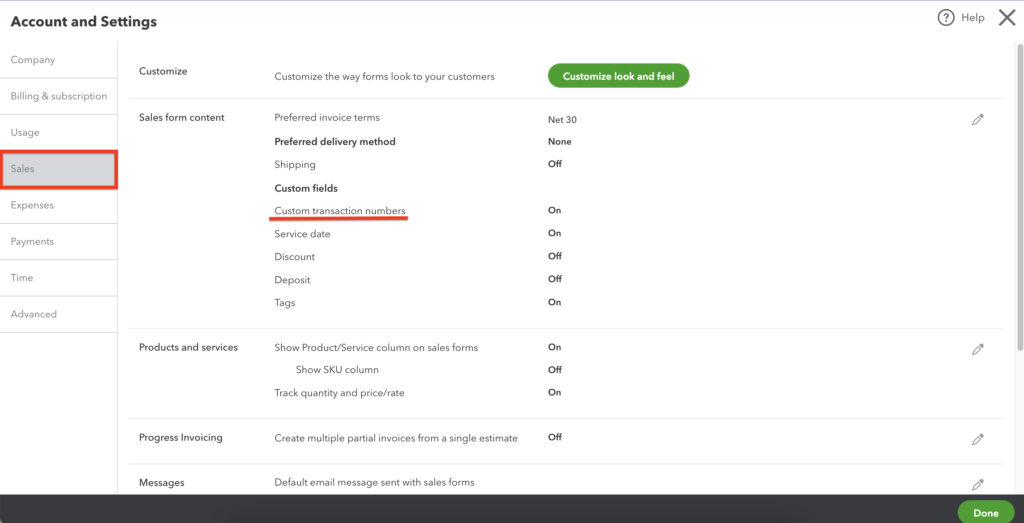
You can turn ‘On’ or ‘Off’ to the option ‘Custom transaction numbers’ and it will auto-generate your invoice number. The following steps will show you what happens when you enable or disable this option.
Enabling ‘Custom transaction numbers’ > ON
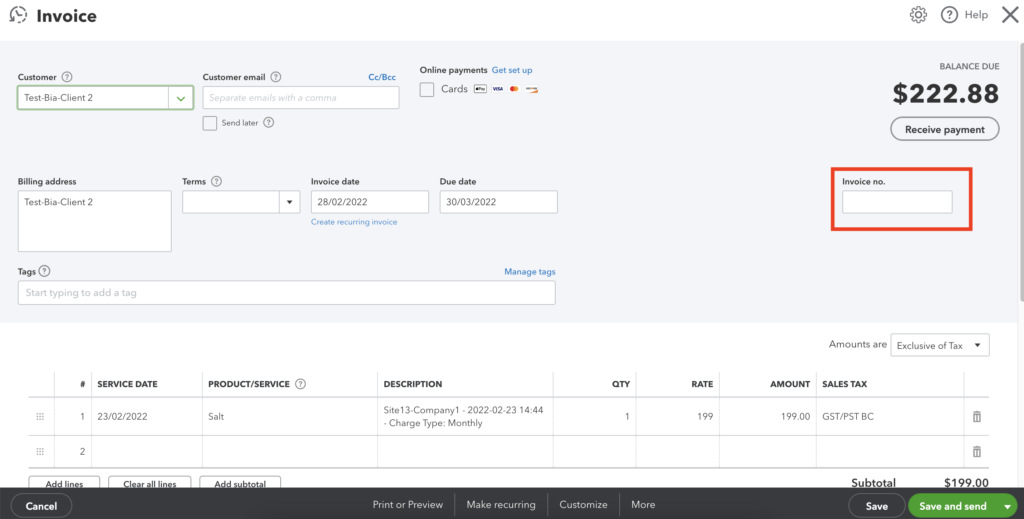
With this option, if your record does not have an invoice number in Yeti, the invoice number field will be blank when you push your records from Yeti to Quickbooks.
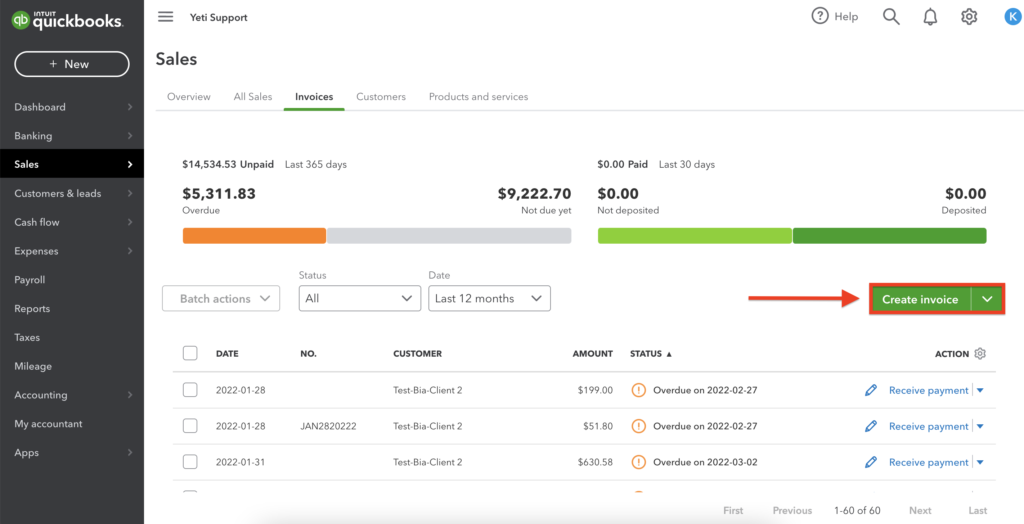
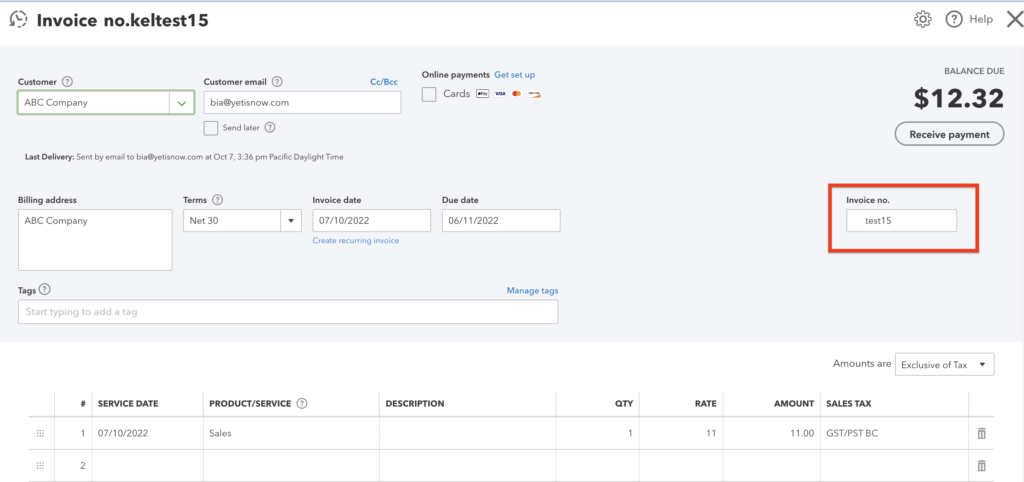
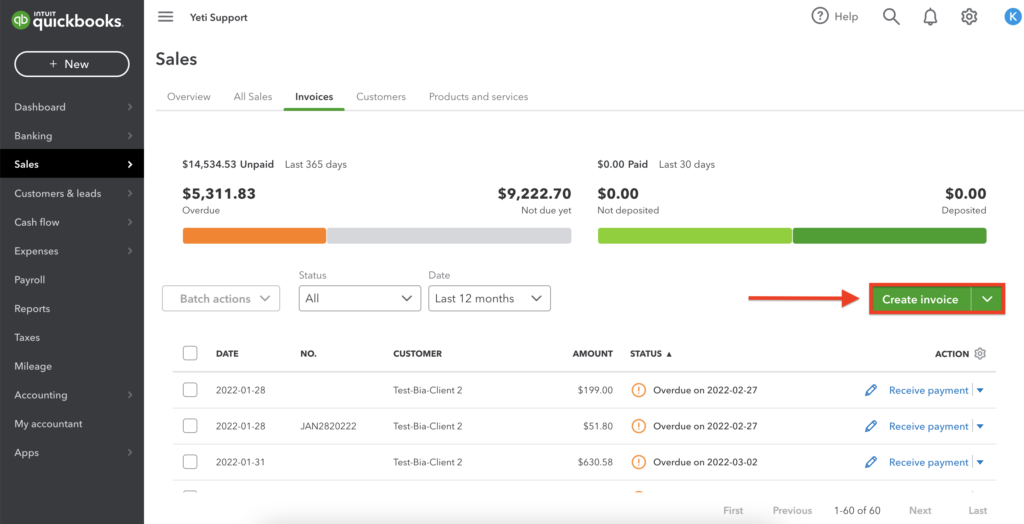
By clicking ‘Create invoice’, Quickbooks will generate the next invoice number.
*** Important information ***
When you register an invoice number following Quickbooks’ sequence and push it to Quickbooks, Quickbooks will recognize the order and generate the following number when you click on ‘Create invoice’. As an example, your next invoice number on Quickbooks is ‘500’ and you set this number in Yeti. This invoice with the number ‘500’ will appear when you push it into your Quickbooks account. Quickbooks recognizes invoice number ‘500’ and generates invoice number ‘501’ once you click ‘Create invoice’.
Disabling ‘Custom transaction numbers’ > OFF
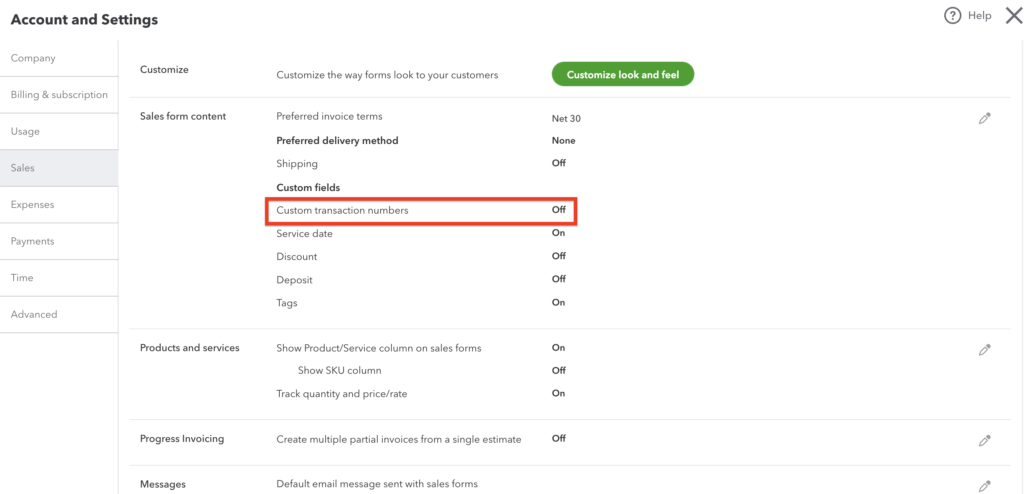
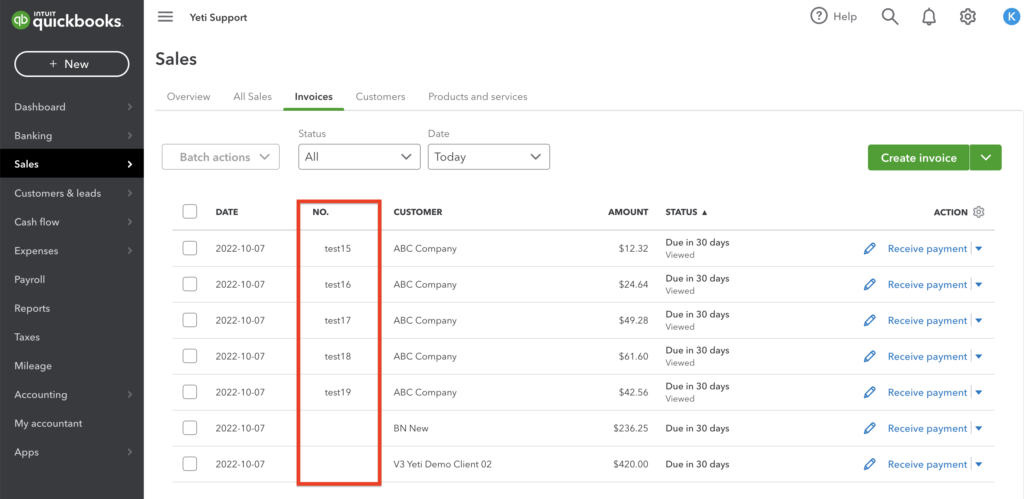
In this case, if you push your records from Yeti to Quickbooks, if there are no invoice numbers in Yeti, Quickbooks will automatically generate them.
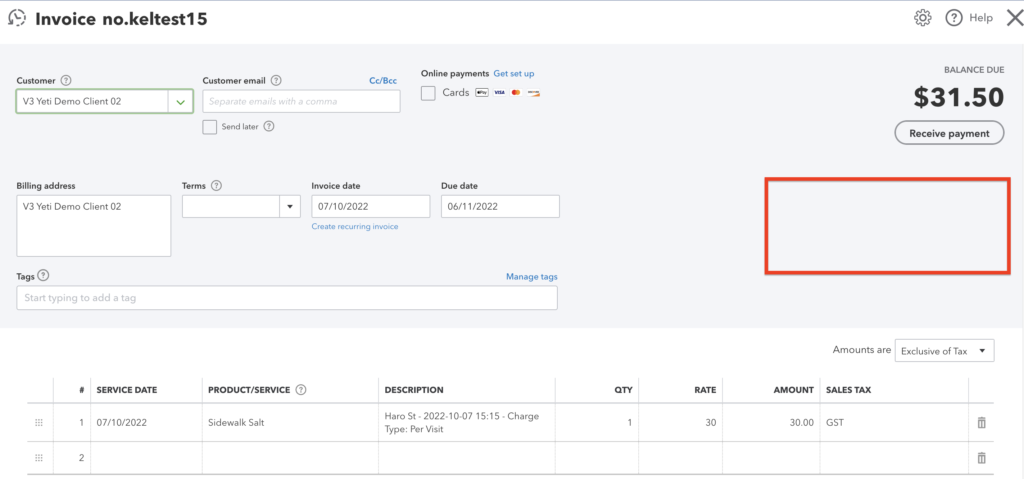
However, you cannot see the invoice number field when you click on the invoice.
*** Important information ***
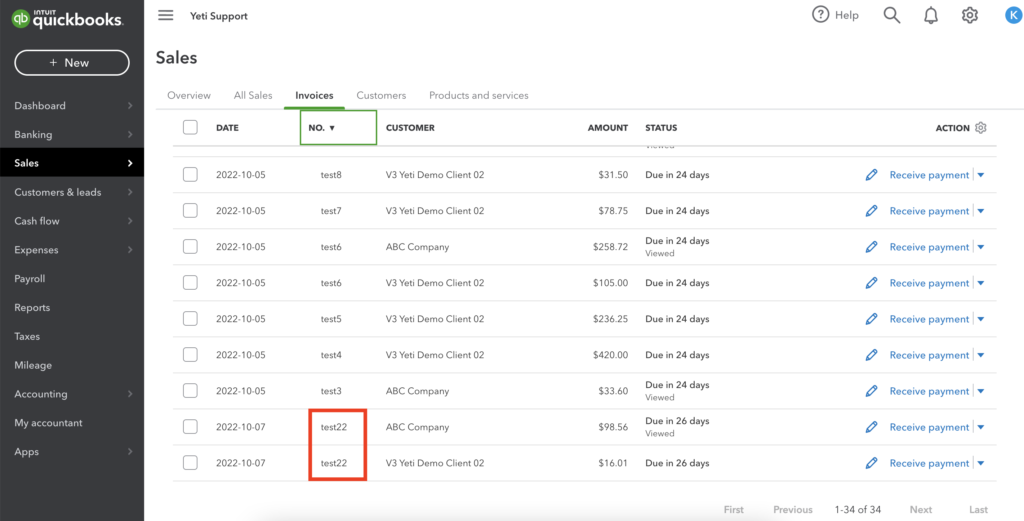
When you register an invoice number following Quickbooks’ sequence and push it to Quickbooks, Quickbooks will not recognize the order and will duplicate the number when you click on ‘Create invoice’. As an example, your next invoice number on Quickbooks is ‘test22’ and you set this number in Yeti. This invoice number ‘test22’ will appear when you push it into your Quickbooks account. As Quickbooks cannot recognize the invoice number ‘test22’, it’ll generate the same invoice number ‘test22’ once you click ‘Create invoice’.
Understanding Quickbooks online currency
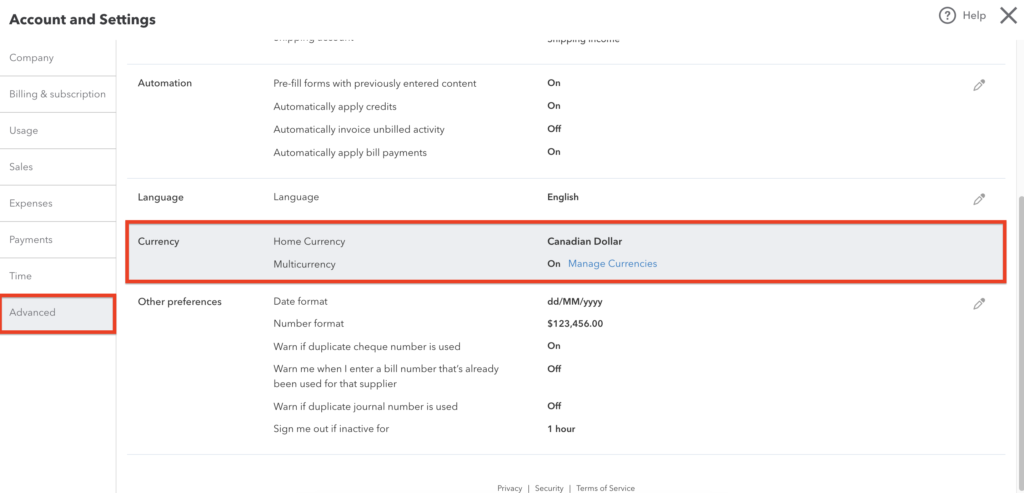
To invoice Clients in different currencies in Quickbooks online (for example: your current Client base requires you to invoice in multiple currencies) you will need to set your Quickbooks account as ‘Multicurrency’.
Changing it will not allow you to revert back to the previous configuration.
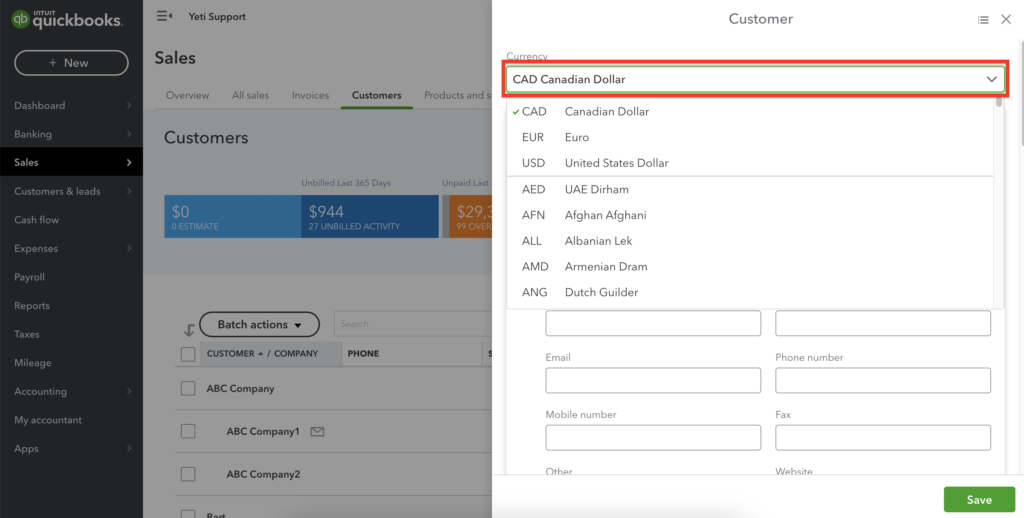
After this, you can set the currency for your Customers in QBO when creating them. Note: You cannot change an existing customer’s currency in your Quickbooks online account if the currency is already set.
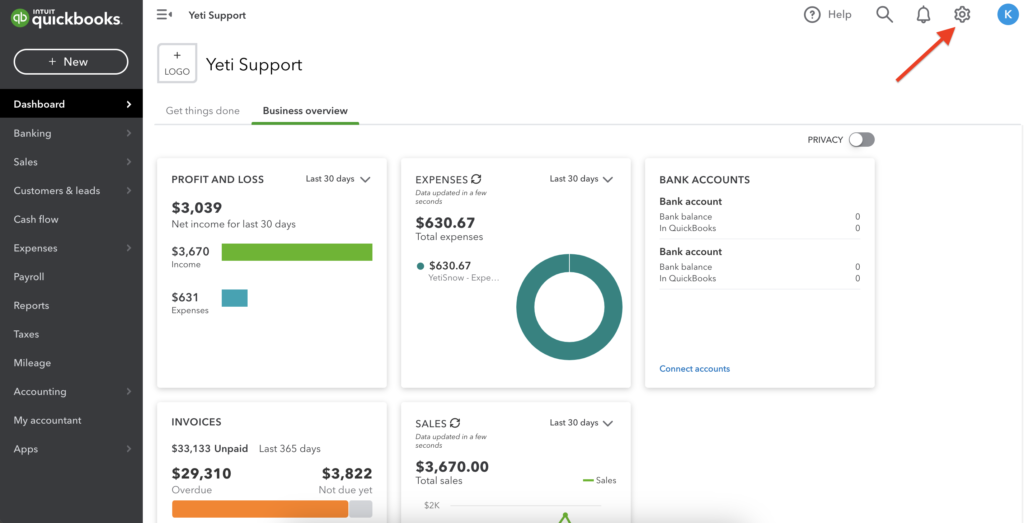
- To set up your company, click on the gear
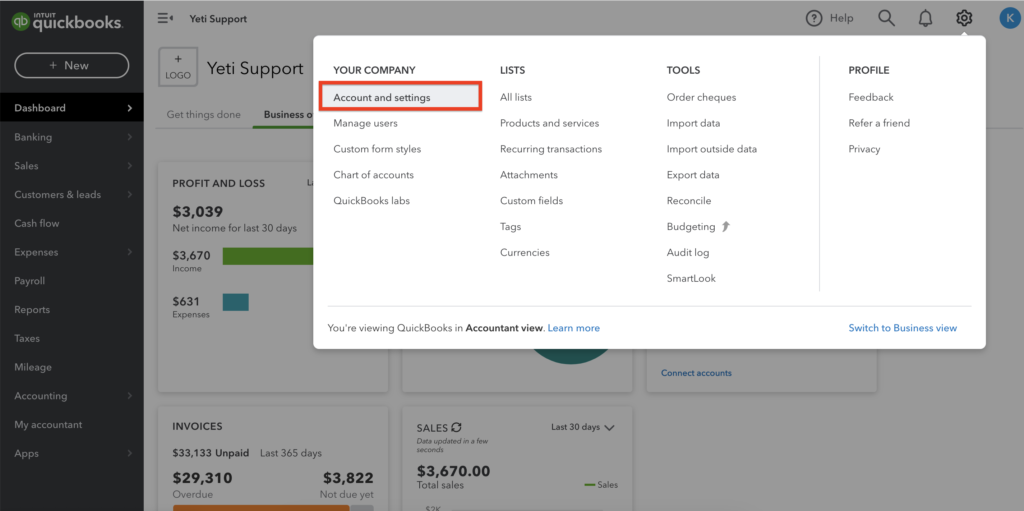
2. Click on ‘Account and settings’
3. Click on ‘Advanced’ and set the ‘Multicurrency’ as ‘On’
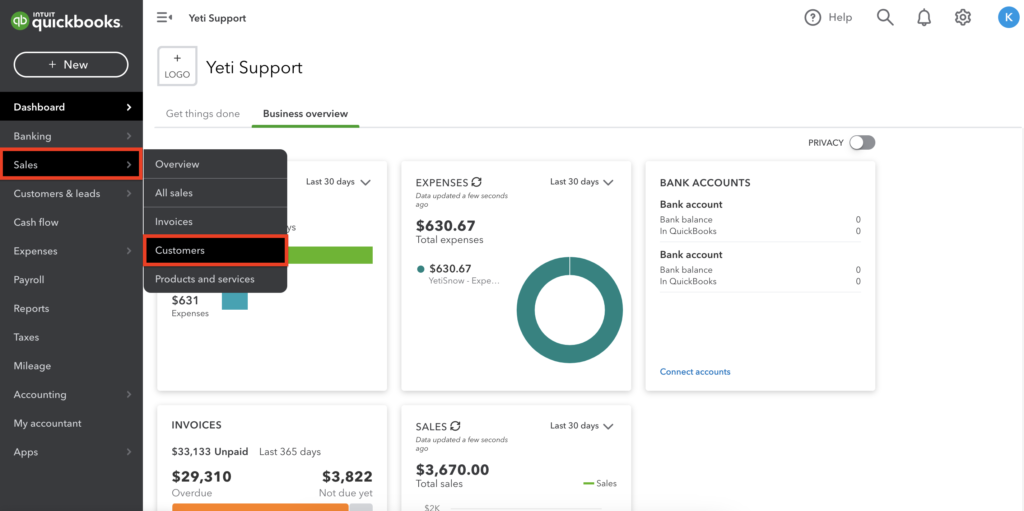
4. To set your new Customer on the correct currency, click on Sales > Customers
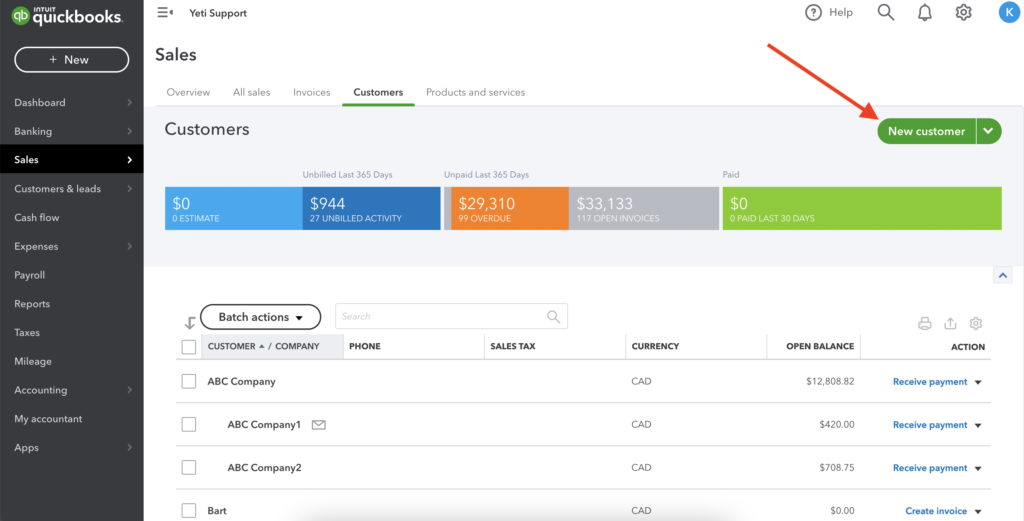
5. Click on ‘New Customer’
6. Select the correct currency for your Customer
Video
The instructions can also be found in the video below.